butter loves company

new york food blogger and lifestyle influencer

  • home
  • Recipes
  • travel
  • lifestyle
  • cookie orders
  • about
  • contact

boston cream pie cake

August 13, 2015 by Butter Loves Company

boston-cream-pie-cake-11I often wonder if people outside of Boston are completely confused by the concept of Boston Cream Pie. I mean, it’s not a pie by any traditional standards. There is no crust or shell or crumble topping. It’s not made in a pie dish. Oh yea, and Boston Cream Pie is a CAKE!

Theory has it that Boston Cream Pie was created at the Parker House Hotel in Boston in 1856. This is the same hotel credited with the birth of the ‘Parker House’ roll; you know those delicious, buttery, addictive fold-over dinner rolls? Some magic was certainly happening in that kitchen in the 1800s…

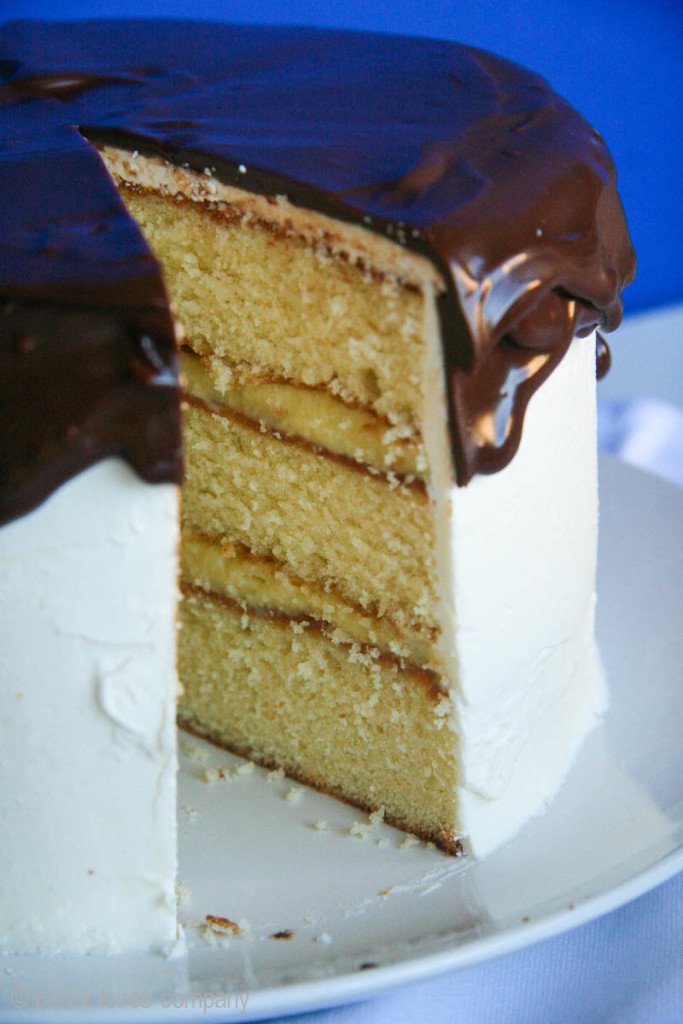
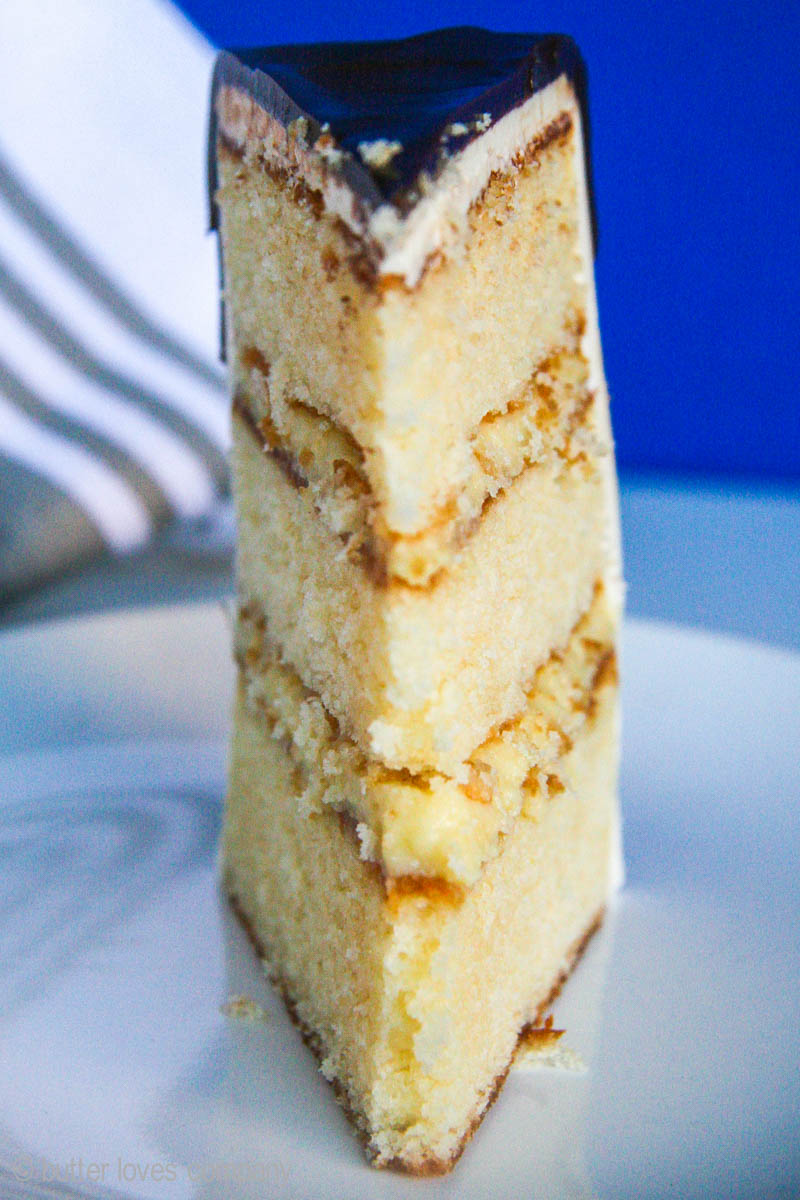
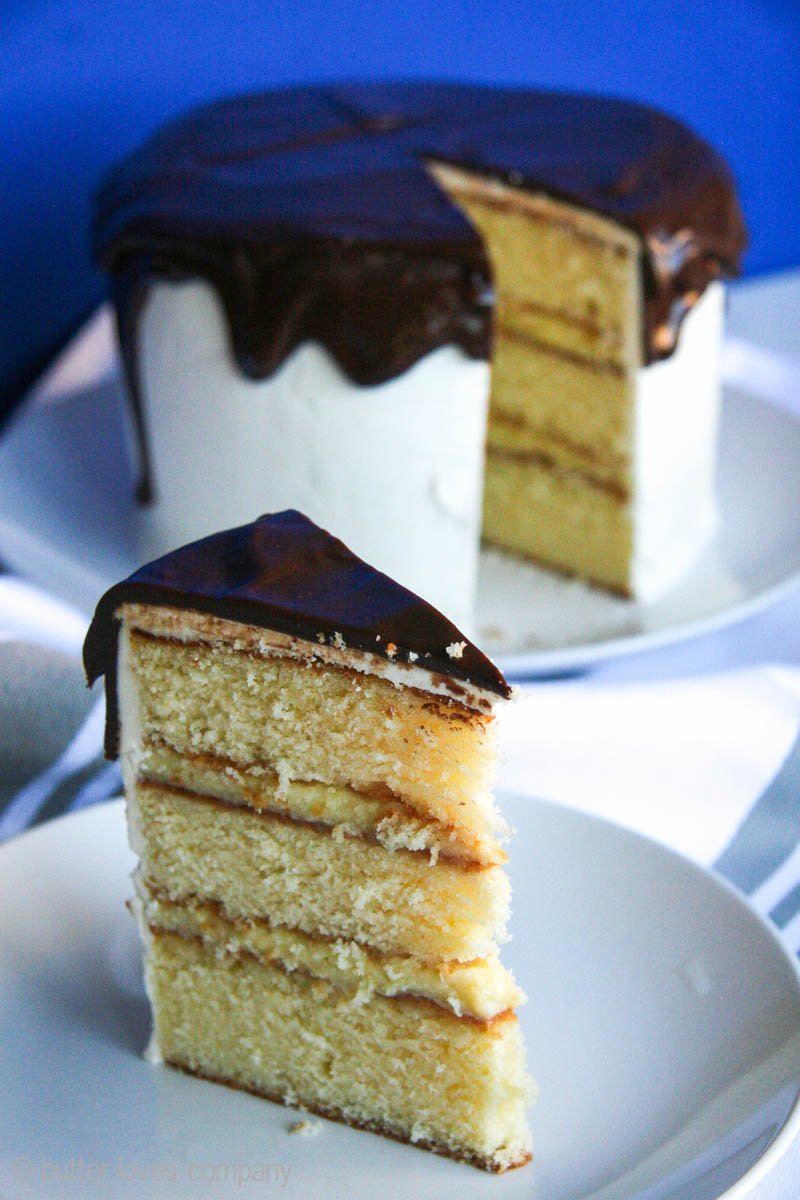
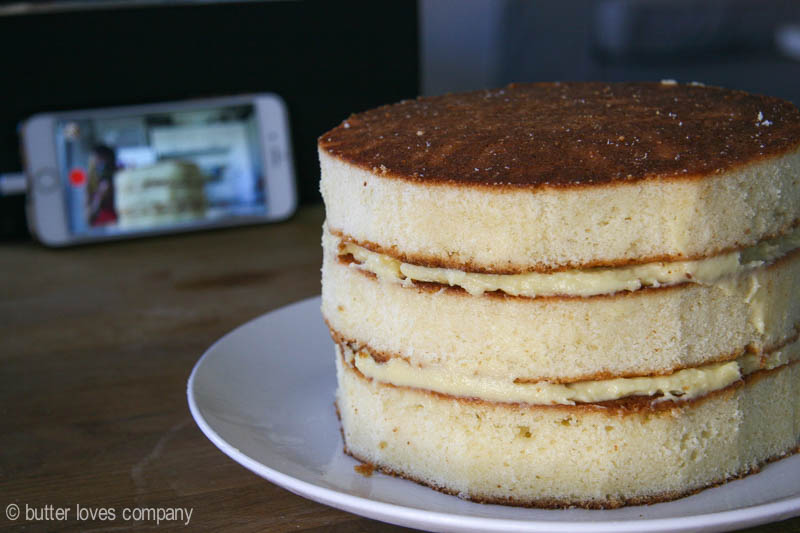
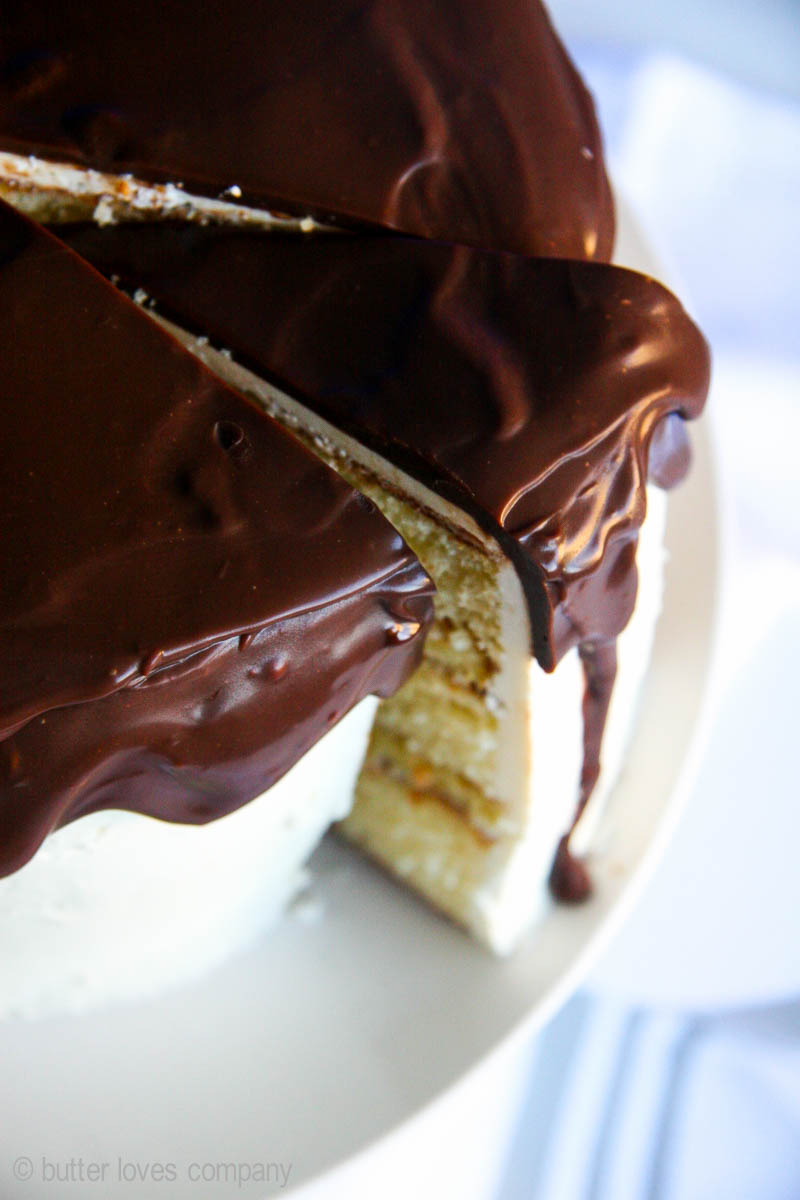
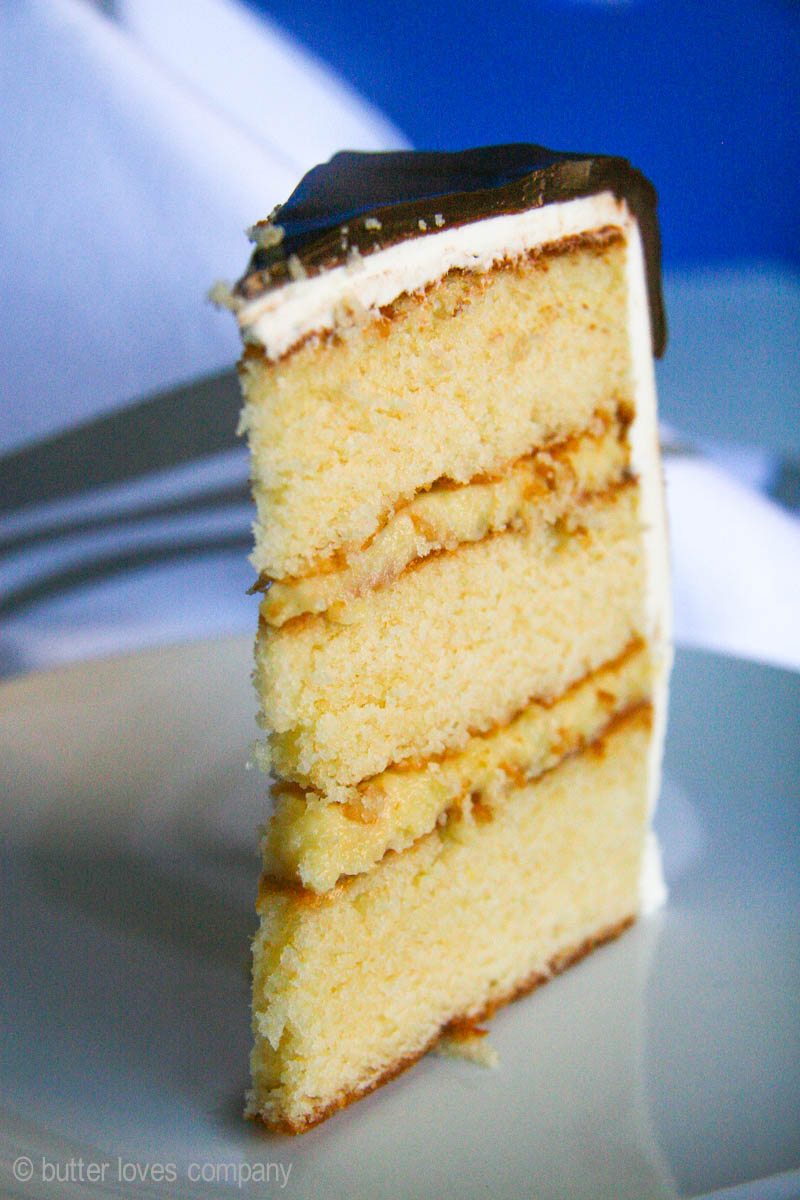
The official dessert of Massachusetts, Boston Cream Pie is typically made up of vanilla cake filled with cream or custard and topped with chocolate. This version is a Boston Cream Pie Cake and consists of three layers of moist and tender vanilla cake layers, a classic pastry cream filling, white chocolate buttercream frosting, and finished with chocolate ganache. Think of it as a somewhat fancied up Boston Cream Pie. If you’d like a more traditional Boston Cream Pie, make only two layers of cake, use all the pastry cream in between those layers, and top with the ganache (skip the white chocolate buttercream).

P.S. In case you missed it, I shared some behind the scenes pics of this cake in process on my snapchat (butterlc), instagram, and Facebook. If you have any interest in seeing some dorky kitchen dancing and baking fails, hop over to the social icons in the right panel and follow along. There is guaranteed to be lots of that to come!!

boston-cream-pie-cake-1

boston-cream-pie-cake-3

BAKING INCEPTION

boston-cream-pie-cake-4

boston-cream-pie-cake-6

boston-cream-pie-cake-7


boston cream pie cake

vanilla cake recipe adapted from just a pinch

total time: 3–4 hours to make cake, frosting, and fillings, and assemble (includes chill time)
makes one 3-layer 9-inch frosted and filled cake (FYI: I made a 3-layer 8-inch cake using pans with high edges and the only adjustment was keeping my eye on the cooking time.)

vanilla cake layers

Ingredients:

1 cup (2 sticks) butter, softened
1/2 cup vegetable shortening
3 cups granulated sugar
5 eggs, room temperature
3 cups all-purpose flour
2 teaspoons baking powder
1/2 teaspoon salt
3/4 cup whole milk, room temperature
1/4 cup Greek yogurt, room temperature
2 1/2 teaspoons vanilla extract

Instructions:

  1. Preheat the oven to 350°F. Grease three 9-inch round cake pans with nonstick baking spray or butter. Line the bottom of each pan with parchment paper and then grease the top of the paper. Set the pans aside.
  2. In the bowl of an electric mixer fitted with the paddle attachment, cream together the butter and shortening on medium speed until light and fluffy, about 3 minutes. With the mixer on low speed, add the sugar—one cup at a time—mixing to incorporate after each addition. Add the eggs one at a time, mixing each egg until it is fully incorporated before adding the next.
  3. In a separate medium bowl, sift together the flour, baking powder, and salt. In a separate small bowl, stir together the whole milk, yogurt and vanilla until it is smooth. Alternate adding the flour mixture and the milk mixture to the butter mixture, beginning and ending with flour mixture. Stop the mixer and, with a spatula, give the bowl a scrape and stir to make sure all the ingredients are well combined.
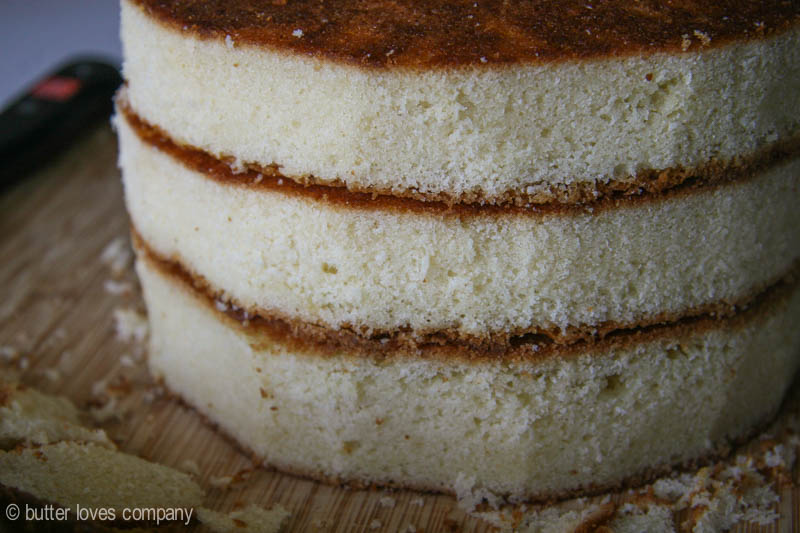
  4. Divide cake batter between prepared cake pans. Pop them in the oven and bake for 25 to 30 minutes, or until a toothpick inserted in the center comes out clean. Remove from the oven and cool the cake in their pans for 5 minutes and then transfer to a wire rack to cool completely. Once they are cool, wrap each layer in plastic and place in the freezer until you are ready to assemble the cake.

Pastry Cream (makes about 2 cups)

Ingredients:

1 1/4 cups (300g) whole milk
1/2 cup (100g) sugar
1/4 cup (30g) cake flour
1/2 teaspoon salt
4 large egg yolks
1 teaspoon vanilla extract

Instructions:

  1. In a medium saucepan, scald the milk over medium-high heat (bubbles start to form around the edge of the pan, but the milk is not boiling). While the milk is heating, in a small bowl, stir together the sugar, flour and salt. (Mixing the flour with the sugar will prevent the flour from clumping when you add it to the egg yolks.) In a medium bowl, whisk the egg yolks until blended and then slowly whisk in the flour mixture (it will be pasty).
  2. Remove the milk from the heat and slowly add it to the egg-flour mixture, a little at a time, whisking constantly (you want to make sure that you only add a little at a time so the hot milk doesn’t cook the eggs in the mixture). When all of the milk has been incorporated, return the contents of the bowl to the saucepan and place over medium heat. Whisk continuously and vigorously for about 3 minutes, or until the mixture thickens and comes to a boil. At first, the mixture will be very frothy and thin; as it cooks longer, it will slowly start to thicken until the frothy bubbles disappear and it becomes more viscous. Once it thickens, stop whisking every few seconds to see if the mixture has come to a boil. If it has not, keep whisking vigorously. As soon as you see it bubbling, immediately go back to whisking for just 10 seconds, and then remove the pan from the heat. Boiling the mixture will thicken it and cook out the flour taste but if you let it boil for longer than 10 seconds, the mixture can become grainy.
  3. Pour the mixture through a fine-mesh sieve into a small heat-proof bowl. Stir in the vanilla, then cover with plastic wrap, placing it directly on the surface of the cream. This will prevent a skin from forming (Kind of like pudding!). Refrigerate for at least 4 hours, or until cold, or up to 3 days.

white chocolate buttercream (makes about 3 cups)

Ingredients:

3/4 cup sugar
4 large egg whites, at room temperature
1 1/2 cups unsalted butter (3 sticks), at room temperature
4 ounces white chocolate, melted and cooled to room temperature

Instructions:

  1. Fill a small saucepan with about 1/2 inch of water and heat it on the stove so the water is simmering. In a large heat-safe mixing bowl (the bowl from your stand mixer works perfectly here), add the sugar and egg whites and set the bowl over the the simmering water. Whisk constantly until the sugar melts and the mixture is thin and warm. Be careful not to let the bottom of the bowl touch the simmering water directly as it could cook the eggs! We just want the residual heat here.
  2. Remove the bowl from the heat and fit it back into your stand mixer (or pour the mixture into the bowl of your stand mixer). Using the whisk attachment, whisk on high speed until stiff peaks form, about 5 minutes. Adjust speed to low and continue beating until the mixture is cool, about 15 minutes.
  3. Keep the mixer on low speed and begin dropping in pieces of the butter, a tablespoon or two at a time. Wait until the butter is incorporated before adding the next piece. It is possible the mixture will look like it is curdling for a little while, but it will come together. Once you have added all the butter, beat in the white chocolate until the frosting is fluffy and smooth. The buttercream will freeze well for up to 6 months. Bring it back to room temperature and re-beat before using.

chocolate ganache (Makes about 2 cups)

Ingredients:

1 1/4 cup semisweet chocolate, roughly chopped (or use semisweet chocolate chips)
1 cup heavy cream
2 tablespoons butter

Instructions:

  1. Place the chopped chocolate in a medium-sized heatproof bowl. Set aside. Heat the cream and butter in a small saucepan over medium heat. You can also heat the cream and butter in the microwave. Bring just to a boil and immediately pour the boiling cream over the chocolate and allow to stand, without stirring, for a few minutes. Stir gently (as you do not want to incorporate air into the ganache) with a spoon or whisk until smooth.

Assemble:

  1. Place one layer of the cake on the center of a cake board or cake platter. With an offset spatula, evenly spread half of the pastry cream on the top of the first layer of cake. Top with another layer of the cake and spread the remaining half of the pastry cream on the top of the second layer. Top with the third and final layer of cake.
  2. Using and offset spatula and/or piping bag, frost the entire cake with the white chocolate buttercream as desired. At this point, I put the entire cake in the fridge for a few minutes to firm up before I topped with ganache. If you have room, it might be helpful, but not necessary.
  3. Pour the slightly cooled ganache in the center of the top of the frosted cake, a little bit at a time. Using an offset spatula, smooth the ganache over the top and push gently to the edges so that is drips over randomly. Let the ganache cool so it firms up and you’re all set!

boston-cream-pie-cake-12

boston-cream-pie-cake-10

Filed Under: desserts and sweets, eat Tagged With: boston cream pie, buttercream, celebration cake, chocolate ganache, vanilla cake

Welcome!

jenna of butterlovescompany

Pull up a chair

Hi! I’m Jenna. Story seeker, food lover, recipe developer based in NYC. Firm believer in making every day delicious! Read more…

looking for something?

  • Email
  • Facebook
  • Instagram
  • Pinterest
  • RSS
  • Twitter

Latest Posts

  • Freezer Meals to Make Before Baby: How We Meal Prepped Before Baby
  • mom’s famous spiced pecans
  • funfetti cookie dough truffles (no-bake)
  • maple coconut cookies
  • snickerdoodle blondies

popular now

strawberry cinnamon rolls
braised short rib pasta sauce (short rib ragu)
rosemary honey buttermilk biscuits
peach blueberry pie
chocolate marble loaf cake
bourbon banana bread

grammin’

Let’s get ready to bake throughout the holidays! Let’s get ready to bake throughout the holidays! I’ve teamed up with @lucky_leaf_fruit_filling, @diamondnuts and #Kids360 to give away some delicious baking ingredients to make your spirits bright this season. 

To enter:
-Follow @lucky_leaf_fruit_filling, @diamondnuts and @butterlovescompany
-Comment and tag a friend and the name of your favorite holiday dessert
-Enter by December 1. Winner will be selected at random and DM’d! 

You’ll win: 
•(1) Can of Lucky Leaf Premium Blueberry Filling
•(1) Can of Lucky Leaf Premium Apple Filling
•(1) Can of Lucky Leaf Premium Cherry Filling
•(1) Can of Lucky Leaf Premium Strawberry Filling
•(1) Can of Lucky Leaf Premium Peach Filling
•(1) Recipe Book
•(2) Dish Towels
•(1) Pot-Holder
•(1) Picnic Basket

#ad NO PURCHASE NECESSARY. Open to legal residents of the United States (including its commonwealths, territories, and possessions) who are legal age of majority. Enter by 11:59 pm ET on December 1, 2021. Odds of winning depend on # of entries received. Void where prohibited. This is not sponsored or endorsed by Instagram or Facebook.
This was the best photo we could get with an alway This was the best photo we could get with an always moving toddler. 🥸 Happy Thanksgiving to you and yours! ♥️
Something that the past year or so has taught me: Something that the past year or so has taught me: stock your pantry! Having a stocked kitchen has made it super easy to cook and bake without having to run out to the store. Crucial when you get a craving for an Apple Walnut Cake and need to make one stat. With @lucky_leaf_fruit_filling and @diamondnuts, you can put together a delicious cake SO easily with no peeling and slicing of apples. 🍎🌰You get all the beautiful warm spice flavor with sweet, tart apples, and crunchy, hearty walnuts. #ad Get the recipe below: 

Apple Walnut Cake

* 1 box (15.25 oz.) spice cake mix
* 1 can (21 oz.) Lucky Leaf® Premium Apple Fruit Filling
* 2 large eggs
* 1 tbsp. pure vanilla extract
* 1/4 cup whole milk
* 1/4 cup brown sugar
* 1 tsp. ground cinnamon
* 1/2 cup finely chopped Diamond of California® Shelled Walnuts
* 1 container (8 oz.) whipped topping, thawed

Instructions
1. Preheat oven to 350° F and grease 9x13-inch pan. 
2. Combine dry cake mix, apple filling, eggs, vanilla & milk in large bowl. Beat for 2 minutes. Spread half of the batter in the pan. 
3. Make the Walnut Cinnamon filling: Combine brown sugar, cinnamon and walnuts. Sprinkle half the mixture on top of batter. Top with remaining batter and then sprinkle remaining walnut mixture on top.
4. Bake cake for 28-33 minutes. Cool cake. Top with whipped topping and sprinkle with walnut pieces.

Don’t miss my upcoming chance to W I N with #kids360, Diamond and Lucky Leaf!
Spiced pecans, wedding cookies, chocolate turtles, Spiced pecans, wedding cookies, chocolate turtles, pecan pie, sticky buns…just a few of the treats on my standard holiday baking agenda. What do they have in common? NUTS! @diamondnuts are a staple around here for the holidays (and all year, let’s be honest) and I want to share the love. Thanks to Diamond and #kids360, we are giving someone ✨15 FREE product coupons for @diamondnuts ✨to help you bake your holiday treats this year. Go nuts!

To enter:
* Follow @diamondnuts and @butterlovescompany
* Comment and tag a friend who deserves a day off to go nuts! 
* Enter by end of day November 25th. Winner will be selected at random and DM’d! 

#ad NO PURCHASE NECESSARY. Open to legal residents of the United States (including its commonwealths, territories, and possessions) who are the legal age of majority. Enter by 11:59 pm ET on November 25, 2021. Odds of winning depend on # of entries received. Void where prohibited. This is not sponsored or endorsed by Instagram or Facebook.
No gimmicks, no “just for the ‘gram” razzle No gimmicks, no “just for the ‘gram” razzle dazzle here. Just really good chocolate chip cookies.🍪
Fun fact: Layered Magic Cookie Bars were one of th Fun fact: Layered Magic Cookie Bars were one of the first things I ever baked. Making them again with @diamondnuts makes me super nostalgic. Brought me directly back to middle school. Watch out or you may find me in butterfly clips doodling I <3 SOS on my binder soon. There is a reason this recipe is awesome: first, the cookie bars are incredibly delicious. And, second, they are SO easy to put together. Honestly, they are the PERFECT treat to make with your kids. Pecans and walnuts give the bars the best crunch, nuttiness, and heartiness. You could totally customize if there is a certain kind of jam you love, or a combination of nuts that the family loves. #ad Get the recipe below: 

Seven Layer Magic Cookie Bars

* 1/2 cup (1 stick) butter, melted
* 2 cups graham cracker crumbs
* 1 cup raspberry jam
* 1 cup shredded coconut
* 1 cup Diamond of California® walnuts
* 1 cup Diamond of California® pecans
* 1 cup semi-sweet or bittersweet chocolate chips
* 1 (14-ounce) can sweetened condensed milk

Instructions
1. Preheat oven to 350°F. To toast walnuts and pecans, spread evenly on a baking sheet or in a shallow pan. Bake, stirring once or twice, until lightly browned and fragrant, 7 to 10 minutes. Line a 9×13-inch pan with parchment paper.
2. In a medium bowl, combine the melted butter and graham cracker crumbs; mix well. Transfer the crumbs to the prepared pan and using your finger tips, or the flat bottom of a small measuring cup, press firmly and evenly on the bottom of the pan. Spread the raspberry jam evenly over the crumbs. Sprinkle coconut in an even layer over the jam, followed by the chocolate chips, walnuts and pecans. Drizzle the condensed milk evenly over the top.
3. Bake until bubbling and golden brown, 30-35 minutes. Let cool completely in the pan. If lined with parchment, lift out and place on a cutting board. With a sharp knife, cut into bars.

Look out for an upcoming chance to ✨ w i n ✨with @diamondnuts and #kids360!
Raise your hand if you could use a cup of coffee. Raise your hand if you could use a cup of coffee. 🙋 We are giving away some @timhortonsus coffee goodies so you can get your cozy cool morning on with Canada’s favorite cup of joe. Make my Pumpkin Coffee Coffee Cake for a buzzy morning snack or just brew a strong cup for a little pep in your step (as tired parents over here, we could surely use it). 🍂

To enter:
● Follow @butterlovescompany and @timhortonsus
● Comment and tag a friend you would love to grab coffee with ☕ (each comment=1 entry)
● Enter by midnight November 18. Winner will be selected at random and DM’d!
 
You’ll win:
•(1) Colombian Ground Coffee
•(1) Dark Roast Ground Coffee
•(1) Decaf Ground Coffee
•(1) Whole Bean Original Blend Coffee
•(1) Keurig Variety 30-Pack
•(1) Mug
•(1) Branded Notebook
•(1) Branded Baseball Cap
 
 
ad #timhortons #kids360 NO PURCHASE NECESSARY. Open to legal residents of the United States (including its commonwealths, territories, and possessions) who are legal age of majority. Enter by 11:59 pm ET on November  18, 2021. Odds of winning depend on # of entries received. Void where prohibited. This is not sponsored or endorsed by Instagram or Facebook.
Can’t beat a classic. 🥧 Apple streusel pie fo Can’t beat a classic. 🥧 Apple streusel pie for yesterday’s friendsgiving.🥰 Grateful for time with friends enjoying great food. Remy had so much fun playing that he slept until 7am so we are hopefully out of the 4am daylight savings nightmare (knock on wood). 

Sunday includes a farmers market bop, movies, and cooking for the week. Wouldn’t change a thing. 🥳
Cannot. Get. Enough. Fall. Baking. Who’s with me Cannot. Get. Enough. Fall. Baking. Who’s with me? 🍁  This coffee cake packs a punch because it is made with @timhortonsus brewed coffee in the batter and the glaze. A true *coffee* cake. The texture is dreamy and the coffee is perfectly balanced and smooth. It is goood. #ad Get the recipe below:
 
Pumpkin Coffee Coffee Cake
 
Topping
● 2/3 cup granulated sugar
● pinch of salt
● 2/3 cup flour
● 1 teaspoon cinnamon
● 4 tablespoons butter, melted

Filling
● 1/3 cup brown sugar, packed
● 1 teaspoon cinnamon
● 1 teaspoon unsweetened cocoa powder, optional

Cake
● 1/3 cup vegetable oil
● 2 large eggs, at room temperature
● 1 cup granulated sugar
● 1 cup pumpkin purée
● 1 teaspoon pumpkin pie spice
● 1 teaspoon salt
● 1 teaspoon baking powder
● 1/2 cup brewed @timhortonsus Coffee
● 2 cups flour

Glaze
● 1 cup powdered sugar
● 2 tablespoons brewed @timhortonsus coffee
 
Instructions
1. Preheat the oven to 350°F and grease an 8 inch square pan and line with parchment.
2. Make topping: Stir together the sugar, salt, flour, cinnamon, and melted butter until combined into pea sized lumps. Stirring just until well combined. Set aside.
3. Make filling: Mix together the brown sugar, spice, and cocoa powder. Set it aside.
4. Make cake: Beat together the oil, eggs, sugar, pumpkin, pie spice, salt, and baking powder until smooth. Add the brewed coffee followed by the flour, alternating in two additions, and stir until combined.
5. Spread half the batter into the prepared pan. Sprinkle the filling evenly on top of the batter. Top with the remaining batter. Sprinkle the topping over the batter in the pan.
6. Bake until a toothpick inserted into the center comes out clean, about 40 to 45 minutes. Let cool.
7. Make glaze: Combine the powdered sugar and brewed coffee until smooth and thick but drizzle-able. Using a fork, drizzle it over the cake.

Don’t miss our upcoming chance to ⚡️W I N⚡️ thanks to @timhortonsus and #Kids360!

#timhortons #kids360fanclub
One of the hardest parts about being a working mom One of the hardest parts about being a working mom is how little time you get to spend with your sweet bean during the week. Between wake up and getting to daycare, to pickup and bedtime it’s often an hour at best (which is also filled with making dinner, bath time, etc). I soak up ALL the minutes and the weekends are an absolute snuggle and play fest. It’s so tough though! If you are in the same boat, know that you aren’t alone and you’re doing a good job!! ♥️

This photo has nothing to do with this but I made the cookies for our neighbors and regretting not keeping one for myself right now. 😬🤣
✨W I N !✨ I’ve teamed up with @nielsenmassey ✨W I N !✨ I’ve teamed up with @nielsenmassey and #Kids360 to give away some seriously amazing ingredients to make your desserts sing. 🎶 I love their products and have been using them for years—the vanilla is 💯!!
 
To enter:
● Follow @nielsenmassey and @butterlovescompany 
● Comment and tag a friend you’d love to bake with
● Enter by Thursday November 11th. Winner will be selected at random and DM’d!
 
You’ll win:
•(1) Madagascar Bourbon Pure Vanilla Powder
•(1) Madagascar Bourbon Pure Vanilla Sugar
•(1) Ugandan Pure Vanilla Extract
•(1) Pure Coffee Extract
•(1) Pure Peppermint Extract
•(1) Rose Water
•(1) Pure Lemon Extract
•(1) Tahitian Two Vanilla Beans
•(1) Tahitian Pure Vanilla Extract
•(1) Mexican Two Vanilla Beans
•(1) Mexican Pure Vanilla Extract
•(1) Madagascar Bourbon Two Vanilla Beans
•(1) Madagascar Bourbon Pure Vanilla Extract
•(1) Madagascar Bourbon Pure Vanilla Bean Paste
•(1) Orange Blossom Water
•(1) Pure Orange Extract
•(1) Pure Almond Extract
•(1) Pure Chocolate Extract
.
#ad NO PURCHASE NECESSARY. Open to legal residents of the United States (including its commonwealths, territories, and possessions) who are legal age of majority. Enter by 11:59 pm ET on November  11, 2021. Odds of winning depend on # of entries received. Void where prohibited. This giveaway is not sponsored or endorsed by Instagram or Facebook.
Brainstorming dessert recipes for Thanksgiving and Brainstorming dessert recipes for Thanksgiving and it’s hard not to think about this Black Forest Pie. 🍒🍫 It was such an indulgent tart-sweet chocolate-y treat. It has a chocolate all butter pie crust, a layer of dark chocolate ganache, a layer of chocolate pudding, a cherry topping, and whipped cream. Oh, and a cherry on top! Recipe is from @emcdowell #thebookonpie! 

This one *might* be too rich for the menu but there WILL be pie (duh)🥧. What kind of pie do you need to have on your Thanksgiving table?
This error message is only visible to WordPress admins
Hi! I'm Jenna, founder of butter loves company. From holidays to Tuesdays, let's find a way to make every meal special.
  • Email
  • Facebook
  • Instagram
  • Pinterest
  • RSS
  • Twitter
a2f54ba1dcf0635e58c8be4aa2035ce84863a9d9606a428ab3

© 2013-2019 BUTTER LOVES COMPANY, LLC.

Copyright © 2025 · Foodie Pro Theme by Shay Bocks · Built on the Genesis Framework · Powered by WordPress