butter loves company

new york food blogger and lifestyle influencer

  • home
  • Recipes
  • travel
  • lifestyle
  • cookie orders
  • about
  • contact

mom’s famous spiced pecans

October 11, 2020 by Butter Loves Company

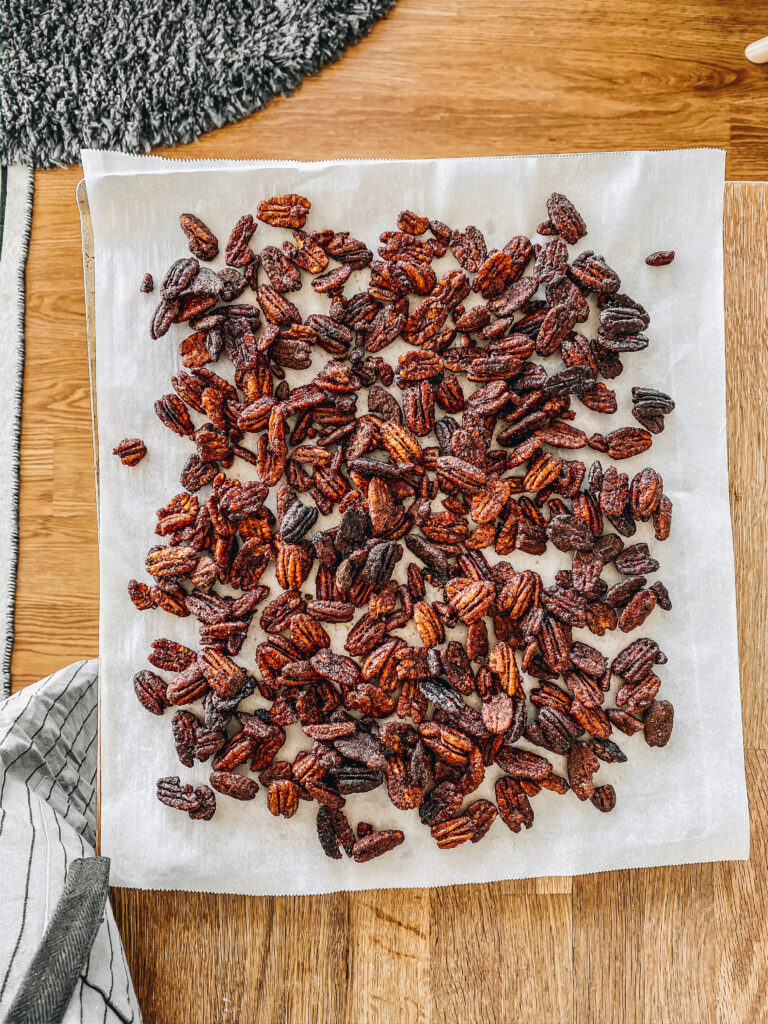
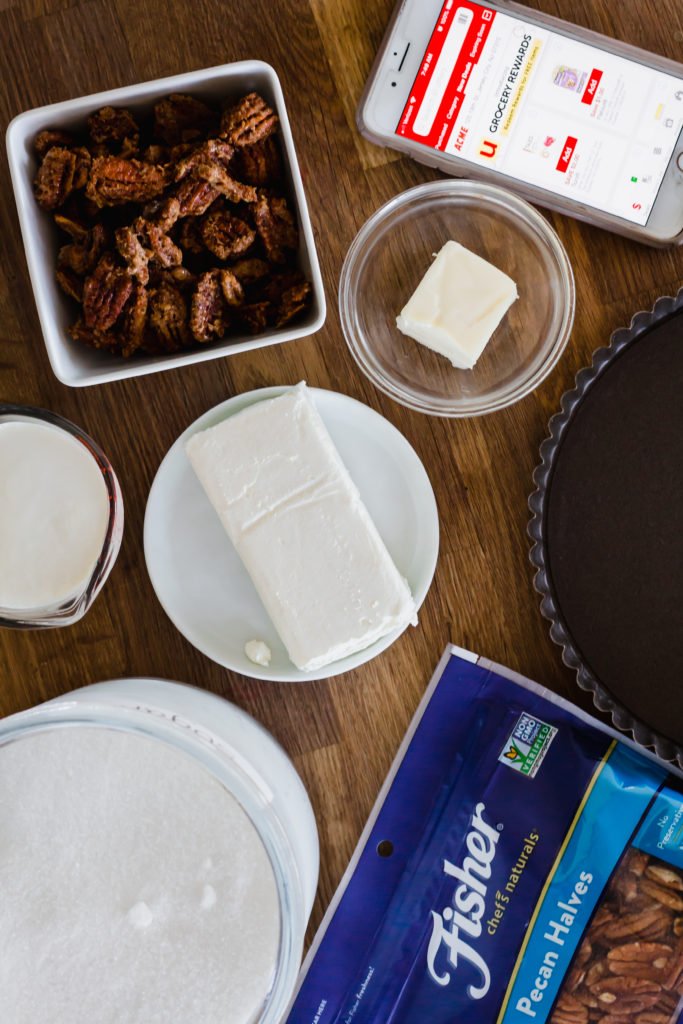
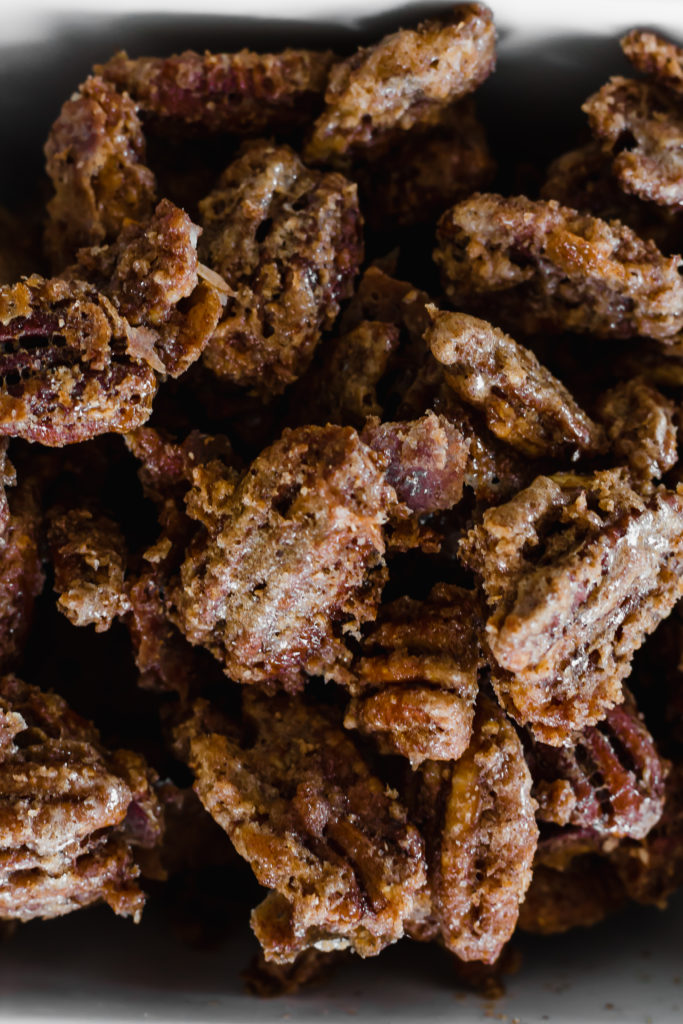
These Spiced Pecans are a perfect combination of sweet, salted, spicy, and crunchy. They are a staple on our tables during the holidays. While our holiday celebrations may look a little different this year, we will 100% have these spiced nuts to snack on while we watch movies and snuggle up.

moms-spiced-pecans-2

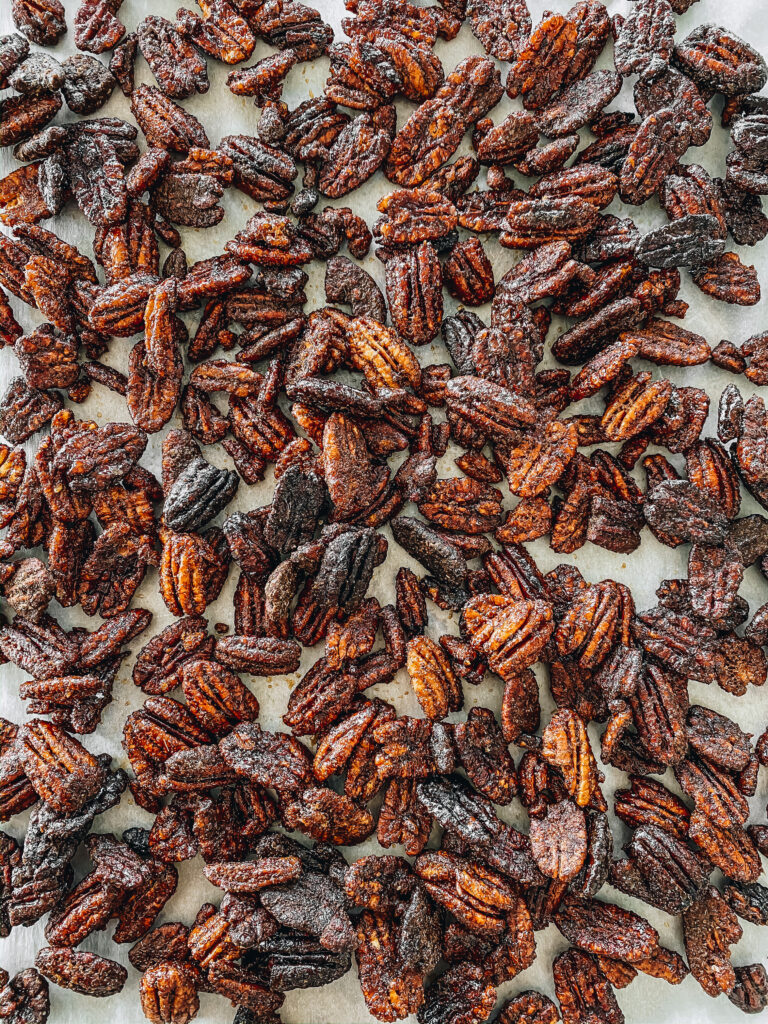
As for spices, cayenne pepper and cumin are doing most of the work here, but the nuts are made sweet with a sugary glaze and are contrasted by a bit of salt. My mom’s original recipe doesn’t call for cinnamon, but I like to add a bit to warm up the flavor a little. The pecans are first boiled and then fried, bringing out the nuttiness and creating a super crunchy texture.

These are extremely hard to stop snacking on once you start and throughout the years have become  a comforting flavor around this house. They are great for a holiday appetizer, an on-the-go snack, or for an edible gift for friends, family, or neighbors.

These spiced nuts are easy to make but I highly encourage you to read through the full recipe twice before starting. It is extremely helpful to prepare your workstation before you start any of the boiling and frying. The first time I made these I was running around looking for bowls and things. Everything worked out fine but it is a much more seamless experience if you are prepped!

Print
mom's famous spiced pecans

Prep Time: 15 minutes

Cook Time: 6 minutes

Total Time: 21 minutes

Category: Snacks

Servings: Makes 4 cups of spiced nuts

moms-spiced-pecans-2

Ingredients

  • 1/2 cup sugar
  • 2 teaspoons cayenne pepper
  • 1 1/2 teaspoon salt
  • 2 teaspoon cumin
  • 1 teaspoon cinnamon
  • 4 cups pecan halves (you could also use walnuts)
  • 2 cups canola or peanut oil (for frying)

Instructions

  1. Prepare your spice mixes: In a large mixing bowl, combine the sugar and cayenne pepper. Set aside. In another small bowl, combine the salt, cumin, and cinnamon. Set aside. Have a second large bowl nearby as well as a baking sheet or two lined with parchment for cooling.
  2. In a pot, bring 6 cups of water to a boil, add the nuts and boil for 1 to 2 minutes then drain in a colander. Pour into your bowl with sugar and cayenne pepper and toss to coat.
  3. In a heavy-bottomed pan heat oil to 350°F (should be about 1 to 2 inches deep). Add half the nuts and fry, stirring occasionally until lightly browned, 3 to 5 minutes (They can go from lightly browned to dark really quickly so keep your eye on them!). Remove from the pan and drain (my mom does this on newspaper, but I like to put some paper towels on the bottom of the cooled pan I boiled the nuts in and then set the colander on top of that and drain them in there). Then toss in a large bowl with half the salt and cumin mixture while nuts are STILL HOT! Toss occasionally to keep from sticking and then spread onto a baking sheet. Fry and season remaining nuts.

Notes

You can easily double or triple this recipe. And they freeze really well too.

6.1.0
https://www.butterlovescompany.com/2020/10/11/moms-famous-spiced-pecans/
butter loves company | jenna larsson

Filed Under: appetizers, eat, sides, soups and salads Tagged With: appetizers, holiday appetizers, spiced nuts

funfetti cookie dough truffles (no-bake)

May 19, 2020 by Butter Loves Company

This post has been sponsored by Eagle Brand Sweetened Condensed Milk. All thoughts and opinions are my own.

I think we can all use a little sprinkle in our life right now! Today we are making No-Bake Funfetti Cookie Dough Truffles. Yes, you read that right! Lots of colorful sprinkles, sweet edible funfetti cookie dough, and a smooth white chocolate coating come together in this easy treat. 

These are perfect for anyone out there who likes to sneak a little cookie dough bite when they are baking cookies. I especially like sneaking funfetti cookie dough because of how sweet and vanilla-y it is and because I love the little sprinkle crunches. 

Since we aren’t baking these, we are making edible cookie dough for the truffle centers. We do this by omitting the raw ingredients you’d find in regular cookie dough, namely egg, and using Eagle Brand Sweetened Condensed Milk to act as a sweetener and binder. Since regular all-purpose flour found in cookie dough is also raw, to be extra cautious, we are using almond flour which is just ground almonds and can be eaten without heating. You can also easily use all purpose flour if you just heat treat it first. To heat treat it, I microwave my flour for a minute, stirring every 15 seconds, to heat off any potential bacteria. Do what works best for you!

I grew up eating truffles that my mom made and she always coated them with a chocolate shell, so we are throwing it back to those days and doing the same here. Since these are funfetti on the inside, I stuck with that white chocolate flavor for the coating. You could also use milk or dark chocolate for the coating if you prefer. Use any sprinkles you have on hand to make them your own. 

These truffles come together so quickly you could easily do it as a virtual video project with your loved ones and any kids in the family. I hope you enjoy these treats! If you make them, I would love to see how they turn out, be sure to tag me @butterlovescompany and @eaglebrandmilk so we can see!

Love, and be well.
Jenna

Print
funfetti cookie dough truffles (no bake)

Prep Time: 20 minutes

Cook Time: 2 minutes

Total Time: 22 minutes

Category: Dessert

Servings: Makes 12–14 truffles

funfetti cookie dough truffles (no bake)

Ingredients

  • 2 cups white chocolate chips, divided
  • 2 tablespoons unsalted butter
  • 1/4 cup Eagle Brand Sweetened Condensed Milk
  • 1/4 cup almond flour or heat-treated all purpose flour
  • 1/4 cup sugar
  • 1/4 teaspoon salt
  • 1 teaspoon vanilla extract
  • 1/4 teaspoon almond extract (optional)
  • 1/3 cup sprinkles, plus more for sprinkling
  • 2 tablespoons coconut oil or shortening

Instructions

  1. In a medium microwave safe bowl, melt 1 cup white chocolate chips with the 2 tablespoons butter by microwaving at 30 second intervals, stirring after each. Mine takes 60 seconds total to melt.
  2. With a spatula, add the sweetened condensed milk and flour to the white chocolate mixture, followed by the sugar, salt, extract(s), and sprinkles. Chill bowl with dough for 5–10 minutes while you prepare the coating.
  3. Make the coating: In a small wide microwave safe bowl, melt the remaining 1 cup of white chocolate chips and the 2 tablespoons of coconut oil or shortening by microwaving at 30 second intervals, stirring after each. Mine takes 60 seconds total to melt. The glaze should be runny and smooth. If it is not, add a little more of the oil or shortening.
  4. Cover a baking sheet with parchment paper. Using your chilled dough, scoop out heaping teaspoons of dough and roll into little balls to form the truffle. Using a fork, dip a truffle into the glaze to coat and scoop up, letting the extra glaze drip off before transferring to the prepared parchment. Sprinkle with extra sprinkles while the glaze is still wet. Repeat with the rest of the truffles and then allow the coating to solidify before eating. Store the truffles in an airtight container at room temperature for a couple of days or in the refrigerator for up to a week.
6.1.0
https://www.butterlovescompany.com/2020/05/19/funfetti-cookie-dough-truffles-no-bake/
butter loves company | jenna larsson

Filed Under: desserts and sweets Tagged With: cookie dough, funfetti, no bake, white chocolate

maple coconut cookies

May 4, 2020 by Butter Loves Company

This post has been sponsored by Eagle Brand Sweetened Condensed Milk. All thoughts and opinions are my own.

The stay-at-home orders continue and so do the baking adventures—this time we’re having Maple Coconut Cookies! We’re so excited to now have our good news public—after months of secret-keeping we are thrilled to be able to share we’re having a baby boy! While it is a strange time to be pregnant and things have not been as I would have imagined (or any of us could have, for that matter), we are so grateful to be growing our family and to have another sweet mouth to feed in the coming months.

One of the things I am most excited to do when our little babe arrives is to bake together. I know it’ll be some time before his little hands can stir but it makes me smile so hard thinking about it! This Maple Coconut Cookie recipe is perfect for getting kids involved. They are easy to mix together—just 5 steps, no stand mixer required, no dough chilling—and they taste super comforting. They come out really thick and stay moist and chewy inside thanks to Eagle Brand Sweetened Condensed Milk, maple syrup, and sweetened shredded coconut (which also gives them some texture). I also drizzled them with a maple glaze because it really ups the maple flavor. If you happen to have maple or coconut extracts you could also add in a teeny bit to enhance the flavor even further.

You can customize the extra mix-ins to whatever you have on hand right now. We added pecans and white chocolate because I love the combination of pecan and maple, and the white chocolate sounded delicious for extra pops of sweetness. You could omit both or substitute in chocolate chips, sprinkles, dried cranberries, other nuts, whatever your heart desires!

These cookies remind me of a combination of breakfast cookies and maple candy. Something about the maple flavor makes me think of a plate of pancakes and the sweet glaze transports you to a Vermont ski lodge gift shop (For me, at least, that is where I used to buy maple candy! Ha!).

Love, and be well.
Jenna

Print
maple coconut cookies

Prep Time: 15 minutes

Cook Time: 12 minutes

Total Time: 27 minutes

Category: Dessert

Servings: Makes 18-20 cookies

maple coconut cookies

Ingredients

  • 2 1/2 cups all-purpose flour
  • 1 teaspoon baking soda
  • 1/2 teaspoon salt
  • 1/2 cup (1 stick) unsalted butter, melted and cooled slightly
  • 1/2 cup light brown sugar
  • 1/2 cup granulated sugar
  • 1 large egg, plus 1 egg yolk, at room temperature
  • 1/3 cup pure maple syrup, plus 2 tablespoons more for glaze
  • 1/3 cup Eagle Brand Sweetened Condensed Milk
  • 1 teaspoon pure vanilla extract
  • 1 cup sweetened shredded coconut
  • 1/2 cup chopped pecans (optional)
  • 1/2 cup white chocolate chips (optional)
  • 1 cup confectioners’ sugar, for glaze

Instructions

  1. Preheat the oven to 350°F and line two cookie sheets with parchment paper. In a medium bowl, whisk together the flour, baking soda, and salt. Set aside.
  2. In a large bowl or the bowl of an electric mixer, stir together the butter, both sugars, eggs, maple syrup, sweetened condensed milk, and vanilla extract until combined.
  3. Add the flour mixture to the butter mixture along with the shredded coconut, pecans, and white chocolate chips (if using) and stir until the flour is incorporated. Scoop the dough into balls onto the prepared cookie sheets, leaving 3 inches between each scoop.
  4. Bake the cookies until the edges are golden brown, about 12–14 minutes.
  5. Glaze the cookies: Prepare the maple glaze by mixing the confectioners’ sugar and a tablespoon or two of maple syrup in a small bowl. Add just enough maple syrup so the confectioners’ sugar absorbs and the glaze drips slowly but smoothly off the tips of a fork. Drizzle over the slightly cooled cookies and allow the glaze to set before eating.
6.1.0
https://www.butterlovescompany.com/2020/05/04/maple-coconut-cookies/
butter loves company | jenna larsson


Filed Under: desserts and sweets Tagged With: coconut, cookies, maple

snickerdoodle blondies

April 2, 2020 by Butter Loves Company

This snickerdoodle blondies post has been sponsored by Eagle Brand Sweetened Condensed Milk. All thoughts and opinions are my own.

I think we can all agree the past month has been some combination of unusual, unexpected, anxiety-inducing, scary…the impact of COVID-19 has brought on many different feelings depending on our personal situations. While we adjust to social distancing and staying at home for a bit to help flatten the curve, and allow our amazing health care professionals to do their best jobs at keeping people safe and healthy, many are turning to baking to help cope with the anxieties, entertain the kids, and feed our families. 

This Snickerdoodle Blondie recipe is easy to pull together using various pantry ingredients, including one of my favorites: Eagle Brand Sweetened Condensed Milk. The sweetened condensed milk helps the bars maintain a moist, chewy texture like you find in your favorite snickerdoodle cookies. There are two other components that give these blondies the signature snickerdoodle cookie flavor: cream of tartar and cinnamon. The acid of the cream of tartar gives the cookies a slight tangy taste and the cinnamon is where snickerdoodles get their warmth. We add a little cinnamon in the center of the blondies as well as across the top, so there is no mistake of their snickerdoodle-ness.

The recipe is perfect for getting kids involved, as the process is straight-forward, the measuring and mixing is a breeze, and sprinkling the cinnamon-sugar on the top of the dough is pretty fun if I do say so myself. I hope you enjoy the process of baking these Snickerdoodle Blondies with your families, as I know I will enjoy baking them with you too, virtually!

I love these Snickerdoodle Blondies because the edges have a tiny bit of cakiness and the middles are super fudgy. They are reminiscent of coffee cake flavors but are distinctly more “brownie” in texture. If you are feeling fancy and want to take the baking with kids activity to the next level, you could also frost these blondies and cover them in sprinkles! 

Also, a random bonus: when these are baking they smell exactly like Disneyworld. I’m not sure why, but I know it is true. The kids might like that as well!

Love, and be well.
Jenna

Print
snickerdoodle blondies

Prep Time: 20 minutes

Cook Time: 50 minutes

Total Time: 1 hour, 10 minutes

Category: Dessert

Cuisine: Brownies and Bars

Servings: Makes 16-20 blondies, depending how small you cut them!

snickerdoodle blondies

Ingredients

    Filling/Topping:
  • 3 tablespoons granulated sugar
  • 1 tablespoon light brown sugar
  • 1 1/2 teaspoons ground cinnamon
    Dough:
  • 1 cup unsalted butter melted and cooled
  • 1 1/2 cups granulated sugar
  • 1/2 cup light brown sugar
  • 1/3 cup Eagle Brand Sweetened Condensed Milk
  • 2 large eggs
  • 1 tablespoon vanilla
  • 3 cups flour
  • 1 teaspoon baking powder
  • 1 teaspoon cream of tartar
  • 1/2 teaspoon salt

Instructions

  1. Preheat your oven to 350°F. Grease and flour a 9×9 inch square cake pan or line the pan with parchment paper. Set aside.
  2. In a small bowl, prepare the filling and topping by mixing together the granulated sugar, light brown sugar, and ground cinnamon. Set aside.
  3. In a large bowl or the bowl of an electric mixer fitted with the paddle attachment, combine the butter, granulated sugar, and brown sugar. Add the Eagle Brand Sweetened Condensed Milk, eggs, and vanilla and slow mix until combined, and then increase speed for a minute to beat until smooth.
  4. In a separate medium bowl, whisk together the flour, baking powder, cream of tartar, and salt. With your mixer on low speed, gradually add this flour mixture to the butter mixture until just incorporated. Scrape half of the dough into the prepared pan and spread with a spatula to create an even layer. Sprinkle half of the cinnamon-sugar mixture across the dough. Scrape the rest of the dough on top of the cinnamon-sugar and spread to cover, making sure to get the dough into the corners. Sprinkle the top with remaining cinnamon-sugar.
  5. Bake until edges are golden and the center no longer wiggles when you gently shake the pan, about 50 to 55 minutes. Allow to cool before slicing.
6.1.0
https://www.butterlovescompany.com/2020/04/02/snickerdoodle-blondies/
butter loves company | jenna larsson

Filed Under: desserts and sweets

eggnog sandwich cookies

December 17, 2019 by Butter Loves Company

This post was sponsored by Eagle Brand®. All thoughts and opinions are my own.

butterlovescompany-eagle-brand-eggnog-cookies-1

Twinkly lights, balsam candles, eggnog, cookies… it’s holiday time, friends! This is also my absolute favorite baking time of year since it is even extra cookie-focused.

One of Greg’s favorite parts of the holidays is eggnog with a little nutmeg on it, so as I was pondering what cookies to make for the cookie boxes I give out, I figured it would be great to incorporate that winter-y classic flavor. 

To achieve the creamy, sweet notes you find in eggnog, I turned to Eagle Brand® Sweetened Condensed Milk. It’s made only with milk and sugar and adds wonderful flavor to both the cookie dough and the filling here. Its smooth texture and thickness gives the cookies just enough moisture without making the dough too wet. 

  • butterlovescompany-eagle-brand-eggnog-cookies-1
  • butterlovescompany-eagle-brand-eggnog-cookies-1

Eggnog also has an eggy richness so we’ll use both a whole egg and an extra yolk. For warming spices, turn to cinnamon, nutmeg, and ginger and don’t be shy with them! 

I decided that these cookies would be best with some filling to really accentuate the creaminess you get with a glass of eggnog. You could of course just make the cookies as-is and they will still taste delicious. I like to scoop them smaller than my typical cookie since they will be sandwiched together. 

These Eggnog Sandwich Cookies will be perfect for your cookie swaps, dessert tables, or secret Santas (Who wouldn’t appreciate an edible gift?). 

Xo,

Jenna

butterlovescompany-eagle-brand-eggnog-cookies-1
  • butterlovescompany-eagle-brand-eggnog-cookies-1
  • butterlovescompany-eagle-brand-eggnog-cookies-1
butterlovescompany-eagle-brand-eggnog-cookies-1
Print
eggnog sandwich cookies

Prep Time: 15 minutes

Cook Time: 15 minutes

Total Time: 30 minutes

Servings: Makes about 18 sandwich cookies

butterlovescompany-eagle-brand-eggnog-cookies-1

Ingredients

    For the cookies:
  • 2 1/2 cups all purpose flour
  • 1 teaspoon baking soda
  • 1 teaspoon ground cinnamon
  • 3/4 teaspoon ground nutmeg
  • 1/2 teaspoon ground ginger
  • 1/2 teaspoon salt
  • 3/4 cups (1 1/2 sticks) unsalted butter, room temperature
  • 1 cup sugar, plus more for rolling if you would like
  • 1 large egg
  • 1 large egg yolk
  • 1 tsp vanilla extract
  • 1/3 cup Eagle Brand® Sweetened Condensed Milk
    For the filling:
  • 3/4 cup unsalted butter at room temperature
  • 3 tablespoons Eagle Brand® Sweetened Condensed Milk
  • 1 teaspoon vanilla extract
  • 1/2 teaspoon cinnamon
  • 1/4 teaspoon ginger
  • 1/8 teaspoon nutmeg
  • 3 tablespoons eggnog (or whole milk)
  • 3 cups confectioners sugar

Instructions

  1. Preheat the oven to 350°F. Line two cookie trays with parchment and set aside.
  2. In a medium bowl, whisk together the flour, baking soda, cinnamon, nutmeg, ginger, and salt. Set aside.
  3. In the bowl of a stand mixer fitted with the paddle attachment, beat the butter on medium speed until it is smooth. Add the sugar and cream until light and fluffy. Add the egg, egg yolk, vanilla extract, and Eagle Brand® Sweetened Condensed Milk, and beat on medium-high until fully incorporated.
  4. With the mixer on low, gradually pour the flour mixture into the butter mixture and beat until incorporated. With a spoon or small cookie scoop, scoop the dough into 1-teaspoon-sized balls, roll in granulated sugar (optional), and place on the prepared baking sheets about 3 inches apart. Bake until edges are golden, about 12–14 minutes. Remove from the oven and let cool on the trays for a couple minutes before transferring to a rack to cool completely.
  5. Meanwhile, prepare the filling. In a medium bowl using a hand mixer (or in your stand mixer with the whisk attachment), beat together the butter, condensed milk, vanilla, cinnamon, ginger, nutmeg, and eggnog until combined. Begin adding sugar, slowly, and continue adding and whisking until all the sugar has been added and the buttercream reaches smooth peaks.
  6. When the cookies are no longer warm, pipe or spread some of your filling onto the insides of half of the cookies. Top with another cookie to create a sandwich and enjoy!
6.1.0
https://www.butterlovescompany.com/2019/12/17/eggnog-sandwich-cookies/
butter loves company | jenna larsson
  • butterlovescompany-eagle-brand-eggnog-cookies-1
  • butterlovescompany-eagle-brand-eggnog-cookies-1
  • butterlovescompany-eagle-brand-eggnog-cookies-1

For another wonderful recipe using Eagle Brand® Sweetened Condensed Milk, see my Pumpking Thanksgiving Trifle.

Filed Under: desserts and sweets Tagged With: cookies, holiday cookies, sandwich cookies

braised short rib pasta sauce (short rib ragu)

October 3, 2019 by Butter Loves Company

This braised short rib pasta sauce is made with hearty fresh veggies and rich red wine. The ribs are slow-cooked until they fall off the bone. The cooking liquid is strained to create a deeply decadent and silky sauce. Toss it with some pasta (homemade, if you have it) and hunker down on the couch.

short rib pasta sauce

By popular demand, I’m sharing one of my favorite meals I’ve made in a while: braised short rib pasta sauce. Save this for heartwarming, soul-satisfying weekend cooking throughout the Fall and Winter months. Meaty and rich short ribs cook down in a flavor-packed combination of veggies and red wine. The veggies and wine (along with some parsley) will be the base of the sauce, and we’ll strain it so there is no need to be meticulous with chopping.

short ribs

After hours in the oven, the short rib meat is fall-off-the-bone fork tender and the braising liquid has reduced to concentrate the flavors even further. We’ll remove the meat from the pot and then strain the liquid into a separate pot where you’ll finish the dish. The strained liquid is your silky, meaty, tomato-y sauce. Into that goes all of our short rib meat, deboned and shredded. 

  • vegetables for short rib pasta sauce
  • short rib pasta sauce cooking

Finally, toss all of that goodness with some al dente pasta and you have a short rib ragu that will feel like a hug. Do not skip grated Parmesan to finish it off! So luxurious. I can’t wait to make this short rib pasta for the rest of the winter.

short rib pasta sauce shredded

Braising Short Ribs for Pasta

You can find short ribs at the grocery store more often during the Winter months. They may have boneless or bone-in. Bone-in is preferred for this as it helps generate a thicker sauce and keeps the meat together-ish while it is cooking in the oven. It is important to brown the short ribs first as it helps to seal in the fat.

If you make this recipe, please let me know by sharing on Instagram and tagging me @butterlovescompany! I would love to see what you think, and drool over it!

Xo,
Jenna

If you’re looking for other good winter meals, might I suggest:

Rigatoni with Sausage and Fennel

Baked Pasta with Broccoli Rabe and Sweet Potato

braised short rib pasta sauce pappardelle
Print
braised short rib pasta sauce (short rib ragu)

Prep Time: 20 minutes

Cook Time: 3 hours

Total Time: 3 hours, 20 minutes

Servings: makes about 6 servings

braised short rib pasta sauce pappardelle

Ingredients

  • 4 pounds bone-in English Style short ribs
  • 4 cloves garlic, minced
  • 1 pound carrots, peeled and diced
  • 1 large yellow onion, chopped
  • 1 6-ounce can tomato paste
  • 1 28-ounce can of peeled whole tomatoes
  • 1 1/2 cups dry red wine (about a half a bottle, eyeball it)
  • 1/3 cup fresh parsley, roughly chopped
  • Parmesan cheese
  • 1 pound pasta of your choice (pappardelle or rigatoni are great choices here)
  • Canola Oil or other neutral oil
  • Salt + Pepper

Instructions

  1. Preheat the oven to 350°F. Bring meat to room temperature and then generously coat with salt and pepper. In a large dutch oven, heat a thin layer of canola oil on medium-high heat. Sear the ribs on each side to brown. It may take about 10 minutes to get them browned on all sides and ends—they will cook fully in the oven so won’t be cooked through at this stage. Remove to a plate, keeping the juices and browned bits in the pan.
  2. Into the Dutch oven with the beef fat, add the garlic, carrots, and onions and cook until softened. While those cook, crush the canned tomatoes with your hand and then add to the mixture along with the tomato paste and parsley. Stir together and cook until the tomato paste starts to caramelize, about 5 minutes.
  3. Add the wine and scrape the bottom of the pan to get any browned bits of flavor off. Nestle the reserved short ribs back into the mixture (with the bone side up), and all the pan sauce back into the pot. Add about a 1/2 cup water or beef stock to help with the braising. Cover and transfer to the preheated over for 2½ to 3 hours or until the meat is incredibly tender and fragrant.
  4. Remove from the oven. Remove the ribs with their meat to a plate. Strain the juices from the Dutch oven into a pot, pressing on the solids to get out any of the concentrated juices from the onions, tomatoes, and carrots.
  5. Shred the ribs with a fork and dump them into the pot of braising liquid. Add salt and pepper to taste.
  6. Meanwhile, bring a large pot of salted water to a boil to make the pasta. Cook your pasta to al dente and then remove from the pot directly into the other pot with the braising liquid and ribs. Toss to coat with the sauce and meat. Enjoy with a generous grating of Parmesan!

Notes

Adapted from Bon Appetit.

6.1.0
https://www.butterlovescompany.com/2019/10/03/braised-short-rib-pasta-sauce-short-rib-ragu/
butter loves company | jenna larsson


Filed Under: mains Tagged With: meat, pasta, sauce, winter

pecan tart with maple cheesecake filling

September 25, 2019 by Butter Loves Company

This post has been sponsored by Fisher. All thoughts and opinions are my own.

pecan-tart-cheesecake

You all may want to sit down. Because this recipe is SO good. I need you all to hunker into your seats, grab a fork, and dig into this Pecan Tart with Maple Cheesecake Filling. Here is the low-down:

  • Nutty, crisp, and buttery crust 
  • Sweet, creamy, and tangy filling
  • Smooth, airy whipped cream
  • Caramelized candied pecans

I love baking with nuts any time of year but from fall through the new year, pecans—like Fisher® Chef’s Naturals® Recipe Pecans—take center stage. Fisher is the #1 selling recipe nut brand and super convenient for bakers. You can find them at ACME in the baking aisle (or check out ACME’s mobile app). 

Save today at your local ACME! There is a Stock Up Sale going on at your local ACME, running 10/2-10/15. 

You can also shop Fisher Nuts – Stock Up Sale and save at any of the Albertsons Companies Family of Stores, including Albertsons, Safeway, ACME Markets, Jewel-Osco, Vons, Randalls, Tom Thumb, Shaw’s, Star Market, and Carrs/Safeway.

Whether in a pecan pie, pecan sticky buns, spiced nuts, or now, this pecan tart, pecans are seriously a star of the season. This recipe uses Fisher pecans as the base of the tart crust and for the sweet and crunchy candied pecan topping. They’re so versatile and really balance the cool creaminess of the autumn-inspired maple cheesecake swoops. 

pecan tart ingredients
ground pecans

Fisher has been a family-run business since 1922, founded by father and son immigrants, and now, the 4th generation of the family continues to run the company. They have American Heart Association (AHA) certified walnuts, pecans, and almonds, which are gluten free, vegan, non-GMO verified, and preservative-free. This Pecan Tart with Maple Cheesecake Filling can also be made gluten free very easily (it is basically gluten free as-is but just double check your ingredient labels if you want to confirm your version is GF).

  • candied pecans

The tart is surprisingly easy to make, as the tart crust comes together in a food processor, the cheesecake is no-bake and can just be spread into the cooled tart shell, and the candied pecans can easily be made ahead. It is actually best when you make the crust and filling ahead so it has ample time to set in the refrigerator. You can make your own whipped cream or use a prepared option.

This would be perfect for fall gatherings like game day, Friendsgiving or Thanksgiving, or for a nice Sunday dinner. 

Check out a Free 3 Months of Online Cooking Classes via Smart Kitchens with Purchase of 2 Fisher Nuts (in a single transaction).

Xo,

Jenna

pecan-tart-maple-cheesecake-filling
  • maple cheesecake with pecan crust
Print
pecan tart with maple cheesecake filling

Prep Time: 6 hours

Cook Time: 1 hour

Total Time: 7 hours

Servings: Makes one-fluted 9-inch tart

maple cheesecake with pecan crust

Ingredients

    For the candied pecans (topping):
  • 1/4 cup granulated sugar
  • 1/4 cup light brown sugar
  • 1 teaspoon ground cinnamon
  • 1/2 teaspoon salt
  • 8 ounces (about 2 cups) unsalted Fisher® Chef’s Naturals® Recipe Pecans halves
  • 1 egg white
  • 1/2 teaspoon vanilla extract
  • 1 teaspoon water
    For the crust:
  • 2 1/2 cups Fisher® Chef’s Naturals® Recipe Pecans
  • 1/2 teaspoon ground cinnamon
  • 1/4 cup granulated sugar
  • 1/4 cup light brown sugar
  • 4 tablespoons unsalted butter, melted
    For the filling:
  • 2/3 cup heavy cream or heavy whipping cream
  • two 8-ounce blocks (452 grams) full-fat cream cheese, room temperature
  • 1/4 cup granulated sugar
  • 1/3 cup pure maple syrup
  • 2 tablespoons cup sour cream, room temperature
  • 1 teaspoon pure vanilla extract
  • 1 teaspoon pure maple extract (optional, for added maple oomph)

Instructions

  1. Prepare the candied pecans: Preheat oven to 300ºF, line a rimmed baking sheet with parchment paper, and set aside. In a medium bowl, add both sugars, cinnamon, and salt. Whisk until combined. In a large bowl, whisk the egg white, vanilla, and water together until frothy. Add the pecans and gently toss until the pecans are well coated. Add the sugar and cinnamon mixture, and toss until pecans are covered. Spread the pecans out in a single layer on prepared baking sheet. Bake for about 40–45 minutes, stirring every 15 minutes. The sugar mixture will harden on the pecans.
  2. Prepare the crust: In the bowl of a food processor, grind the pecans until they are very fine. Transfer to a medium bowl, and stir in the cinnamon, granulated sugar, light brown sugar, and butter until the mixture is well moistened and sticks together when pinched. Press the pecan mixture into the bottom and sides of a 9-inch fluted tart pan. Transfer to the refrigerator to chill for about 30 to 45 minutes (or freezer for about 15).
  3. Center a rack in the middle of the oven and preheat to 350° F. Bake pecan crust for 15-20 minutes or until lightly browned and very fragrant. Remove from the oven and allow to cool completely. Place in the freezer while you prepare the filling.
  4. Prepare the filling: In the bowl of a stand mixer with the whisk attachment (or using a hand mixer), whip the cold heavy cream on medium-high speed until stiff peaks form—about 4-5 minutes. Set aside (if using your stand mixer, scrape the whipped cream into a small bowl so you can use the mixer again for the rest of the filling. No need to clean it between).
  5. In the bowl of a stand mixer with the whisk attachment (or using a hand mixer), beat the cream cheese, granulated sugar, and maple syrup together on medium speed until smooth and creamy, scraping the sides and bottom of the bowl periodically to combine. Add the sour cream, vanilla extract, and maple extract (if using), and beat on medium-high speed until super smooth and combined (no lumps should remain). Using a rubber spatula, fold your whipped cream into the cheesecake filling until combined. Do not overmix as the whipped cream will start to deflate.
  6. Assemble: Remove crust from the freezer and spread filling into crust. Use an offset spatula to smooth down the top. Cover with plastic wrap or foil, and refrigerate for at least 6-8 hours or overnight until it sets. Gently remove the tart from the pan onto a serving platter. Top with whipped cream and candied pecans. Serve!

Notes

To make this gluten free, just cross check the ingredient labels you choose to ensure there are no hidden ingredients.

You can store leftover cheesecake covered in the refrigerator for 4-5 days.

Filling recipe adapted from Sally’s Baking Addiction.

6.1.0
https://www.butterlovescompany.com/2019/09/25/pecan-tart-with-maple-cheesecake-filling/
butter loves company | jenna larsson
pecan tart

Save today at your local ACME! 

Filed Under: desserts and sweets Tagged With: cheesecake, maple, pecans

tropical pineapple coconut scones

September 18, 2019 by Butter Loves Company

This post has been sponsored by DOLE®. All thoughts and opinions are my own.

pineapple-coconut-scones

Scones are one of my favorite quick breakfast baked goods. Their tender centers and crispy, buttery edges are a perfectly satisfying combination. These Tropical Pineapple Coconut Scones are made a little healthier, and a little more delicious, by using wheat flour and DOLE® Fridge Pack Pineapple Chunks.

The combination of pineapple and coconut in the scones will transport you to the tropics, even if you are rushing out the door for work. You’ll love how simple they are to make; you don’t even need a stand or hand mixer—just a big bowl and your own hands. If you gather the ingredients together, you can be eating the scones in less than 30 minutes. Hello, tropical scone paradise!

pineapple-chunks

Using the Pineapple Chunks is a great way to incorporate fruit servings into your breakfast. We’ll use about half of one DOLE Fridge Pack (each has 3.5 servings of fruit), and then you can just pop the cover back on for easy fridge storage. (Snack on them later or try adding them to another recipe!) They are naturally gluten-free, rich in Vitamin C, non-GMO, and the packaging is BPA-Free. 

pineapple-scones

Because the Pineapple Chunks are in 100% pineapple juice, you can actually make a quick pineapple glaze for the scones using the juice and a little confectioners sugar. This is optional for these scones but adds even more tropical flair.

The new DOLE Fridge packs are available in 4 varieties, and you can find them near the Canned Fruit at your local grocery store: 

  • Peach Slices in Fruit Juice
  • Pineapple Chunks in 100% Pineapple Juice
  • Mandarin Oranges in Fruit Juice
  • Mixed Fruit in Fruit Juice
pineapple-coconut-scone-recipe
glazed-pineapple-scones

I found myself daydreaming about laying on a beach chair on a faraway island when I was eating these. It is a welcome way to start the day if you ask me. I can’t wait to see how yours turn out! 

Xo,
Jenna

pineapple-scone-recipe
Print
tropical pineapple coconut scones

Prep Time: 10 minutes

Cook Time: 20 minutes

Total Time: 30 minutes

Servings: Makes 8 scones

pineapple-coconut-scones-feature

Ingredients

  • 3 cups whole wheat flour (or 1 1/2 cup whole wheat, 1 1/2 cup all purpose)
  • 1 cup shredded coconut
  • 1/3 cup sugar, plus a tablespoon for sprinkling before baking
  • 2 1/2 teaspoons baking powder
  • 1/2 teaspoon baking soda
  • 1/2 teaspoon salt
  • 3/4 cup (1 1/2 sticks) unsalted butter, cut into 1/2 inch pieces
  • 1 cup DOLE® Fridge Pack Pineapple Chunks, roughly chopped
  • 1 cup cold buttermilk
  • 1 tablespoon milk, for brushing
  • Glaze (optional):
  • 2 tablespoons juice from Dole® Fridge Pack Pineapple Chunks
  • 1 cup confectioners’ sugar

Instructions

  1. Preheat oven to 400°F and line a baking sheet with parchment paper; set aside.
  2. In a large bowl, whisk together the flour, coconut, sugar, baking powder, baking soda, and salt. Add the chilled diced butter and mix with your fingertips to a coarse meal. Stir in the pineapple to distribute. Slowly pour in the buttermilk, a little at a time, and mix just until it just combines and the mixture starts to come together as a dough (you may not need all the buttermilk). Transfer dough to a floured board, gently knead a couple of times, and then pat into a 7-inch circle. Cut into 8 wedges and place slightly separated on a greased baking sheet. Brush the tops with milk, sprinkle with a little extra sugar, and bake for 18–20 minutes or until lightly browned.
  3. If glazing, combine the pineapple juice and the confectioners’ sugar in a small bowl until it is thick enough to drizzle across the scones. Drizzle generously and serve.
6.1.0
https://www.butterlovescompany.com/2019/09/18/pineapple-scones/
butter loves company | jenna larsson

For more recipe ideas, check out Dolesunshine.com!

dole-pineapple-scones

Filed Under: breakfast and breads Tagged With: coconut, scones

chocolate chip and funfetti cookie cake

September 15, 2019 by Butter Loves Company

Does the thought of a cookie cake make you think of the mall you visited growing up or the work birthdays and events you attend these days? For me it’s both and that’s part of why I love them so much. The other thing I love about them is that they’re so easy to make and enjoy in the comfort of your own home too! Today’s chocolate chip and funfetti cookie cake is a combination of two favorite cookies.

This cookie cake recipe includes instructions to make half the dough chocolate chip and half the dough funfetti. You can swirl the two together by scooping each randomly into the pie dish. OR, you can make it half and half like you would your Friday night pizza order (a half pepperoni and half mushroom and olive in our house). 

funfetti-cookie-cake

Cookie cake is basically a giant cookie that is perfect for slicing and sharing. You get the crisp edges you love in cookies along with super soft and intentionally underbaked centers. To make the cookie cake more, well, cake-y, we add a little cornstarch. It also helps with making the cake soft.

I decided to make this for our first wedding anniversary since Greg REALLY loves cookie cakes. I was going to make funfetti only but he wanted chocolate chip, so here we are with a compromise. This gives you the best of both worlds: melty semi-sweet chocolate, creamy white chocolate, and colorful sprinkles.

cookie-cake-recipe-close-up

This is really easy to put together since you will be using the same base dough for both. Essentially you will just remove half of the dough while it is naked (aka before adding chocolates and sprinkles). You’ll add the chocolate to the remaining dough, and then swap halves and add the white chocolate and sprinkles. 

Bake this chocolate and funfetti cookie cake in a cake pan or a pie dish. I like using a glass pie dish. You can add some buttercream on top for extra flair. I would recommend just a vanilla American buttercream which is made with butter, confectioners’ sugar, a little milk or cream, and vanilla extract. YUM!

Xo,
Jenna

P.s. If you are in the funfetti mood, you can also check out Confetti Broyé or a Funfetti Pie Crust. Both add a little celebration to the table. 🙂

cookie-cake-on-table
Print
chocolate chip and funfetti cookie cake

Prep Time: 15 minutes

Cook Time: 25 minutes

Total Time: 40 minutes

Servings: 1 9-inch cookie pie

funfetti-cookie-cake

Ingredients

  • 1/2 cup (1 stick) unsalted butter, room temperature
  • 1/2 cup granulated sugar
  • 1/4 cup light brown sugar, packed
  • 1 large egg and 1 large egg yolk
  • 2 teaspoons pure vanilla extract
  • 1 1/2 cups all purpose flour
  • 1/4 teaspoon salt
  • 1 teaspoon baking powder
  • 1/2 teaspoon baking soda
  • 1 and 1/2 teaspoons cornstarch
  • 1/2 cup semi-sweet chocolate chips
  • 1/2 cup white chocolate chips
  • 1/2 cup rainbow sprinkles (not nonpareils)
  • Buttercream frosting for decorating (optional)

Instructions

  1. Place a rack in the middle of your oven and preheat to 350°F. Grease or spray a 9-inch pie dish or cake pan with nonstick spray. Set aside.
  2. In a medium bowl, whisk together the flour, salt, baking powder, baking soda, and cornstarch. Set aside.
  3. In a large bowl using a hand mixer or stand mixer fitted with a paddle attachment, cream the butter, granulated sugar, and light brown sugar together on medium speed until light and fluffy, about 3 minutes. Add the egg, egg yolk, and vanilla and mix to combine. With the mixer on low speed, gradually add the flour mixture to the butter mixture, mixing until just combined. Remove half of the dough from the bowl and place it in the empty bowl the flour was just in while you mix the chocolate chip dough.
  4. Add the chocolate chips to the remaining half of dough in the stand mixer. Mix until distributed. With a spoon or cookie scoop, drop dough chunks into the prepared pie pan (randomly all over for swirled cake or keeping to one side of the pan if you want a half and half cookie cake). Don’t press the scoops down yet.
  5. Transfer the reserved dough to the stand mixer bowl. Add the white chocolate chips and sprinkles and mix until distributed. With a spoon or cookie scoop, drop dough chunks into the prepared pie pan (in between holes of chocolate chip dough for swirled, on the other half of the pan if doing half and half). With your hand, gently pat down the dough so there aren’t any holes.
  6. Bake for 25–30 minutes or until very lightly browned on the edges. Be careful not to overbake as the cookie cake is best when the center is underbaked. 🙂 It will puff up in the oven and then sink as it cools. Top with a buttercream frosting, if desired.

Notes

Adapted from Sally’s Baking Addiction

6.1.0
https://www.butterlovescompany.com/2019/09/15/funfetti-cookie-cake/
butter loves company | jenna larsson
funfetti-cookie-cake

Filed Under: desserts and sweets Tagged With: cookies, funfetti, party

butternut squash alfredo

September 4, 2019 by Butter Loves Company

This post has been sponsored by Ronzoni SuperGreens® Pasta. All thoughts and opinions are my own.

butternut-squash-alfredo

You all know how much I love pasta, which is why I’m super pumped about today’s recipe. We’re taking all the luxurious creaminess of a traditional alfredo sauce and giving it a fall-forward veggie twist by using butternut squash in the sauce, plus a green spaghetti!

This Butternut Squash Alfredo uses Ronzoni SuperGreens® Thin Spaghetti from ACME Markets. The pasta is packed with greens as it is made with spinach, zucchini, broccoli, parsley, and kale. So, not only are we making the sauce a little more nutritious by using squash in place of the heavy cream and cheese you often find in alfredo but we’re also getting an excellent dose of veggies within the pasta itself. 

The butternut squash alfredo sauce can be made in advance and kept in the refrigerator for up to a week (or frozen for about a month), making it perfect for weekday meals for the family. I love that the pasta is a good source of fiber, vitamin A, thiamin, folate, iron, and riboflavin. I’m always looking for more ways to get iron into our diets, so finding out I could do that by twirling this pasta was quite the pleasant surprise!

The sauce has a slight sweetness from the squash and warmth from a dash of nutmeg, which is perfect for the autumn season. It’s balanced by the saltiness of some grated Parmesan and the welcome earthiness of the Ronzoni SuperGreens® Thin Spaghetti. I added shrimp for a little protein, but you could also omit or swap with ground turkey or chicken if you prefer. Just be sure to cook your protein fully before combining with the sauce and spaghetti.

The pasta can be found at your local ACME in the pasta aisle (it’s the only major green pasta made with 5 green vegetables on the market today), and be sure to check out the ACME mobile app in case there are any coupons or deals on your other ingredients!

I can’t wait to eat this butternut squash alfredo pasta throughout the fall and winter months. Prime pasta months if you ask me!

Xo,

Jenna

Print
Butternut Squash Alfredo Pasta with Shrimp

Prep Time: 20 minutes

Cook Time: 25 minutes

Total Time: 45 minutes

Servings: 4 Servings (depending on how hungry you are!)

butternut-squash-alfredo

Ingredients

  • 4 cups butternut squash, cut into 1/2 inch cubes
  • 1 1/2 cups yellow onion, chopped (about 1 medium)
  • 3 cloves garlic, minced
  • 2 tablespoons butter
  • 2 tablespoons olive oil, divided
  • 1/4 teaspoon nutmeg
  • 1/2 cup water or chicken stock
  • 1 cup milk
  • 1 pound Ronzoni SuperGreens® Thin Spaghetti
  • 1 pound shrimp, peeled and deveined (optional)
  • Salt and pepper
  • 1/4 cup Parmesan cheese, for serving
    Special Equipment: A blender or handheld immersion blender

Instructions

  1. Set a large skillet over medium heat, add the butter and 1 tablespoon oil, and allow butter to melt. Add the onion and sauté to soften, about 1–2 minutes.
  2. Add the garlic and butternut squash and stir to combine. Add the water or stock and nutmeg as well as a generous pinch of salt and pepper. Stir to combine and then cover to cook until the butternut squash is fork tender, about 15 minutes.
  3. Transfer butternut squash mixture to a blender or large bowl if using an immersion blender. Add the milk and then purée until smooth.
  4. In a small bowl, toss the shrimp with a little salt and pepper. Give your skillet a quick wipe or rinse, and then set it back over medium heat. Add remaining 1 tablespoon oil, followed by the shrimp—cooking until pink, about 2–3 minutes. Remove pan from heat.
  5. Bring a large pot of salted water to a boil. Add pasta and cook until al dente (6–8 minutes).
  6. Drain pasta and add to the skillet with the shrimp. Pour the butternut squash alfredo over the pasta and gently toss together. Serve with a little grated Parmesan cheese.
6.1.0
https://www.butterlovescompany.com/2019/09/04/butternut-squash-alfredo/
butter loves company | jenna larsson

Save now at your local ACME! 

Filed Under: mains Tagged With: pasta, squash

Next Page »

Welcome!

jenna of butterlovescompany

Pull up a chair

Hi! I’m Jenna. Story seeker, food lover, recipe developer based in NYC. Firm believer in making every day delicious! Read more…

looking for something?

  • Email
  • Facebook
  • Instagram
  • Pinterest
  • RSS
  • Twitter

Latest Posts

  • Freezer Meals to Make Before Baby: How We Meal Prepped Before Baby
  • mom’s famous spiced pecans
  • funfetti cookie dough truffles (no-bake)
  • maple coconut cookies
  • snickerdoodle blondies

popular now

strawberry cinnamon rolls
braised short rib pasta sauce (short rib ragu)
peach blueberry pie
bourbon banana bread
crunchy chewy bakery-style sugar cookies
rosemary honey buttermilk biscuits

grammin’

Let’s get ready to bake throughout the holidays! Let’s get ready to bake throughout the holidays! I’ve teamed up with @lucky_leaf_fruit_filling, @diamondnuts and #Kids360 to give away some delicious baking ingredients to make your spirits bright this season. 

To enter:
-Follow @lucky_leaf_fruit_filling, @diamondnuts and @butterlovescompany
-Comment and tag a friend and the name of your favorite holiday dessert
-Enter by December 1. Winner will be selected at random and DM’d! 

You’ll win: 
•(1) Can of Lucky Leaf Premium Blueberry Filling
•(1) Can of Lucky Leaf Premium Apple Filling
•(1) Can of Lucky Leaf Premium Cherry Filling
•(1) Can of Lucky Leaf Premium Strawberry Filling
•(1) Can of Lucky Leaf Premium Peach Filling
•(1) Recipe Book
•(2) Dish Towels
•(1) Pot-Holder
•(1) Picnic Basket

#ad NO PURCHASE NECESSARY. Open to legal residents of the United States (including its commonwealths, territories, and possessions) who are legal age of majority. Enter by 11:59 pm ET on December 1, 2021. Odds of winning depend on # of entries received. Void where prohibited. This is not sponsored or endorsed by Instagram or Facebook.
This was the best photo we could get with an alway This was the best photo we could get with an always moving toddler. 🥸 Happy Thanksgiving to you and yours! ♥️
Something that the past year or so has taught me: Something that the past year or so has taught me: stock your pantry! Having a stocked kitchen has made it super easy to cook and bake without having to run out to the store. Crucial when you get a craving for an Apple Walnut Cake and need to make one stat. With @lucky_leaf_fruit_filling and @diamondnuts, you can put together a delicious cake SO easily with no peeling and slicing of apples. 🍎🌰You get all the beautiful warm spice flavor with sweet, tart apples, and crunchy, hearty walnuts. #ad Get the recipe below: 

Apple Walnut Cake

* 1 box (15.25 oz.) spice cake mix
* 1 can (21 oz.) Lucky Leaf® Premium Apple Fruit Filling
* 2 large eggs
* 1 tbsp. pure vanilla extract
* 1/4 cup whole milk
* 1/4 cup brown sugar
* 1 tsp. ground cinnamon
* 1/2 cup finely chopped Diamond of California® Shelled Walnuts
* 1 container (8 oz.) whipped topping, thawed

Instructions
1. Preheat oven to 350° F and grease 9x13-inch pan. 
2. Combine dry cake mix, apple filling, eggs, vanilla & milk in large bowl. Beat for 2 minutes. Spread half of the batter in the pan. 
3. Make the Walnut Cinnamon filling: Combine brown sugar, cinnamon and walnuts. Sprinkle half the mixture on top of batter. Top with remaining batter and then sprinkle remaining walnut mixture on top.
4. Bake cake for 28-33 minutes. Cool cake. Top with whipped topping and sprinkle with walnut pieces.

Don’t miss my upcoming chance to W I N with #kids360, Diamond and Lucky Leaf!
Spiced pecans, wedding cookies, chocolate turtles, Spiced pecans, wedding cookies, chocolate turtles, pecan pie, sticky buns…just a few of the treats on my standard holiday baking agenda. What do they have in common? NUTS! @diamondnuts are a staple around here for the holidays (and all year, let’s be honest) and I want to share the love. Thanks to Diamond and #kids360, we are giving someone ✨15 FREE product coupons for @diamondnuts ✨to help you bake your holiday treats this year. Go nuts!

To enter:
* Follow @diamondnuts and @butterlovescompany
* Comment and tag a friend who deserves a day off to go nuts! 
* Enter by end of day November 25th. Winner will be selected at random and DM’d! 

#ad NO PURCHASE NECESSARY. Open to legal residents of the United States (including its commonwealths, territories, and possessions) who are the legal age of majority. Enter by 11:59 pm ET on November 25, 2021. Odds of winning depend on # of entries received. Void where prohibited. This is not sponsored or endorsed by Instagram or Facebook.
No gimmicks, no “just for the ‘gram” razzle No gimmicks, no “just for the ‘gram” razzle dazzle here. Just really good chocolate chip cookies.🍪
Fun fact: Layered Magic Cookie Bars were one of th Fun fact: Layered Magic Cookie Bars were one of the first things I ever baked. Making them again with @diamondnuts makes me super nostalgic. Brought me directly back to middle school. Watch out or you may find me in butterfly clips doodling I <3 SOS on my binder soon. There is a reason this recipe is awesome: first, the cookie bars are incredibly delicious. And, second, they are SO easy to put together. Honestly, they are the PERFECT treat to make with your kids. Pecans and walnuts give the bars the best crunch, nuttiness, and heartiness. You could totally customize if there is a certain kind of jam you love, or a combination of nuts that the family loves. #ad Get the recipe below: 

Seven Layer Magic Cookie Bars

* 1/2 cup (1 stick) butter, melted
* 2 cups graham cracker crumbs
* 1 cup raspberry jam
* 1 cup shredded coconut
* 1 cup Diamond of California® walnuts
* 1 cup Diamond of California® pecans
* 1 cup semi-sweet or bittersweet chocolate chips
* 1 (14-ounce) can sweetened condensed milk

Instructions
1. Preheat oven to 350°F. To toast walnuts and pecans, spread evenly on a baking sheet or in a shallow pan. Bake, stirring once or twice, until lightly browned and fragrant, 7 to 10 minutes. Line a 9×13-inch pan with parchment paper.
2. In a medium bowl, combine the melted butter and graham cracker crumbs; mix well. Transfer the crumbs to the prepared pan and using your finger tips, or the flat bottom of a small measuring cup, press firmly and evenly on the bottom of the pan. Spread the raspberry jam evenly over the crumbs. Sprinkle coconut in an even layer over the jam, followed by the chocolate chips, walnuts and pecans. Drizzle the condensed milk evenly over the top.
3. Bake until bubbling and golden brown, 30-35 minutes. Let cool completely in the pan. If lined with parchment, lift out and place on a cutting board. With a sharp knife, cut into bars.

Look out for an upcoming chance to ✨ w i n ✨with @diamondnuts and #kids360!
Raise your hand if you could use a cup of coffee. Raise your hand if you could use a cup of coffee. 🙋 We are giving away some @timhortonsus coffee goodies so you can get your cozy cool morning on with Canada’s favorite cup of joe. Make my Pumpkin Coffee Coffee Cake for a buzzy morning snack or just brew a strong cup for a little pep in your step (as tired parents over here, we could surely use it). 🍂

To enter:
● Follow @butterlovescompany and @timhortonsus
● Comment and tag a friend you would love to grab coffee with ☕ (each comment=1 entry)
● Enter by midnight November 18. Winner will be selected at random and DM’d!
 
You’ll win:
•(1) Colombian Ground Coffee
•(1) Dark Roast Ground Coffee
•(1) Decaf Ground Coffee
•(1) Whole Bean Original Blend Coffee
•(1) Keurig Variety 30-Pack
•(1) Mug
•(1) Branded Notebook
•(1) Branded Baseball Cap
 
 
ad #timhortons #kids360 NO PURCHASE NECESSARY. Open to legal residents of the United States (including its commonwealths, territories, and possessions) who are legal age of majority. Enter by 11:59 pm ET on November  18, 2021. Odds of winning depend on # of entries received. Void where prohibited. This is not sponsored or endorsed by Instagram or Facebook.
Can’t beat a classic. 🥧 Apple streusel pie fo Can’t beat a classic. 🥧 Apple streusel pie for yesterday’s friendsgiving.🥰 Grateful for time with friends enjoying great food. Remy had so much fun playing that he slept until 7am so we are hopefully out of the 4am daylight savings nightmare (knock on wood). 

Sunday includes a farmers market bop, movies, and cooking for the week. Wouldn’t change a thing. 🥳
Cannot. Get. Enough. Fall. Baking. Who’s with me Cannot. Get. Enough. Fall. Baking. Who’s with me? 🍁  This coffee cake packs a punch because it is made with @timhortonsus brewed coffee in the batter and the glaze. A true *coffee* cake. The texture is dreamy and the coffee is perfectly balanced and smooth. It is goood. #ad Get the recipe below:
 
Pumpkin Coffee Coffee Cake
 
Topping
● 2/3 cup granulated sugar
● pinch of salt
● 2/3 cup flour
● 1 teaspoon cinnamon
● 4 tablespoons butter, melted

Filling
● 1/3 cup brown sugar, packed
● 1 teaspoon cinnamon
● 1 teaspoon unsweetened cocoa powder, optional

Cake
● 1/3 cup vegetable oil
● 2 large eggs, at room temperature
● 1 cup granulated sugar
● 1 cup pumpkin purée
● 1 teaspoon pumpkin pie spice
● 1 teaspoon salt
● 1 teaspoon baking powder
● 1/2 cup brewed @timhortonsus Coffee
● 2 cups flour

Glaze
● 1 cup powdered sugar
● 2 tablespoons brewed @timhortonsus coffee
 
Instructions
1. Preheat the oven to 350°F and grease an 8 inch square pan and line with parchment.
2. Make topping: Stir together the sugar, salt, flour, cinnamon, and melted butter until combined into pea sized lumps. Stirring just until well combined. Set aside.
3. Make filling: Mix together the brown sugar, spice, and cocoa powder. Set it aside.
4. Make cake: Beat together the oil, eggs, sugar, pumpkin, pie spice, salt, and baking powder until smooth. Add the brewed coffee followed by the flour, alternating in two additions, and stir until combined.
5. Spread half the batter into the prepared pan. Sprinkle the filling evenly on top of the batter. Top with the remaining batter. Sprinkle the topping over the batter in the pan.
6. Bake until a toothpick inserted into the center comes out clean, about 40 to 45 minutes. Let cool.
7. Make glaze: Combine the powdered sugar and brewed coffee until smooth and thick but drizzle-able. Using a fork, drizzle it over the cake.

Don’t miss our upcoming chance to ⚡️W I N⚡️ thanks to @timhortonsus and #Kids360!

#timhortons #kids360fanclub
One of the hardest parts about being a working mom One of the hardest parts about being a working mom is how little time you get to spend with your sweet bean during the week. Between wake up and getting to daycare, to pickup and bedtime it’s often an hour at best (which is also filled with making dinner, bath time, etc). I soak up ALL the minutes and the weekends are an absolute snuggle and play fest. It’s so tough though! If you are in the same boat, know that you aren’t alone and you’re doing a good job!! ♥️

This photo has nothing to do with this but I made the cookies for our neighbors and regretting not keeping one for myself right now. 😬🤣
✨W I N !✨ I’ve teamed up with @nielsenmassey ✨W I N !✨ I’ve teamed up with @nielsenmassey and #Kids360 to give away some seriously amazing ingredients to make your desserts sing. 🎶 I love their products and have been using them for years—the vanilla is 💯!!
 
To enter:
● Follow @nielsenmassey and @butterlovescompany 
● Comment and tag a friend you’d love to bake with
● Enter by Thursday November 11th. Winner will be selected at random and DM’d!
 
You’ll win:
•(1) Madagascar Bourbon Pure Vanilla Powder
•(1) Madagascar Bourbon Pure Vanilla Sugar
•(1) Ugandan Pure Vanilla Extract
•(1) Pure Coffee Extract
•(1) Pure Peppermint Extract
•(1) Rose Water
•(1) Pure Lemon Extract
•(1) Tahitian Two Vanilla Beans
•(1) Tahitian Pure Vanilla Extract
•(1) Mexican Two Vanilla Beans
•(1) Mexican Pure Vanilla Extract
•(1) Madagascar Bourbon Two Vanilla Beans
•(1) Madagascar Bourbon Pure Vanilla Extract
•(1) Madagascar Bourbon Pure Vanilla Bean Paste
•(1) Orange Blossom Water
•(1) Pure Orange Extract
•(1) Pure Almond Extract
•(1) Pure Chocolate Extract
.
#ad NO PURCHASE NECESSARY. Open to legal residents of the United States (including its commonwealths, territories, and possessions) who are legal age of majority. Enter by 11:59 pm ET on November  11, 2021. Odds of winning depend on # of entries received. Void where prohibited. This giveaway is not sponsored or endorsed by Instagram or Facebook.
Brainstorming dessert recipes for Thanksgiving and Brainstorming dessert recipes for Thanksgiving and it’s hard not to think about this Black Forest Pie. 🍒🍫 It was such an indulgent tart-sweet chocolate-y treat. It has a chocolate all butter pie crust, a layer of dark chocolate ganache, a layer of chocolate pudding, a cherry topping, and whipped cream. Oh, and a cherry on top! Recipe is from @emcdowell #thebookonpie! 

This one *might* be too rich for the menu but there WILL be pie (duh)🥧. What kind of pie do you need to have on your Thanksgiving table?
This error message is only visible to WordPress admins
Hi! I'm Jenna, founder of butter loves company. From holidays to Tuesdays, let's find a way to make every meal special.
  • Email
  • Facebook
  • Instagram
  • Pinterest
  • RSS
  • Twitter
a2f54ba1dcf0635e58c8be4aa2035ce84863a9d9606a428ab3

© 2013-2019 BUTTER LOVES COMPANY, LLC.

Copyright © 2025 · Foodie Pro Theme by Shay Bocks · Built on the Genesis Framework · Powered by WordPress