butter loves company

new york food blogger and lifestyle influencer

  • home
  • Recipes
  • travel
  • lifestyle
  • cookie orders
  • about
  • contact

mom’s famous spiced pecans

October 11, 2020 by Butter Loves Company

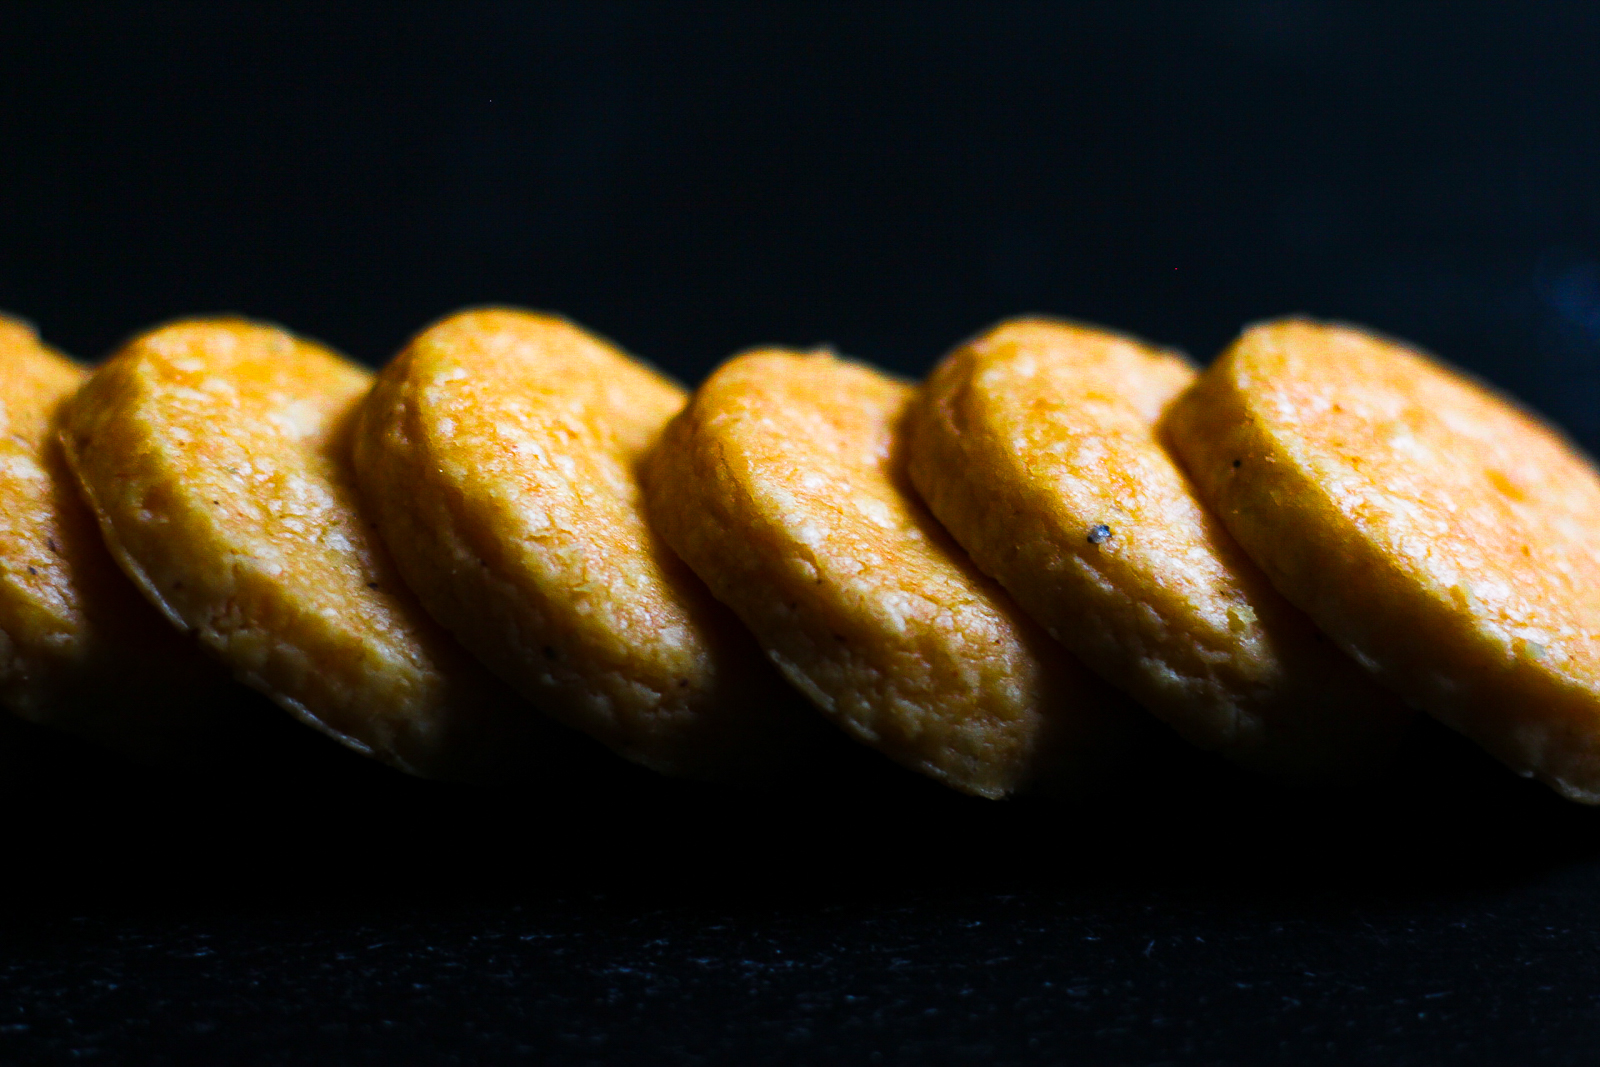
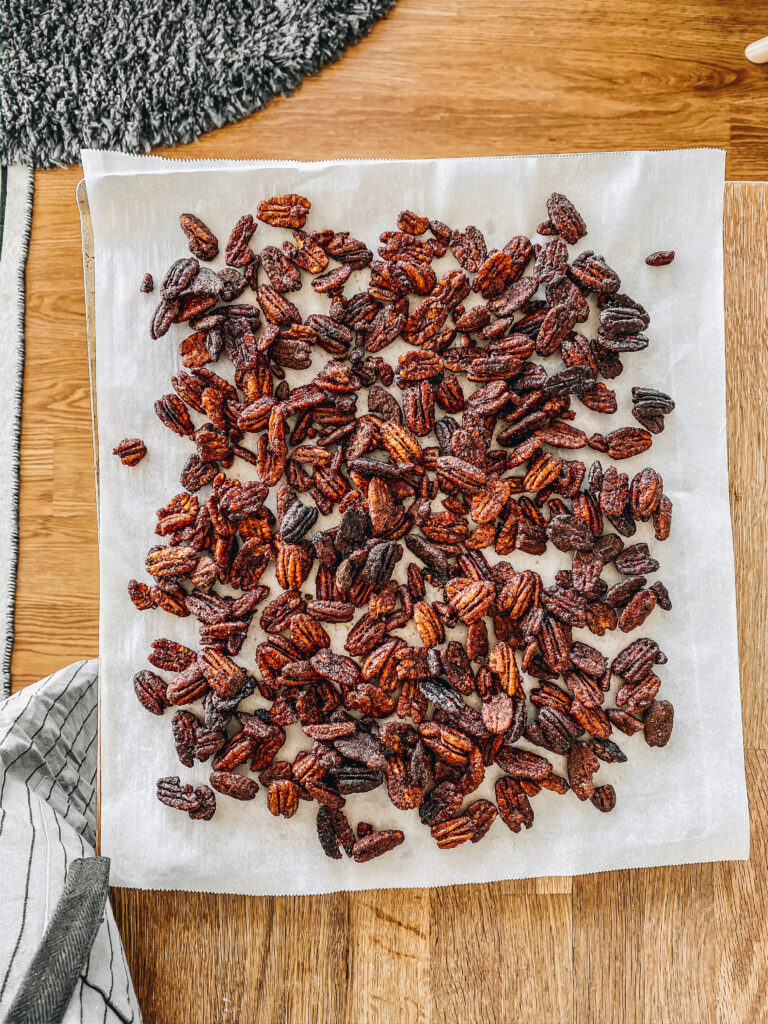
These Spiced Pecans are a perfect combination of sweet, salted, spicy, and crunchy. They are a staple on our tables during the holidays. While our holiday celebrations may look a little different this year, we will 100% have these spiced nuts to snack on while we watch movies and snuggle up.

moms-spiced-pecans-2

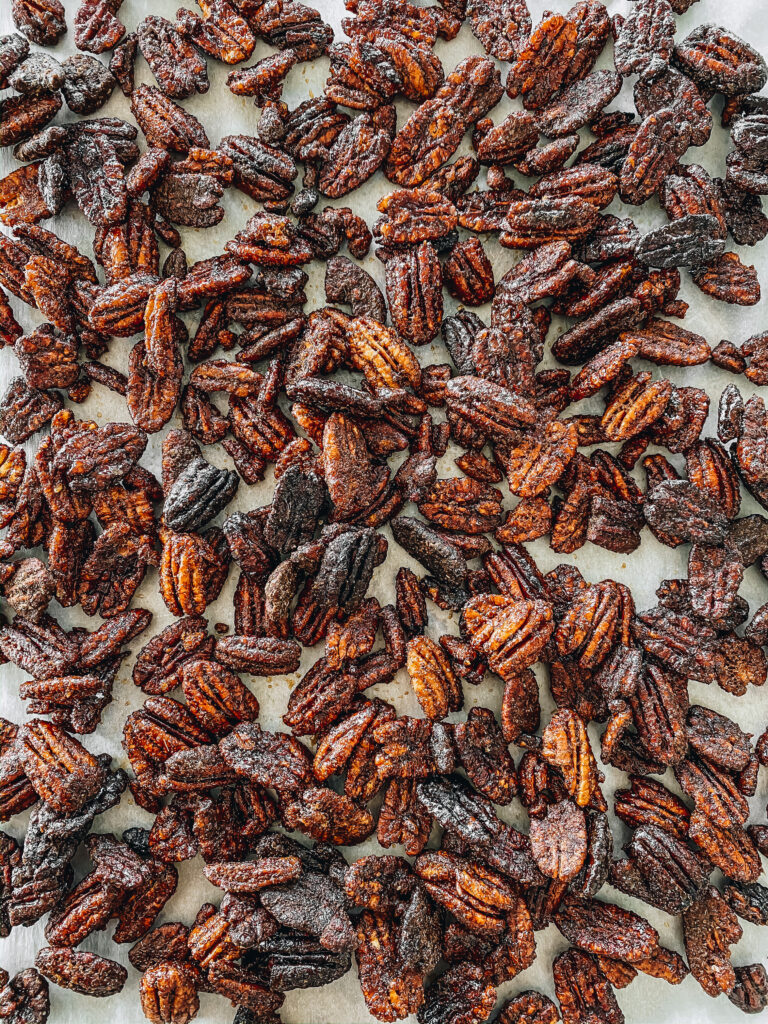
As for spices, cayenne pepper and cumin are doing most of the work here, but the nuts are made sweet with a sugary glaze and are contrasted by a bit of salt. My mom’s original recipe doesn’t call for cinnamon, but I like to add a bit to warm up the flavor a little. The pecans are first boiled and then fried, bringing out the nuttiness and creating a super crunchy texture.

These are extremely hard to stop snacking on once you start and throughout the years have become  a comforting flavor around this house. They are great for a holiday appetizer, an on-the-go snack, or for an edible gift for friends, family, or neighbors.

These spiced nuts are easy to make but I highly encourage you to read through the full recipe twice before starting. It is extremely helpful to prepare your workstation before you start any of the boiling and frying. The first time I made these I was running around looking for bowls and things. Everything worked out fine but it is a much more seamless experience if you are prepped!

Print
mom's famous spiced pecans

Prep Time: 15 minutes

Cook Time: 6 minutes

Total Time: 21 minutes

Category: Snacks

Servings: Makes 4 cups of spiced nuts

moms-spiced-pecans-2

Ingredients

  • 1/2 cup sugar
  • 2 teaspoons cayenne pepper
  • 1 1/2 teaspoon salt
  • 2 teaspoon cumin
  • 1 teaspoon cinnamon
  • 4 cups pecan halves (you could also use walnuts)
  • 2 cups canola or peanut oil (for frying)

Instructions

  1. Prepare your spice mixes: In a large mixing bowl, combine the sugar and cayenne pepper. Set aside. In another small bowl, combine the salt, cumin, and cinnamon. Set aside. Have a second large bowl nearby as well as a baking sheet or two lined with parchment for cooling.
  2. In a pot, bring 6 cups of water to a boil, add the nuts and boil for 1 to 2 minutes then drain in a colander. Pour into your bowl with sugar and cayenne pepper and toss to coat.
  3. In a heavy-bottomed pan heat oil to 350°F (should be about 1 to 2 inches deep). Add half the nuts and fry, stirring occasionally until lightly browned, 3 to 5 minutes (They can go from lightly browned to dark really quickly so keep your eye on them!). Remove from the pan and drain (my mom does this on newspaper, but I like to put some paper towels on the bottom of the cooled pan I boiled the nuts in and then set the colander on top of that and drain them in there). Then toss in a large bowl with half the salt and cumin mixture while nuts are STILL HOT! Toss occasionally to keep from sticking and then spread onto a baking sheet. Fry and season remaining nuts.

Notes

You can easily double or triple this recipe. And they freeze really well too.

6.1.0
https://www.butterlovescompany.com/2020/10/11/moms-famous-spiced-pecans/
butter loves company | jenna larsson

Filed Under: appetizers, eat, sides, soups and salads Tagged With: appetizers, holiday appetizers, spiced nuts

spinach macadamia pesto

January 6, 2017 by Butter Loves Company

spinach pesto - butter loves company

As we jot down our New Year’s resolutions and push the leftover holiday cookies and chocolate trees aside—not too far aside, of course—let’s take a moment to welcome this healthy, vibrant green spinach pesto to our January tables.

This spinach macadamia pesto is an extremely versatile sauce, perfect for tossing with pasta, drizzling on salads, spreading on sandwiches, swirling into soup—you name it. Super Greg and I chose to serve it with lemon ricotta raviolis (will be sharing that recipe with you soon).

This pesto packs the bright flavor of basil, but with the herb out of its peak summer season, we’re punching it up with earthy, leafy spinach. We’re also swapping in crunchy macadamias for pesto’s traditional pine nut. This swap was born out of having extra macadamia nuts in my freezer (after making these), but is a move we’d certainly repeat.

If pesto is met with as much excitement in your house as it is mine, feel free to add this recipe to your resolutions list: it’ll be an easy one to check off!

spinach pesto - butter loves company

Print
spinach macadamia pesto

Prep Time: 15 minutes

Servings: about 1 1/2 to 2 cups pesto

spinach macadamia pesto

Ingredients

  • 3 cups baby spinach, packed
  • 1 cup fresh basil leaves, packed
  • 1/2 cup macadamia nuts (or other nut you have on hand—get wild!)
  • 1/2 cup grated Parmesan cheese
  • 2 cloves garlic, peeled
  • 1/2 teaspoon salt
  • 1/2 teaspoon freshly ground pepper
  • 1/2 cup extra virgin olive oil

Instructions

  1. In the work bowl of a food processor, or powerful blender, pulse together the spinach, basil, hazelnuts, cheese, garlic, salt, pepper and 1/4 cup of the olive oil until fully incorporated and smooth. Drizzle in the remaining 1/4 cup olive oil and pulse until smooth. Taste and add a dash of salt and pepper if needed.
6.1.0
https://www.butterlovescompany.com/2017/01/06/spinach-macadamia-pesto/
butter loves company | jenna larsson

spinach pesto - butter loves company

Filed Under: condiments, bases and sauces, eat, sides, soups and salads Tagged With: basil, healthy, macadamia, nuts, pesto, spinach

homemade cheese crackers

December 16, 2016 by Butter Loves Company

homemade cheese crackers | butter loves company
A few weeks ago, my best friend became my *fiancé*—what a word and what a whirlwind! I really can’t imagine having anyone else by my side to laugh with for life. Supergreg, as you know him via this site, is the most thoughtful person I’ve ever met. I’m one lucky girl!

Despite all of the many things we’ve been through together since we’ve met, and how much we’ve learned and changed personally, there is one thing that still rings true. Greg can demolish a box of Cheez-It crackers in one sitting (Love you boo!).

This recipe for homemade cheese crackers is my personal gift to Greg. A cracker honoring the great Cheez-It that we can from this point forward make at home. These are your adult Cheez-Its: deeply cheesy, salt-forward with a smoky undertone thanks to paprika and cayenne. Sharp cheddar cheese leads the way with Gouda by its side. If you can find aged Gouda—I used 3-year aged—it is wonderful for adding a funky-in-a-good-way cheesy stink. I’m really selling it, huh? If you can’t find aged Gouda, a smoked Gouda could be substituted for a slightly smokier alternative.

These homemade cheesy crackers teeter on the cookie line, since they don’t shatter like some crackers as they meet your teeth, but if you roll them thin, you’ll achieve that cracker-y crunch. They also pair perfectly with wine or beer as a cocktail hour snack.

Go on and enjoy the marriage of cheeses!

homemade cheese crackers | butter loves company

Print
homemade cheese crackers

Prep Time: 30 minutes

Cook Time: 18 minutes

Servings: Makes about 60 little crackers.

homemade cheese crackers

Ingredients

  • 1/2 cup (1 stick) cold unsalted butter, cut into 16 cubes, and re-chilled
  • 1 cup sharp cheddar cheese, grated
  • 1/4 cup aged Gouda cheese, grated (can substitute a firm smoked Gouda)
  • 3/4 teaspoon salt
  • 1/4 teaspoon pepper
  • 1/4 teaspoon smoked paprika
  • 1/8 teaspoon cayenne pepper
  • 1 1/4 cups all-purpose flour

Instructions

  1. In the bowl of a food processer, pulse together the cold butter, the cheeses, salt, pepper, paprika, and cayenne until the butter is in little distinguishable bits and the mixture is crumbly. Add in the flour and pulse until absorbed and the mixture starts to come together in moist chunks. Transfer dough onto a clean sheet of parchment paper and pat together into a disk with your hands. Top the disk with another sheet of parchment so the dough is sandwiched between the two sheets and, using a rolling pin, roll the dough out to 1/4-inch thick (or thinner for crispier crackers). Freeze for at least 30 minutes.
  2. When you’re ready to bake, preheat the oven to 350°F. Peel the top layer of the parchment off the dough and set it on a cookie sheet. Set nearby. Using a cookie cutter or knife, cut the dough into desired shapes and place shapes on prepared cookie sheet, leaving 1 1/2 inches between each. Bake for 16 to 18 minutes or until the edges appear golden brown. Remove from oven and let cool completely on the cookie sheets.

Notes

Adapted from Dorie Greenspan's Smoked Cheese Cookies

6.1.0
https://www.butterlovescompany.com/2016/12/16/homemade-cheese-crackers/
butter loves company | jenna larsson

homemade cheese crackers | butter loves company

homemade cheese crackers | butter loves company

Filed Under: appetizers, eat, sides, soups and salads Tagged With: cheddar, cheese, crackers, gouda, happy hour

mini challah loaves

August 22, 2016 by Butter Loves Company

Chewy, eggy, braided mini challah loaves—perfect with butter, for sandwiches or treat them like bagels and smear them with cream cheese. Be sure to use the extras for challah french toast—dreamy!

mini-challah-loaves

From my plane ride to Boston, something a little different…

—–

She settles deep into her window seat for the six-hour flight and pops open her book to where she left off. She’s barely a chapter in but she leafs back a few pages—another vivid daydream had taken her away from the words her eyes scanned for the past fifteen minutes. Or, had she fallen asleep? Tough to tell these days.

It takes only a few moments for the lids to weigh down over her brown eyes. Her thoughts drift away to the sounds of twin toddlers giggling in the row in front of her. They’re bouncing in their seats beaming with excitement to be flying across the country, “Mom, look! We’re in the CLOUDS!”

They each wore French braids, just like she had nearly every day of her childhood. In this moment, they epitomize pure happiness. She sighs.

mini-challah-loaves

She drifts further into memories and transports back to the day she made challah bread for the first time. She had woken early from a nightmare and began to braid the challah dough she had prepared the night before to get her mind off things. It was profoundly therapeutic; rolling and twisting the eggy dough.

mini-challah-loaves

The buns had barely hit the cooling rack before she ripped into the puffy loaves, spreading their soft centers with butter and sprinkling with flaky salt. Her boyfriend, now awake to the smell of freshly baked bread, hurried over to grab a bite of his own. Their eyes locked and they both smiled. It was so good. In this moment, she imagined herself as one of those giggling toddlers: she was purely happy. This time trading those braids in the hair for another, much more delicious, braid she could share with everyone around her.

mini-challah-loaves

Print
Mini Challah Loaves

Prep Time: 3 hours, 45 minutes

Cook Time: 25 minutes

Total Time: 3 hours, 45 minutes

Servings: Makes 8 small loaves

mini-challah-bread-recipe-2

Ingredients

    For the starter:
  • 1 cup all purpose flour
  • 1 cup lukewarm water
  • 2 1/4 teaspoons active dry yeast (1 packet)
    For the dough:
  • the starter
  • 3 1/2 cups all purpose flour
  • 1 3/4 teaspoons salt
  • 1/3 cup sugar
  • 1/4 cup vegetable or olive oil
  • 2 large eggs + 1 yolk (reserve leftover egg white for wash, below)
    For the egg wash and topping:
  • 1 egg white, saved from above
  • 1 teaspoon sugar
  • 1 tablespoon water
  • poppy or sesame seeds, optional

Instructions

  1. Make the starter by mixing the 1 cup flour, 1 cup water and yeast together in the bowl of a stand mixer. Let the mixture sit for about 45 minutes. It should be bubbly.
  2. Fit the mixer with the paddle attachment, and add all the dough ingredients to the starter. Mix on low until the dough starts to come together. Stop the mixer and remove the paddle attachment—scraping any sticking dough into the bowl—replacing it with the dough hook. Knead on low-medium speed for 8- to 10-minutes, until smooth and silky and moist, but not sticky.
  3. Grease a medium bowl lightly with vegetable or olive oil. Scrape the dough from the mixer’s bowl and pat into a ball. Place into the prepared bowl, rolling it once to grease all sides. Cover lightly with plastic wrap and let rise for 1 1/2 hours, until doubled in size.
  4. Line a baking sheet with parchment paper and set nearby. Turn the dough out onto a very lightly floured surface and pat down with your fingers to release some of the air bubbles. Divide into eight equal pieces and then cut each of those pieces into four strands (you’ll end up with 8 groups of four). Roll each strand to about 8- to 10-inch long logs. Braid into your round four-strand mini loaves—instructions to do so can be found in this video. Place each braided loaf onto the prepared baking sheet.
  5. In a small bowl, make the glaze by mixing together the reserved egg white, sugar, and water. Brush loaves, reserving some for a second application.
  6. Cover the loaves with a clean damp towel and let rise for 45 minutes to 1 hour, or until almost doubled in size. When the loaves have about 15 minutes left to rise, preheat the oven to 375°F.
  7. Brush the loaves again with the egg wash and sprinkle with poppy or sesame seeds, if using. Bake for 20 to 25 minutes, or until the challah bread loaves are deep golden brown. Remove from the oven and let cool completely before slicing (Or just go right ahead and tear off a bite, lather with butter, sprinkle with salt, and repeat.). Bread keeps well for several days, well wrapped at room temperature.

Notes

Adapted from King Arthur Flour

6.1.0
https://www.butterlovescompany.com/2016/08/22/mini-challah-loaves/
butter loves company | jenna larsson

mini-challah-loaves

Filed Under: breakfast and breads, eat, sides, soups and salads Tagged With: bread, breakfast, brunch, challah

turkey quinoa poblano chili

January 13, 2016 by Butter Loves Company

Warming Turkey Quinoa Poblano Chili is your answer for cold days, game days and all the days you want to curl up with some ‘healthier’ comfort food. Also, it’s perfect for feeding a group!

turkey poblano quinoa chili | butter loves company

I’ve made this easy turkey chili recipe a handful of times within the past year and, each time, Greg and I seem to be surprised by how delicious it is. The more I think about it, though, the more I’m surprised that we’re surprised. With tender turkey, mildly spice from the poblanos, and slight nuttiness of quinoa all simmered with the heat of chili powder and cayenne, plus a touch of sweet from cinnamon and cloves, this dish has so many comforting flavors. When topped with creamy avocado, tangy lime and a dollop of cooling Greek yogurt, you really can’t go wrong with this not-surprisingly delicious turkey chili.

turkey-poblano-quinoa-chili-3

While this chili is a great alternative to the traditional beef chili when celebrating game day, you could also make a batch to have for lunch throughout the week. I bet you could even make this one vegetarian if you wanted to sub out the turkey for a variety of different beans and the chicken broth for a vegetable broth.

Depending on your brand of chili powder and the specific poblano peppers you use, the heat level can vary. If you are wary of spice, I would recommend starting with about half of the chili powder and then adding more to taste.

turkey poblano quinoa chili recipe | butter loves company

Print
turkey quinoa poblano chili

Prep Time: 10 minutes

Cook Time: 55 minutes

Servings: makes 6 to 8 servings

turkey poblano quinoa chili | butter loves company

Ingredients

  • 3 tablespoons extra virgin olive oil
  • 1 large yellow onion, chopped
  • 4 cloves garlic, minced
  • 2 large poblano chilis (or 3 medium), seeded and diced
  • 1 celery stalk, diced
  • 2 pounds ground turkey meat (not breast only)
  • 1 tablespoon all purpose flour
  • 1/4 cup tomato paste
  • 4 tablespoons chili powder
  • 11/2 tablespoons ground cumin
  • 1 teaspoon dried oregano
  • 1/2 teaspoon ground cinnamon
  • 1/4 teaspoon ground cloves
  • 1 1/2 tablespoons dark brown sugar
  • 1 teaspoon salt, plus more to taste
  • 1/2 teaspoon fresh ground black pepper, plus more to taste
  • 3 cups low sodium chicken broth
  • 1 15-ounce can cannellini beans, rinsed and drained
  • 1 cup cooked quinoa
  • Avocado, lime and/or Greek yogurt for serving (optional)

Instructions

  1. In a large heavy pot or Dutch oven, heat the olive oil over medium high heat. Stir in the onion, garlic, poblanos, and celery. Cook until the vegetables soften and the onions are translucent, about 6 or 7 minutes.
  2. Add the ground turkey and stir to distribute, breaking up the turkey with a spoon as you go. Sauté until no longer pink, about 7 to 8 minutes. Add the flour and stir to combine. Add the tomato paste, chili powder, cumin, oregano, cinnamon, cloves, sugar, salt, and pepper and stir to blend. Cook 4 to 5 minutes.
  3. Pour in the chicken broth and bring to a boil. Reduce heat to a simmer and cook for 10 minutes, stirring often. Add in the beans and cook until the chili thickens, about 20 minutes. Stir in the cooked quinoa and simmer 5 minutes more. Turn off heat—it’s ready to serve!

Notes

adapted from Giada de Laurentiis

6.1.0
https://www.butterlovescompany.com/2016/01/13/turkey-quinoa-poblano-chili-recipe/
butter loves company | jenna larsson

turkey poblano quinoa chili | butter loves company

Filed Under: eat, mains, sides, soups and salads Tagged With: chili, game day, poblano, quinoa, soup, turkey

homemade sweet corn polenta with tomato onion ragoût

July 17, 2014 by Butter Loves Company

homemade fresh corn polenta with tomato onion ragout 10 copyOdds are you’ve had at least one corn dish so far this summer. Grilled on the cobb, boiled on the cob, off the cobb on a salad, in a salsa, in a pasta dish, Mexican-style smothered in cojita cheese, cayenne and lime (one of my favorite ways)—the options are nearly endless through corn’s summer season. But have you had a plate of warm, sweet, fresh corn polenta yet? Did you know you could make fresh corn polenta? Did you know you could make it very easily? I certainly didn’t.

homemade fresh corn polenta with tomato onion ragout 1

My polenta experiences, like many of yours perhaps, have been that of sometimes gummy, sometimes watery, cornmeal porridge. But seeing as cornmeal is just coarse flour made from dried corn, it does seem logical that you could make a fresher version.

The thought first crossed my mind when I stumbled upon a recipe for sweet corn polenta in Yotam Ottolenghi’s gorgeous vegetarian cookbook, Plenty. As a side note, I’ve spent the past few years flirting with this cookbook from the acclaimed British restaurateur each time I’ve walked into a bookstore. Seeing as I’m dating a former English major who works in publishing, I’ve found myself in bookstores quite often. I rarely read novels or your typical nonfiction books (a pain point for half of those in our relationship 🙂 ), but I do read cookbooks. A lot. And this was one I’ve been wanting to get my hands on.

homemade fresh corn polenta with tomato onion ragout 2

As I read more and more of my favorite bloggers confirming the excellence of Ottolenghi’s unique recipes (see here, here, or here, for example) it became clear it was time for me to take the plunge. We had our first date the other night and it was glorious. Greg declared the result of my rendezvous hands down the best polenta he had eaten in his life. I agreed. After a very simple cook, blend, reduce process, the result was a remarkably creamy, cheesy and sweet polenta unlike any polenta made from dried cornmeal. I completed the meal with a quick, slightly spicy, slightly acidic vegetable ragoût. As a bonus, it reheated well, which is also a quality that dried polenta doesn’t always possess.

The original recipe called for mixing feta into the ground corn and eggplant into the ragoût but I didn’t have either on hand so I substituted with Parmesan and extra tomato and onions. I encourage you to top with any veggie sauce you enjoy since this polenta is a great vehicle for yummy sauce. Or you can top it with meat. Whatever you top it with, please let me know in the comments section how it comes out!

homemade fresh corn polenta with tomato onion ragout 3

homemade fresh corn polenta with tomato onion ragout 4

homemade fresh corn polenta with tomato onion ragout 5

homemade fresh corn polenta with tomato onion ragout 6

homemade fresh corn polenta with tomato onion ragout 9

homemade fresh corn polenta with tomato onion ragout 10

homemade fresh corn polenta with tomato onion ragout 12

homemade fresh corn polenta with tomato onion ragout 9

homemade sweet corn polenta with tomato onion ragoût
adapted from Plenty, by Yotam Ottolenghi

prep time: 20 minutes
cook time: 40 minutes
makes 4 entrée servings

tomato and onion ragoût

Ingredients:

2 tablespoons olive oil
2 cloves garlic, minced
2 cups sweet white onions, diced
4 cups diced tomatoes (fresh or canned, if fresh it will be about 5 small tomatoes)
1/4 cup dry white wine
1/2 teaspoon salt
1/2 teaspoon sugar
1/4–1/2 teaspoon red pepper flakes (depending on your spice tolerance)
1 teaspoon chicken bouillon, if you have it
1/3 cup fresh basil, sliced into 1/4 inch ribbons

Instructions:

  1. Heat the oil in a medium saucepan on medium-low heat. Add garlic and onions and cook until the onions begin to become tender and translucent, about 6-7 minutes. Add the tomatoes to the pan and stir to combine. Cook for 2 minutes, then add the wine and cook for 1 minute. Add the salt, sugar, red pepper flakes, bouillion, if using, and basil and cook for a further 5 minutes. Reduce heat and simmer for 20 minutes. You can set the sauce aside and warm it up when needed.

homemade sweet corn polenta

Ingredients:

6 ears of corn, shucked
2 1/4 cups water, approximately
3 tablespoons butter, diced
7 ounces Parmesan or Feta cheese, grated or crumbled if using the latter
1/4 teaspoon salt
Black pepper

Instructions:

  1. Using a sharp knife, cut the kernels off each ear of corn. I find it easiest to do this with the ear standing up inside of a short wide bowl, which will catch any stray flying kernels. You can also just do it on a cutting board. You should end up with around 1 1/4 pounds kernels.
  2. Place the kernels in a medium saucepan and pour in water until you just barely cover them (you may not need the entire 2 1/4 cups. Cook for 12 minutes on a low simmer. Using a slotted spoon, lift the kernels from the water and transfer into a food processor; reserve the cooking liquid. I like to leave a handful of kernels in the saucepan with the liquid so the polenta will have some SURPRISE full corn kernel pops. You can choose to leave some or put them all in the food processor.
  3. Process the corn kernels in the food process until smooth. It will take a few minutes as you are trying to break up the kernel cases as much as possible. Add some of the cooking liquid if the mixture becomes too dry to process.
  4. Please read full step before beginning: Pour the cooking liquid you reserved in step 2 from the saucepan into a small bowl (you can leave any full kernels you decided not to puree in the saucepan). Scoop the corn paste from the food processor into the saucepan and cook, on low heat for 10 to 15 minutes, stirring in the cooking liquid in small increments until it reaches your desired consistency (many like it the consistency of thick mashed potatoes). NOTE: If you add too much of the cooking liquid to the pan, it can take a while to cook down the polenta, and it will splatter about. This is why I recommend beginning with no liquid and subtly adding in more. You may even like the consistency of the corn after processing in step 3, in which case you can skip directly from step 3 to step 5.
  5. Fold in the butter, the cheese, salt and some pepper and optionally cook for a further 2 minutes. Taste and add more salt if needed.


Filed Under: eat, mains, sides, soups and salads Tagged With: corn, dinner, homemade polenta, onion, polenta, ragout, sauce, tomato, vegetarian

cold soba noodle salad with tahini dressing

March 26, 2014 by Butter Loves Company

soba noodle salad on plate3Soba (buckwheat) noodles served chilled with crunchy cabbage, mushrooms, and scallions. Stir up with a creamy, nutty, tahini sesame ginger dressing and you have lunch ready for the week!

If you’re anything like me, you’ll know sometimes even the greatest intentions to wake up early and make lunch before work succumb to the blessed snooze button; not unlike the early alarm I set to go running before work each morning. I can’t tell you how many times I’ve completed a run only to realize I had run in my dream and I did not, in fact, actually get out of bed to hit the pavement.

Anyways, until I started separating leftovers after dinner to bring for lunch the next day and bulk making things like this noodle salad or this Asian Quinoa Salad, I would inevitably end up lunch-less and forced into the money eating cafeteria abyss.

If you’ve ever boiled pasta, you can easily make this dish and step away from the café!

Soba noodles are thin Japanese buckwheat-flour noodles and they are super approachable. Tahini is a sesame paste, recognizable for its roles in Hummus and The Condiment on Top of Falafel. It is a bit bitter on its own, so to counter that I added a bit of honey and some citrus juices. This dressing is not a spicy tahini, but more a creamy, nutty, gingery sauce. You can certainly add spice to the recipe or mix some in when serving. If cabbage or mushrooms aren’t your thing, I think shredded carrot, shelled edamame, or snap peas would also be great alternatives on the veggie side.

Bonus: This dish is stress free, in that you don’t need to worry about working on too many things simultaneously or really over/undercooking anything. Make the pasta, let cool. Slice veggies. Cook mushrooms, let cool. Mix dressing. Mix everything.

oba noodle salad ingredients

gather your ingredients

soba noodle salad soba noodles

soba noodle salad soba noodles cooked

soba noodle salad tahini dressing ingredients

gather your ingredients for the tahini dressing

soba noodle salad ready to mix

combine!

oba noodle salad on plate4

enjoy! (Some like it hot. Like me. I added Sriracha.)

Cold Soba Noodle Salad with Tahini Dressing
butter loves company

Prep Time: 15 minutes
Cook Time: 10 minutes
Total Time: 25–30 minutes
Serves: 4–6

Ingredients:

Soba Salad:
6 oz dry soba noodles
4 cups thinly sliced cabbage (about ½ a small head)
1 tablespoon olive oil
2 Portobello mushroom caps sliced into ¼ inch slivers (or 3 cups shitake mushrooms sliced thin)
1 tablespoon low sodium soy sauce
1 thinly sliced green onion, white and light green parts, for garnishing
Toasted sesame seeds, for garnishing

Tahini Dressing:
¼ cup tahini (sesame paste)
4 tablespoons orange juice (freshly squeezed)
1 tablespoon lemon juice
1 tablespoon olive oil
2 teaspoons dark sesame oil
2 teaspoons honey, raw if you have it
1 teaspoon fresh ginger zest
1 tablespoon thinly sliced green onions, white and light green parts
½ teaspoon salt, plus more to taste

Instructions:

  1. Bring 4 cups water to a boil. Add the dry soba noodles. Cook 5 to 6 minutes, or until tender. Strain and transfer noodles to a bowl. Refrigerate until cooled.
  2. Heat the oil in a small saucepan. Add the sliced mushrooms and soy sauce and cook until the mushrooms have released their juice and the slices have shrunk in size, about 4 minutes. Remove mushrooms, discarding excess juice, and transfer to a small bowl to cool.
  3. While the noodles and mushrooms are cooling, prepare the dressing by mixing all ingredients from the tahini to the ½ teaspoon salt together in a bowl. Season with additional salt—if necessary—to taste.
  4. In a large bowl, mix together the cooled noodles, cooled mushrooms, and sliced cabbage. Using tongs or a large wooden spoon, stir in half the tahini dressing. Slowly add additional dressing until the noodles are covered, but not dripping with sauce. Add the green onions and sesame seeds to the entire mixture now or atop each serving.

Filed Under: eat, mains, sides, soups and salads Tagged With: cabbage, easy, ginger, lunch, mushrooms, pasta salad, salad, sesame, soba, soba salad, tahini

pea, fennel and leek soup

March 18, 2014 by Butter Loves Company

pea, fennel and leek soup recipe 1A recipe for a light, healthy, pea, fennel and leek soup. Fennel adds a subtle anise flavor to the sweet leek and pea puree; completed with sharp, salty, shaved Parmesan.

Sometimes it scares me how similar my mom and I think: I buy lots of fennel on Saturday, and she has the family over for a fennel filled, porchetta on Sunday (wrapped in prosciutto, no less). The bright green, feathered tips of the fennel—the fronds—were generously rolled into the meat, like cinnamon in cinnamon buns. While I like fennel, the thought of making another heavily fennel flavored dish seemed like it could be overload for one week. I needed to use my fennel in a more subtle way (call me a fennel-phobe, I can take it).

What resulted was an adaptation of the Fennel, Lettuce, and Pea soup recipe from Giada de Laurentiis’ Feel Good Food.  I had no lettuce, so I subbed with leftover leeks that didn’t make it into my boyfriend’s St. Patrick’s Day boiled dinner. To keep the fennel light in the soup, I omitted the fennel seeds she had called for, instead adding a bay leaf for flavor during the cook time. The result was a creamy, nourishing soup with a gorgeous sea foam green color. You’ll love this recipe if you’re looking for a friendly introduction to this licorice-flavored vegetable. The bright, sweet pea soup balances the anise flavor enough to please both sides of the fennel divide; the lovers and the skeptics. Of course, feel free to add another ½ or full fennel bulb if you’re entertaining a group of fennel fans.

fennel fronds and bulb

fennel fronds and leeks

sliced leeks. pea, fennel and leek soup

pea, fennel and leak soup in pot

pea fennel leek soup 3

pea, fennel and leek soup
Recipe Type: soup
Author: adapted slightly from Giada de Laurentiis, Feel Good Food
Prep time: 15 mins
Cook time: 20 mins
Total time: 35 mins
Serves: 4
A recipe for a light, healthy, pea, fennel and leek soup. Fennel adds a subtle anise flavor to the sweet leek and pea puree; completed with sharp, salty, shaved Parmesan.
Ingredients
  • 3 tablespoons unsalted butter
  • 2 small shallots, diced
  • 1 medium fennel bulb, chopped (about 2 cups)
  • 1 teaspoon salt
  • ½ teaspoon freshly ground black pepper
  • 2 medium leeks, white and light green parts only, cut into ¼ inch slices
  • One 10-ounce package frozen petite peas (about 2 ¼ cups)
  • 2 cups low-salt chicken broth, plus extra, as needed
  • 1 bay leaf
  • shredded parmesan, for garnishing (optional, only, not really)
  • fennel fronds, for garnishing (optional)
Instructions
  1. Melt the butter in a heavy, large saucepan over medium heat. Add the shallots and fennel. Season with the salt and pepper. Cover the pan and cook 5 minutes, stirring occasionally. Stir in the leeks and continue to cook until all the vegetables are almost tender, another 3 to 5 minutes. Mix in the peas, broth, and bay leaf. Bring the soup to a boil. Cover; reduce the heat to medium-low and simmer until the vegetables are just tender, 5 to 6 minutes. Remove the bay leaf from the saucepan and discard.
  2. Using a blender, or immersion blender, blend the soup until smooth. If using a standing blender, take the saucepan off of the heat for 5 minutes and then blend just 1 cup at a time. Pour the soup back into the saucepan and keep warm over low heat. Season with additional salt and pepper to taste. Thin out the soup by adding 1 tablespoon of extra broth at a time, if needed.
  3. Ladle the soup into bowls and serve with a sprinkle of parmesan and a pinch of fennel fronds.
3.2.1275


Filed Under: eat, sides, soups and salads Tagged With: easy, fennel, fronds, green, healthy, leeks, parmesan, peas, soup, weekday

brown and wild rice with mushrooms and brussel sprouts

March 1, 2014 by Butter Loves Company

Prepare yourself. My cuisinerd level is about to rise.

I recently came to the realization that I read cookbooks like most people read novels.  I’ll grab a cookbook and read it cover to cover in one sitting, hanging onto every word, every ingredient, every step of every recipe—from the prologue to the epilogue. But, give me the latest New York Times best selling novel? I’ll make it ¾ of the way through, and that’s if I think it’s really good. I’d never make it in a traditional book club. When it came to talk about the last few chapters, I would suddenly have to fake receive a phone call and sneak out the back door.

My latest read was earlier this week after I made the Asian Quinoa Salad. The health bug bit me and I picked up the latest from Giada de Laurentiis, Feel Good Food. After a few pages, I knew this would be a staple on my cookbook shelf for all times when I’m craving something light and healthy that doesn’t taste like birdseed.

Giada developed this Brown and Wild Rice with Brussel Sprouts recipe as a vegetarian, gluten free stuffing for a Thanksgiving meal, but says she started making it more regularly after loving the nutty combination of the brown and wild rice. Because I love mushrooms and brussel sprouts so much, I up’d the amount I added of each (reflected in the below recipe).  This would make a nice side dish at a dinner party, or an easy weekday lunch or dinner.

brussel sprouts1

wild and brown rice1

wild rice1

mushrooms and brussels1

brown and wild rice with mushrooms and brussels1

brown and wild rice with mushrooms and brussel sprouts
Recipe Type: dinner, vegetarian, side
Author: adapted from Giada de Laurentiis Feed Good Food
Prep time: 15 mins
Cook time: 40 mins
Total time: 55 mins
Serves: 6
Ingredients
  • 2 cups low sodium chicken broth (or vegetable broth if you would like to keep the dish vegetarian)
  • ¼ cup water
  • 1 ½ tablespoons chopped fresh thyme
  • ¾ cup short-grain brown rice
  • ¾ cup wild rice
  • 2 tablespoons extra-virgin olive oil
  • 1 cup frozen pearl onions, thawed
  • 2 large portobello mushrooms, thinly sliced
  • 1 ½ cups brussel sprouts, sliced in half if small and quarters if large
  • salt and pepper, to taste
  • ¼ cup toasted hazelnuts, coarsely chopped (optional)
Instructions
  1. For the rice: In a heavy saucepan or Dutch oven, bring the broth, ¼ cup water, and the thyme to a boil. Add the brown rice and wild rice. Cover the saucepan and lower the heat and simmer until the rice is tender but still chewy, about 30 minutes. Turn off the heat and allow the rice to stand for 10 minutes. Fluff with a fork.
  2. For the vegetables: Meanwhile, in a large nonstick skillet, heat the oil over medium-high heat. Add the onions and season lightly with salt and pepper. Cook, stirring occasionally, until light golden, about 5 minutes. Add the mushrooms and cook until softened, about 8 minutes. Add the brussel sprouts and cook until tender, about 5-8 more minutes. Season with salt and pepper to taste.
  3. Transfer the vegetable mixture to the saucepan of cooked rice. Add hazelnuts if desired. Toss until all the ingredients are mixed. Serve warm or at room temperature.
3.2.1275


Filed Under: eat, sides, soups and salads Tagged With: brown rice, brussel sprouts, gluten-free, healthy meal, mushroom, rice, vegetable side dish, vegetarian, wild rice

asian quinoa salad

February 24, 2014 by Butter Loves Company

No matter how much rest and relaxation I get over a weekend, when Monday comes, I feel like I always have a tough time kicking it into gear. I wonder if there has been any scientific research done on the physical affects of Mondays?

I knew I’d feel like a slug bug today after a weekend that consisted of lots of heavy, not the best for me, food (think fried chicken, tacos, movie theater popcorn, lots of homemade marshmallows). My body was craving something fresh and crisp in a serious way.

To pick me up, dinner tonight was this tasty Asian Quinoa Salad filled with crunchy veggies—a light, fresh, meat-free salad that won’t leave you bored after a few bites.

I’ll definitely be making it again to keep in the fridge for lunches throughout a busy week. I can also see myself making it as a side dish at a party because it meets a range of dietary guidelines; it’s vegetarian, vegan, and gluten-free (if made with tamari rather than soy sauce).

asian quinoa salad2

The "it" girl of 2013: Quinoa!

The “it” girl of 2013: Quinoa!

asian quinoa salad4

asian quinoa salad1

asian quinoa salad
Recipe Type: salad
Author: adapted from Two Peas and Their Pod
Prep time: 10 mins
Cook time: 20 mins
Total time: 30 mins
Serves: 4
Ingredients
  • 1 cup quinoa
  • 2 cups water
  • 1/4 teaspoon salt
  • 1 cup chopped red cabbage
  • 1 cup shelled and cooked edamame
  • 1 red bell pepper, chopped in thin strips
  • 1/2 cup shredded carrots
  • 1 cup shredded or diced cucumber
  • 1/2 cup sliced almonds
  • 1/4 cup low sodium soy sauce or tamari sauce
  • 1 tablespoon sesame oil
  • 1 tablespoon rice vinegar
  • 2 tablespoons chopped green onion
  • 1 tablespoon sesame seeds
  • 1/4 teaspoon grated fresh ginger (dried will work fine too)
  • 1/8 teaspoon red pepper flakes
  • Salt and black pepper, to taste
Instructions
  1. Add water, quinoa, and salt to a medium saucepan and bring to a boil over medium heat. Boil for 5 minutes. Turn the heat to low and simmer for about 15 minutes, or until water is absorbed. Remove from heat and fluff with a fork.
  2. Place the quinoa in a large bowl and add the cabbage, edamame, red pepper, carrots, cucumber, and almonds. Set aside.
  3. In a small bowl, whisk together the soy sauce, sesame oil, rice wine vinegar, green onions, sesame seeds, ginger, red pepper flakes, salt, and pepper.
  4. Pour the dressing over the quinoa salad and stir to combine. Enjoy at room temperature or chilled.
3.2.1275


Filed Under: eat, sides, soups and salads Tagged With: edamame, gluten-free, healthy, make ahead, quinoa, salad, sesame, vegan, vegetarian

Next Page »

Welcome!

jenna of butterlovescompany

Pull up a chair

Hi! I’m Jenna. Story seeker, food lover, recipe developer based in NYC. Firm believer in making every day delicious! Read more…

looking for something?

  • Email
  • Facebook
  • Instagram
  • Pinterest
  • RSS
  • Twitter

Latest Posts

  • Freezer Meals to Make Before Baby: How We Meal Prepped Before Baby
  • mom’s famous spiced pecans
  • funfetti cookie dough truffles (no-bake)
  • maple coconut cookies
  • snickerdoodle blondies

popular now

strawberry cinnamon rolls
braised short rib pasta sauce (short rib ragu)
rosemary honey buttermilk biscuits
peach blueberry pie
bourbon banana bread
chocolate marble loaf cake

grammin’

Let’s get ready to bake throughout the holidays! Let’s get ready to bake throughout the holidays! I’ve teamed up with @lucky_leaf_fruit_filling, @diamondnuts and #Kids360 to give away some delicious baking ingredients to make your spirits bright this season. 

To enter:
-Follow @lucky_leaf_fruit_filling, @diamondnuts and @butterlovescompany
-Comment and tag a friend and the name of your favorite holiday dessert
-Enter by December 1. Winner will be selected at random and DM’d! 

You’ll win: 
•(1) Can of Lucky Leaf Premium Blueberry Filling
•(1) Can of Lucky Leaf Premium Apple Filling
•(1) Can of Lucky Leaf Premium Cherry Filling
•(1) Can of Lucky Leaf Premium Strawberry Filling
•(1) Can of Lucky Leaf Premium Peach Filling
•(1) Recipe Book
•(2) Dish Towels
•(1) Pot-Holder
•(1) Picnic Basket

#ad NO PURCHASE NECESSARY. Open to legal residents of the United States (including its commonwealths, territories, and possessions) who are legal age of majority. Enter by 11:59 pm ET on December 1, 2021. Odds of winning depend on # of entries received. Void where prohibited. This is not sponsored or endorsed by Instagram or Facebook.
This was the best photo we could get with an alway This was the best photo we could get with an always moving toddler. 🥸 Happy Thanksgiving to you and yours! ♥️
Something that the past year or so has taught me: Something that the past year or so has taught me: stock your pantry! Having a stocked kitchen has made it super easy to cook and bake without having to run out to the store. Crucial when you get a craving for an Apple Walnut Cake and need to make one stat. With @lucky_leaf_fruit_filling and @diamondnuts, you can put together a delicious cake SO easily with no peeling and slicing of apples. 🍎🌰You get all the beautiful warm spice flavor with sweet, tart apples, and crunchy, hearty walnuts. #ad Get the recipe below: 

Apple Walnut Cake

* 1 box (15.25 oz.) spice cake mix
* 1 can (21 oz.) Lucky Leaf® Premium Apple Fruit Filling
* 2 large eggs
* 1 tbsp. pure vanilla extract
* 1/4 cup whole milk
* 1/4 cup brown sugar
* 1 tsp. ground cinnamon
* 1/2 cup finely chopped Diamond of California® Shelled Walnuts
* 1 container (8 oz.) whipped topping, thawed

Instructions
1. Preheat oven to 350° F and grease 9x13-inch pan. 
2. Combine dry cake mix, apple filling, eggs, vanilla & milk in large bowl. Beat for 2 minutes. Spread half of the batter in the pan. 
3. Make the Walnut Cinnamon filling: Combine brown sugar, cinnamon and walnuts. Sprinkle half the mixture on top of batter. Top with remaining batter and then sprinkle remaining walnut mixture on top.
4. Bake cake for 28-33 minutes. Cool cake. Top with whipped topping and sprinkle with walnut pieces.

Don’t miss my upcoming chance to W I N with #kids360, Diamond and Lucky Leaf!
Spiced pecans, wedding cookies, chocolate turtles, Spiced pecans, wedding cookies, chocolate turtles, pecan pie, sticky buns…just a few of the treats on my standard holiday baking agenda. What do they have in common? NUTS! @diamondnuts are a staple around here for the holidays (and all year, let’s be honest) and I want to share the love. Thanks to Diamond and #kids360, we are giving someone ✨15 FREE product coupons for @diamondnuts ✨to help you bake your holiday treats this year. Go nuts!

To enter:
* Follow @diamondnuts and @butterlovescompany
* Comment and tag a friend who deserves a day off to go nuts! 
* Enter by end of day November 25th. Winner will be selected at random and DM’d! 

#ad NO PURCHASE NECESSARY. Open to legal residents of the United States (including its commonwealths, territories, and possessions) who are the legal age of majority. Enter by 11:59 pm ET on November 25, 2021. Odds of winning depend on # of entries received. Void where prohibited. This is not sponsored or endorsed by Instagram or Facebook.
No gimmicks, no “just for the ‘gram” razzle No gimmicks, no “just for the ‘gram” razzle dazzle here. Just really good chocolate chip cookies.🍪
Fun fact: Layered Magic Cookie Bars were one of th Fun fact: Layered Magic Cookie Bars were one of the first things I ever baked. Making them again with @diamondnuts makes me super nostalgic. Brought me directly back to middle school. Watch out or you may find me in butterfly clips doodling I <3 SOS on my binder soon. There is a reason this recipe is awesome: first, the cookie bars are incredibly delicious. And, second, they are SO easy to put together. Honestly, they are the PERFECT treat to make with your kids. Pecans and walnuts give the bars the best crunch, nuttiness, and heartiness. You could totally customize if there is a certain kind of jam you love, or a combination of nuts that the family loves. #ad Get the recipe below: 

Seven Layer Magic Cookie Bars

* 1/2 cup (1 stick) butter, melted
* 2 cups graham cracker crumbs
* 1 cup raspberry jam
* 1 cup shredded coconut
* 1 cup Diamond of California® walnuts
* 1 cup Diamond of California® pecans
* 1 cup semi-sweet or bittersweet chocolate chips
* 1 (14-ounce) can sweetened condensed milk

Instructions
1. Preheat oven to 350°F. To toast walnuts and pecans, spread evenly on a baking sheet or in a shallow pan. Bake, stirring once or twice, until lightly browned and fragrant, 7 to 10 minutes. Line a 9×13-inch pan with parchment paper.
2. In a medium bowl, combine the melted butter and graham cracker crumbs; mix well. Transfer the crumbs to the prepared pan and using your finger tips, or the flat bottom of a small measuring cup, press firmly and evenly on the bottom of the pan. Spread the raspberry jam evenly over the crumbs. Sprinkle coconut in an even layer over the jam, followed by the chocolate chips, walnuts and pecans. Drizzle the condensed milk evenly over the top.
3. Bake until bubbling and golden brown, 30-35 minutes. Let cool completely in the pan. If lined with parchment, lift out and place on a cutting board. With a sharp knife, cut into bars.

Look out for an upcoming chance to ✨ w i n ✨with @diamondnuts and #kids360!
Raise your hand if you could use a cup of coffee. Raise your hand if you could use a cup of coffee. 🙋 We are giving away some @timhortonsus coffee goodies so you can get your cozy cool morning on with Canada’s favorite cup of joe. Make my Pumpkin Coffee Coffee Cake for a buzzy morning snack or just brew a strong cup for a little pep in your step (as tired parents over here, we could surely use it). 🍂

To enter:
● Follow @butterlovescompany and @timhortonsus
● Comment and tag a friend you would love to grab coffee with ☕ (each comment=1 entry)
● Enter by midnight November 18. Winner will be selected at random and DM’d!
 
You’ll win:
•(1) Colombian Ground Coffee
•(1) Dark Roast Ground Coffee
•(1) Decaf Ground Coffee
•(1) Whole Bean Original Blend Coffee
•(1) Keurig Variety 30-Pack
•(1) Mug
•(1) Branded Notebook
•(1) Branded Baseball Cap
 
 
ad #timhortons #kids360 NO PURCHASE NECESSARY. Open to legal residents of the United States (including its commonwealths, territories, and possessions) who are legal age of majority. Enter by 11:59 pm ET on November  18, 2021. Odds of winning depend on # of entries received. Void where prohibited. This is not sponsored or endorsed by Instagram or Facebook.
Can’t beat a classic. 🥧 Apple streusel pie fo Can’t beat a classic. 🥧 Apple streusel pie for yesterday’s friendsgiving.🥰 Grateful for time with friends enjoying great food. Remy had so much fun playing that he slept until 7am so we are hopefully out of the 4am daylight savings nightmare (knock on wood). 

Sunday includes a farmers market bop, movies, and cooking for the week. Wouldn’t change a thing. 🥳
Cannot. Get. Enough. Fall. Baking. Who’s with me Cannot. Get. Enough. Fall. Baking. Who’s with me? 🍁  This coffee cake packs a punch because it is made with @timhortonsus brewed coffee in the batter and the glaze. A true *coffee* cake. The texture is dreamy and the coffee is perfectly balanced and smooth. It is goood. #ad Get the recipe below:
 
Pumpkin Coffee Coffee Cake
 
Topping
● 2/3 cup granulated sugar
● pinch of salt
● 2/3 cup flour
● 1 teaspoon cinnamon
● 4 tablespoons butter, melted

Filling
● 1/3 cup brown sugar, packed
● 1 teaspoon cinnamon
● 1 teaspoon unsweetened cocoa powder, optional

Cake
● 1/3 cup vegetable oil
● 2 large eggs, at room temperature
● 1 cup granulated sugar
● 1 cup pumpkin purée
● 1 teaspoon pumpkin pie spice
● 1 teaspoon salt
● 1 teaspoon baking powder
● 1/2 cup brewed @timhortonsus Coffee
● 2 cups flour

Glaze
● 1 cup powdered sugar
● 2 tablespoons brewed @timhortonsus coffee
 
Instructions
1. Preheat the oven to 350°F and grease an 8 inch square pan and line with parchment.
2. Make topping: Stir together the sugar, salt, flour, cinnamon, and melted butter until combined into pea sized lumps. Stirring just until well combined. Set aside.
3. Make filling: Mix together the brown sugar, spice, and cocoa powder. Set it aside.
4. Make cake: Beat together the oil, eggs, sugar, pumpkin, pie spice, salt, and baking powder until smooth. Add the brewed coffee followed by the flour, alternating in two additions, and stir until combined.
5. Spread half the batter into the prepared pan. Sprinkle the filling evenly on top of the batter. Top with the remaining batter. Sprinkle the topping over the batter in the pan.
6. Bake until a toothpick inserted into the center comes out clean, about 40 to 45 minutes. Let cool.
7. Make glaze: Combine the powdered sugar and brewed coffee until smooth and thick but drizzle-able. Using a fork, drizzle it over the cake.

Don’t miss our upcoming chance to ⚡️W I N⚡️ thanks to @timhortonsus and #Kids360!

#timhortons #kids360fanclub
One of the hardest parts about being a working mom One of the hardest parts about being a working mom is how little time you get to spend with your sweet bean during the week. Between wake up and getting to daycare, to pickup and bedtime it’s often an hour at best (which is also filled with making dinner, bath time, etc). I soak up ALL the minutes and the weekends are an absolute snuggle and play fest. It’s so tough though! If you are in the same boat, know that you aren’t alone and you’re doing a good job!! ♥️

This photo has nothing to do with this but I made the cookies for our neighbors and regretting not keeping one for myself right now. 😬🤣
✨W I N !✨ I’ve teamed up with @nielsenmassey ✨W I N !✨ I’ve teamed up with @nielsenmassey and #Kids360 to give away some seriously amazing ingredients to make your desserts sing. 🎶 I love their products and have been using them for years—the vanilla is 💯!!
 
To enter:
● Follow @nielsenmassey and @butterlovescompany 
● Comment and tag a friend you’d love to bake with
● Enter by Thursday November 11th. Winner will be selected at random and DM’d!
 
You’ll win:
•(1) Madagascar Bourbon Pure Vanilla Powder
•(1) Madagascar Bourbon Pure Vanilla Sugar
•(1) Ugandan Pure Vanilla Extract
•(1) Pure Coffee Extract
•(1) Pure Peppermint Extract
•(1) Rose Water
•(1) Pure Lemon Extract
•(1) Tahitian Two Vanilla Beans
•(1) Tahitian Pure Vanilla Extract
•(1) Mexican Two Vanilla Beans
•(1) Mexican Pure Vanilla Extract
•(1) Madagascar Bourbon Two Vanilla Beans
•(1) Madagascar Bourbon Pure Vanilla Extract
•(1) Madagascar Bourbon Pure Vanilla Bean Paste
•(1) Orange Blossom Water
•(1) Pure Orange Extract
•(1) Pure Almond Extract
•(1) Pure Chocolate Extract
.
#ad NO PURCHASE NECESSARY. Open to legal residents of the United States (including its commonwealths, territories, and possessions) who are legal age of majority. Enter by 11:59 pm ET on November  11, 2021. Odds of winning depend on # of entries received. Void where prohibited. This giveaway is not sponsored or endorsed by Instagram or Facebook.
Brainstorming dessert recipes for Thanksgiving and Brainstorming dessert recipes for Thanksgiving and it’s hard not to think about this Black Forest Pie. 🍒🍫 It was such an indulgent tart-sweet chocolate-y treat. It has a chocolate all butter pie crust, a layer of dark chocolate ganache, a layer of chocolate pudding, a cherry topping, and whipped cream. Oh, and a cherry on top! Recipe is from @emcdowell #thebookonpie! 

This one *might* be too rich for the menu but there WILL be pie (duh)🥧. What kind of pie do you need to have on your Thanksgiving table?
This error message is only visible to WordPress admins
Hi! I'm Jenna, founder of butter loves company. From holidays to Tuesdays, let's find a way to make every meal special.
  • Email
  • Facebook
  • Instagram
  • Pinterest
  • RSS
  • Twitter
a2f54ba1dcf0635e58c8be4aa2035ce84863a9d9606a428ab3

© 2013-2019 BUTTER LOVES COMPANY, LLC.

Copyright © 2025 · Foodie Pro Theme by Shay Bocks · Built on the Genesis Framework · Powered by WordPress