butter loves company

new york food blogger and lifestyle influencer

  • home
  • Recipes
  • travel
  • lifestyle
  • cookie orders
  • about
  • contact

thai chili coconut cream doughnuts

March 4, 2017 by Butter Loves Company

coconut cream doughnuts | butter loves companySometimes you start the day with a nourishing smoothie, and end it with a doughnut. It’s all about that balance.

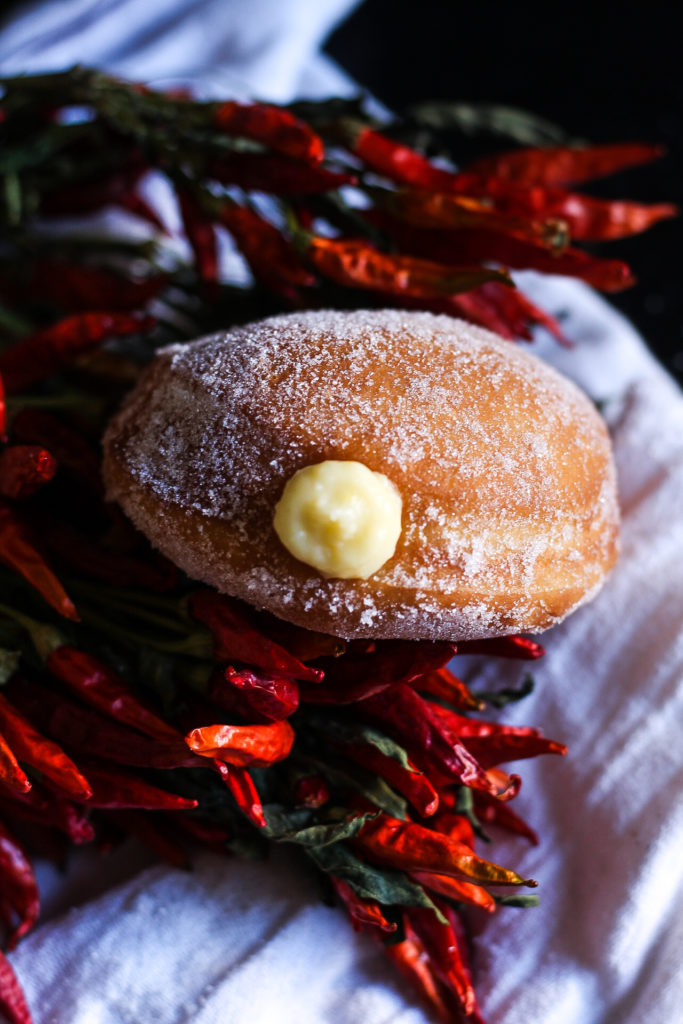
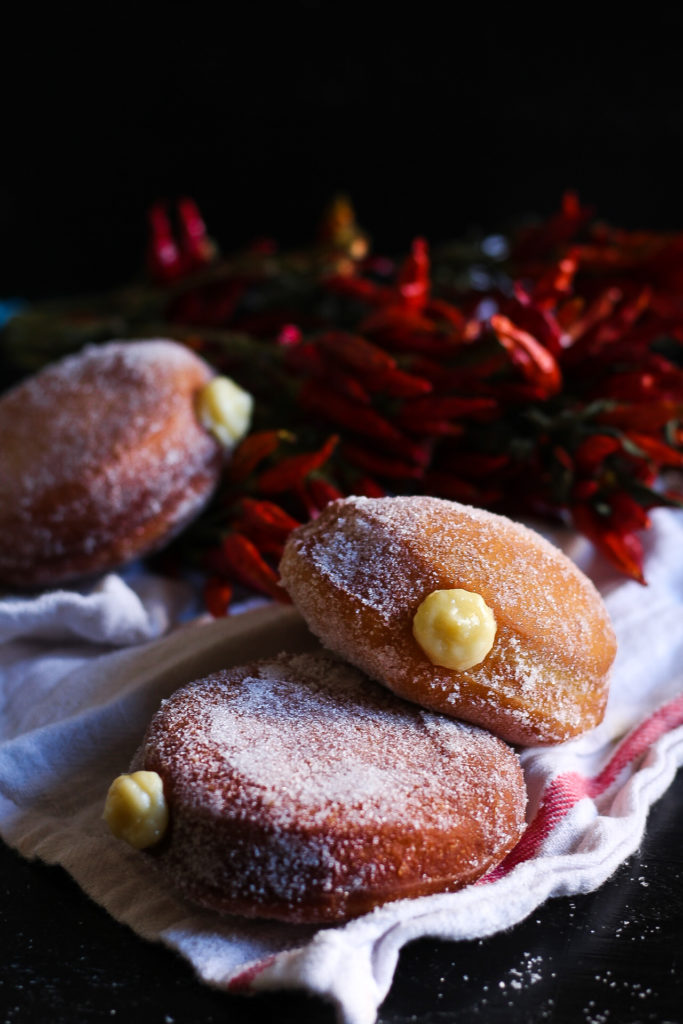
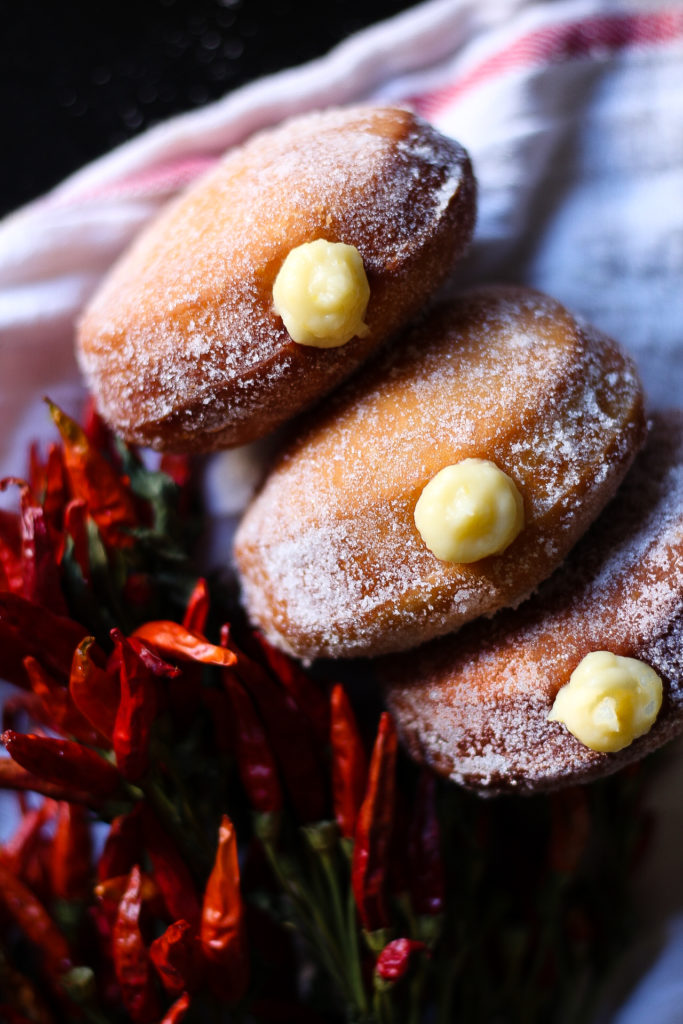
Ever since I made these brioche doughnuts, my mind has been swirling with reasons (excuses) to make them again. After one glance over my shoulder at the bushel of almost dried out Thai bird chilies hanging in our kitchen, I knew my next move. Herein, we have the Thai Chili Coconut Cream Doughnuts. As an ode to some of our favorite Thai curries, which are deep with heat, yet balanced by creamy coconut milk, we are steeping the Thai bird chilies in a milky cream of coconut mixture to create the coconut pastry cream that is piped into your freshly fried doughnuts.

The combination of buttery brioche dough rolled in vanilla sugar and the slightly spicy, creamy coconut filling is the one of the best excuses I could ever think of. For your filling, you’ll use some cornstarch to help your custard thicken up like a pastry cream. No Thai chilies? You could definitely omit and stick to a coconut cream. Alternatively, you could experiment with a jalapeno or serrano pepper—just be sure to test along the way to make sure your filling doesn’t end up too fire-y hot.

coconut cream doughnuts | butter loves company

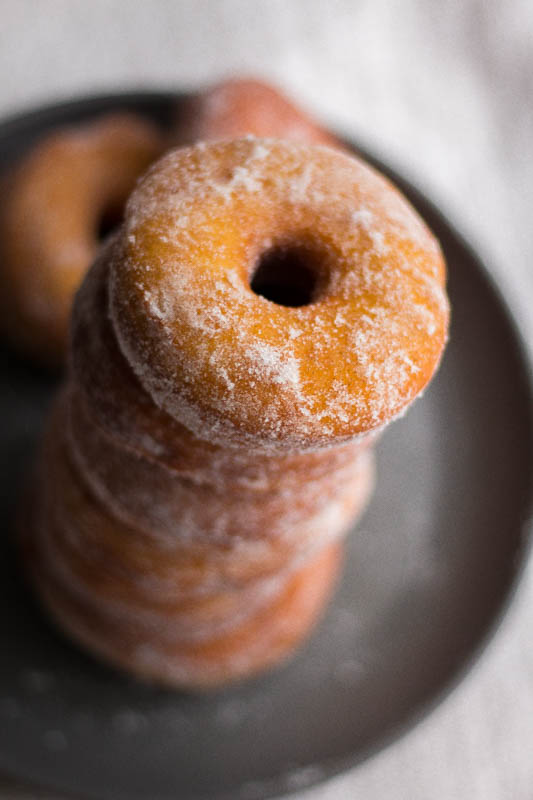
These Thai Chili Coconut Cream Doughnuts are a great weekend project as the brioche dough is best prepped and shaped a day ahead, left to proof overnight in the refrigerator, and fried up on Sunday morning while you sip your coffee in your jammies.

Because the brioche doughnut dough takes a day to prepare (mostly inactive), it is great to prep the pastry cream the same day to mix the dough so it will be chilled and ready to use as soon as you you fry the doughnuts.

Here’s to a happy weekend!

coconut cream doughnuts | butter loves company

Print
Thai Chili Coconut Cream Doughnuts

Prep Time: 24 hours

Servings: Makes 8 large doughnuts

coconut cream doughnuts | butter loves company

Ingredients

  • 1 Recipe brioche doughnuts , making sure to use a round cookie cutter without a center hole, to shape.***Please See Note About Timing
  • 2 cups whole milk
  • 1/4 cup cream of coconut
  • 1/2 cup sweetened shredded coconut
  • 1/2 vanilla bean, seeds scraped or 1 teaspoon pure vanilla extract
  • 3–5 small red fresh or dried Thai bird chilies, with a small vertical slit cut into each
  • 4 large egg yolks
  • 1/4 cup granulated sugar
  • 1 tablespoon cornstarch
  • 1/4 teaspoon of salt

Instructions

  1. Prepare brioche doughnuts completely through frying and rolling in sugar. Set cooked doughnuts aside while preparing the filling.*
  2. In a medium bowl, whisk together the egg yolks, sugar, cornstarch, and salt. Set nearby.
  3. In a medium saucepan over medium high heat, bring the milk, cream of coconut, coconut, vanilla bean and seeds, and Thai chilies to a simmer. Stir until sugar dissolves and then reduce heat to a simmer. Turn off heat and steep for 5 minutes. Strain the liquid into a medium bowl to separate out the shredded coconut and Thai bird chilies. Discard the solids and return the liquid to the saucepan.
  4. Gradually pour about 1/3 of the warm milk mixture into the bowl with the eggs, whisking constantly to prevent the warm liquid from cooking the eggs. Pour the milk/egg mixture back into the saucepan with the rest of the milk mixture, turn the saucepan back to a low heat and whisk constantly until the mixture thickens enough to coat the back of a spoon without dripping off. Turn off heat and cool custard completely.
  5. Transfer the cooled custard to a piping bag fitted with a small pointy tip. Insert the tip of the piping bag into one of the prepared doughnuts and squeeze the filling into the doughnut until you can feel the sides of the doughnut puffing out slightly. Repeat with the remaining doughnuts.

Notes

*Alternatively, prepare the filling on the same day you prepare the doughnut dough. Chill while you fry the doughnuts and then fill the just-fried doughnuts with the chilled pastry cream.

6.1.0
https://www.butterlovescompany.com/2017/03/04/coconut-cream-doughnuts/
butter loves company | jenna larsson

coconut cream doughnuts | butter loves company

Filed Under: breakfast and breads, desserts and sweets, eat Tagged With: brioche, chili, coconut, cream, donuts, doughnuts, pastry cream, spicy, Thai

sugared brioche doughnuts

August 11, 2016 by Butter Loves Company

brioche-doughnut-recipe-6

Check. Check 1-2. Check 1-2-3-4.

Hello…

it’s me!

I am (honestly) in California dreaming about who we used to be. That is, food friends! Life has been quite busy lately and I’m going to blame my temporary break on the new doughnut in my life. No, I’m not talking about these sugared brioche doughnuts that I hope you’re grabbing for on the screen (they are that good, I promise). I’m referring to the newest member of the Butter Loves Company family, our precious calico kitten—say hello to Nori! She is my new kitchen assistant, contributing mostly by sleeping curled into an adorable doughnut shape. I couldn’t be happier to be her mama.

nori2

Cute cats aside, I am bursting with excitement to share this recipe with you. Imagine biting into a sweet, buttery cloud with egg-y richness and a kiss of vanilla. Sounds pretty amazing, right? That’s what you’ll get with this perfect sugared brioche doughnut recipe. As soon as I tried Thomas Keller’s recipe from Bouchon Bakery, it was game over.

brioche-doughnut-recipe-1

If you’re thinking, “Homemade doughnuts? That seems difficult,” let’s take it step-by-step. You’ll prepare a simple dough, which is a mostly hands-off process, allowing your stand mixer to do the heavy lifting. You’ll let the dough proof for an hour and then again overnight in the fridge. You’ll roll out and cut the dough into your doughnut shapes. You’ll heat the oil and fry those pretties for just a couple minutes. Remove from the oil, let cool and toss them in vanilla sugar. Give one to everyone you see around you—well, maybe not the cats!

blc signature

brioche-doughnut-recipe-4

Print
sugared brioche doughnuts

Prep Time: 10 hours

Cook Time: 30 minutes

Servings: 8 doughnuts, plus 8 munchkins!

brioche-donut-recipe-5

Ingredients

  • 518 grams all-purpose flour (3 1/2 cups plus 3 tablespoons)
  • 10 grams instant yeast (1 tablespoon)
  • 74 grams granulated sugar (1/4 cup plus 2 tablespoons)
  • 9 grams table salt (1 tablespoon)
  • 212 grams warm whole milk (3/4 cup plus 1 1/2 tablespoons; at about 75°F)
  • 111 grams egg (1/4 cup plus 3 tablespoons; about 2 large eggs)
  • 9 grams vanilla extract, vanilla bean paste, or vanilla bean caviar (1 1/2 teaspoons)
  • 55 grams unsalted butter, at room temperature, cut into cubes (2 ounces)
  • Canola oil, for frying (enough to fill your Dutch oven or pot 3 inches deep)
  • 300 grams granulated sugar or vanilla sugar (1 1/2 cups; sugar massaged with leftover vanilla bean pod)
  • Other tools:
  • Round doughnut cutter or circular cookie cutters (you could use two round cookie cutters: one large one for the outside and one small one to cut out the doughnut centers)
  • Candy thermometer

Instructions

    Prepare the Dough
  1. Spray a medium bowl with non-stick spray and set aside.
  2. In the bowl of a stand mixer fitted with the dough hook, mix together the flour and yeast. Add the sugar, salt, milk, egg, and vanilla and mix on low speed until incorporated. Continue mixing on low speed for 30 minutes (the dough may stick to the side of the bowl).
  3. With the mixer running, gradually add the butter, a cube at a time, incorporating each cube completely before adding the next. Continue until you’ve added all the butter, scraping down the bowl periodically. Mix for 5 more minutes.
  4. Scrape the dough onto a lightly floured surface and pat into a rectangular shape, using only enough flour so it doesn’t stick to the surface. Stretch and fold the left side of the dough to over 2/3 of the dough, and then stretch the right side and folder over the left (Like you would fold a letter, if people still sent letters!). Repeat once more, this time folding the top down and then the bottom up. Place in prepared bowl seam-side down. Cover with plastic wrap or a clean dishtowel and let sit at room temperature for an hour.
  5. Turn the dough out onto a lightly floured surface and gently pat the dough down pressing large air bubbles to the edge to release. Repeat the stretching and folding process and then return the dough to the bowl, seam-side down, cover, and refrigerate overnight.
    Roll and Shape
  1. Line a baking sheet with parchment paper, spray with non-stick spray, and set nearby. Turn the chilled dough out onto a lightly floured surface and roll it out to about 11-inches wide and about 1-inch thick. Working quickly using your doughnut cutter or round cookies cutters, cut rounds from the dough. Dust off excess flour and place onto prepared pan. Gently lay a sheet of plastic wrap over the dough and allow to proof at room temperature for 1 to 1 1/2 hours, or until the dough has doubled in size and when you gently press with your finger, the imprint remains.
    Fry Doughnuts!
  1. Fill a Dutch oven or heavy stockpot with 3 inches of canola oil. Fit with your candy thermometer and heat oil to 350°F/177°C. Set a cooling rack over a baking sheet and pour your sugar or vanilla sugar into a wide, shallow bowl—ready for dipping! Gently lower 2 to 4 doughnuts (depending on how large your pot is—the doughnuts should be able to float freely) into the oil and fry for 30 seconds, without moving them. Flip doughnuts over with tongs, a spoon, or chopsticks and fry for 45 seconds. Flip back over once more and fry another 45 seconds, or until they are golden brown. Adjust the heat as needed throughout frying to maintain the temperature. Transfer the doughnuts to the prepared rack to cool while you start the second batch. While the second batch is frying, toss the first batch in the sugar to coat on all sides, and transfer to a serving platter. Repeat with remaining batches.
  2. The doughnuts are best enjoyed the day they are fried—heavenly eaten fresh, fresh, fresh! They do last another day or two in a covered container but their texture will be much more dense and the sugar coating will moisten.

Notes

Recipe by Thomas Keller from the Bouchon Bakery cookbook, process adapted slightly.

6.1.0
https://www.butterlovescompany.com/2016/08/11/brioche-doughnut-recipe/
butter loves company | jenna larsson

brioche-doughnut-recipe-2

Filed Under: breakfast and breads, desserts and sweets, eat Tagged With: breakfast, breakfast bread, brioche, donuts, doughnuts

pan aux raisins

July 14, 2015 by Butter Loves Company

pan-aux-raisins-6

As part of my ongoing quest to become a Parisian woman (Happy Bastille Day!), I am teaching myself to make every traditional French pastry that I’m introduced to. This Pan aux Raisin is the next step in this journey of mine (see you soon almond croissant and kouign amann). Inspired by those sold at Flour Bakery and Cafe in Boston, these ‘tres chic’ brioche swirls are filled with pastry cream and plump golden raisins.

Bread with raisins? Total snooze-fest, right? I get it. I would’ve said the same thing before I made them but now I understand why they are Flour founder, Joanne Chang’s favorite pastry. They are a perfect subtly sweet, creamy, and doughy treat even for raisin haters (just go light-handed on the raisins or skip completely—they’ll still be good, I promise).

The basic brioche recipe here yields enough for two batches of Pan aux Raisins or you can freeze half the dough and save it to make plain brioche buns in a pinch. For ease and sanity, I suggest you prepare the brioche and the pastry cream the night before you’d like to enjoy the completed Pan aux Raisins. This will allow the brioche to proof in the refrigerator overnight and will also give the pastry cream time to cool and come to its thick, creamy, pudding-like texture. On the morning of baking, all of your components will be ready so all you’ll have to do is assemble, let rise for an hour or two, and then bake!

pan-aux-raisins-2

pan-aux-raisins-4

pan-aux-raisins-7

Pain aux Raisins
Recipe from Flour: Spectacular Recipes from Boston’s Flour Bakery + Cafe

prep time: 1 hour (plus overnight for proofing of dough/cooling of pastry cream
cook time: 30–40 minutes
total time: 12–14 hours (includes proofing time)
makes 10–12 pastries

Basic Brioche Dough (makes 2 loaves)

Ingredients:

2 1/4 cups (315g) all-purpose flour
2 1/4 cups (340g) bread flour
1 1/2 packages (3 1/4 tsps) active dry yeast
1/3 cup plus 1 tbsp (82g) sugar
1 tablespoon salt
1/2 cup (120g) cold water
5 large eggs
1 cup plus 6 tablespoons (310g) unsalted butter, at room temperature, cut into 10 to 12 pieces

Instructions:

  1. In a stand mixer fitted with the dough hook, combine the all-purpose flour, bread flour, yeast, sugar, salt, water, and the eggs. Beat on low speed for 3 to 4 minutes, or until all of the ingredients have come together and all the flour is incorporated into the wet ingredients. Once the dough has come together, beat on low speed for another 3 to 4 minutes.  The dough will be very stiff and seem quite dry.
  2. With the mixer on low speed, add the butter, one piece at a time, mixing after each addition until it disappears into the dough. Once you have added all the butter, continue mixing on low speed for about 10 minutes, stopping the mixer occasionally to scrape the sides and bottom of the bowl to make sure all of the butter is mixed in very thoroughly.
  3. Once the butter is completely incorporated, turn up the speed to medium and beat for another 15 minutes, or until the dough becomes sticky, soft, and somewhat shiny. It will take some time to come together. Once it has, turn the speed to medium-high and beat for about 1 minute.  You should hear the dough make a ‘slap-slap-slap’ sound as it hits the sides of the bowl. You can test the dough by pulling at it. It should stretch a bit and have a little give. If it seems wet and loose and moves more like a batter than a dough, add a few tablespoons of flour and mix until it comes together. If it breaks off into pieces when you pull at it, continue to mix on medium speed for another 2 to 3 minutes, or until it develops more strength and stretches when you grab it. It is ready when you gather it all together and pick it up in one piece.
  4. Place the dough in a large bowl or plastic container and cover it with plastic wrap, pressing the wrap directly onto the surface of the dough. Let the dough proof in the refrigerator for at least 6 hours or up to overnight. At this point, you can freeze all or half the dough in an airtight container for up to 1 week.

Pastry Cream (makes about 2 cups)

Ingredients:

1 1/4 cups (300g) whole milk
1/2 cup (100g) sugar
1/4 cup (30g) cake flour (if you don’t have it, here is a tutorial on how to make cake flour out of all-purpose flour at home)
1/2 teaspoon salt
4 large egg yolks
1 teaspoon vanilla extract

Instructions:

  1. In a medium saucepan, scald the milk over medium-high heat (bubbles start to form around the edge of the pan, but the milk is not boiling). While the milk is heating, in a small bowl, stir together the sugar, flour and salt. (Mixing the flour with the sugar will prevent the flour from clumping when you add it to the egg yolks.)  In a medium bowl, whisk the egg yolks until blended and then slowly whisk in the flour mixture (it will be pasty).
  2. Remove the milk from the heat and slowly add it to the egg-flour mixture, a little at a time, whisking constantly (you want to make sure that you only add a little at a time so the hot milk doesn’t cook the eggs in the mixture). When all of the milk has been incorporated, return the contents of the bowl to the saucepan and place over medium heat. Whisk continuously and vigorously for about 3 minutes, or until the mixture thickens and comes to a boil. At first, the mixture will be very frothy and thin; as it cooks longer, it will slowly start to thicken until the frothy bubbles disappear and it becomes more viscous. Once it thickens, stop whisking every few seconds to see if the mixture has come to a boil. If it has not, keep whisking vigorously. As soon as you see it bubbling, immediately go back to whisking for just 10 seconds, and then remove the pan from the heat. Boiling the mixture will thicken it and cook out the flour taste but if you let it boil for longer than 10 seconds, the mixture can become grainy.
  3. Pour the mixture through a fine-mesh sieve into a small heat-proof bowl. Stir in the vanilla, then cover with plastic wrap, placing it directly on the surface of the cream. This will prevent a skin from forming (Kind of like pudding!). Refrigerate for at least 4 hours, or until cold, or up to 3 days.

Pain aux Raisins

Ingredients:

1/2 recipe Basic Brioche dough
1 recipe pastry cream
1 cup (160g) golden raisins
1 cup (140g) confectioners’ sugar
2 to 3 tablespoons water
1/4 teaspoons vanilla extract

Instructions:

  1. Line a baking sheet with parchment paper.
  2. On a floured work surface, roll out the dough into a rectangle about 16 by 12 inches and 1/4 inch thick. It will have the consistency of cold, damp Play-Doh and should be fairly easy to roll. Position the rectangle so a long side is facing you.  Spread the pastry cream evenly over the entire surface of the dough and then sprinkle the raisins evenly over the cream.  Starting from the long side farthest from you and working your way down, roll up the rectangle like a jelly roll.  Try to roll tightly, so you have a nice round spiral. You can even-off the ends by trimming about 1/4 inch from either side.
  3. Use a sharp, serrated knife to cut the roll into 8–10 equal pieces, each about 1 1/2 inches wide.
  4. Place the pieces, cut-sides down, evenly on the prepared baking sheet. Cover the baking sheet lightly with plastic wrap and place in a warm spot to proof for 2 hours, or until the dough is puffy, pillowy and soft.
  5. Position a rack in the center of the oven, and heat the oven to 350°
  6. Bake the pastries for 30 to 40 minutes, or until they are golden brown on the edges of the spiral and pale brown in the center.  Let cool on the baking sheet on a wire rack for 20 to 30 minutes.
  7. While the pastries are still hot, prepare the glaze. In a small bowl, whisk together the sugar, 2 tablespoons of the water, and vanilla until smooth. Add more water as needed to thin the glaze enough to make it spreadable. Generously brush the tops of the still-warm pastries with the glaze. The pastries are best served warm or within 4 hours of baking. They can be stored in an airtight container at room temperature for up to 1 day, and then warmed in a 300°F oven for 5 minutes before serving.

pan-aux-raisins-5

Filed Under: breakfast and breads, eat Tagged With: bastille day, brioche, flour bakery, french pastries, joanne chang, pan aux raisins

Welcome!

jenna of butterlovescompany

Pull up a chair

Hi! I’m Jenna. Story seeker, food lover, recipe developer based in NYC. Firm believer in making every day delicious! Read more…

looking for something?

  • Email
  • Facebook
  • Instagram
  • Pinterest
  • RSS
  • Twitter

Latest Posts

  • Freezer Meals to Make Before Baby: How We Meal Prepped Before Baby
  • mom’s famous spiced pecans
  • funfetti cookie dough truffles (no-bake)
  • maple coconut cookies
  • snickerdoodle blondies

popular now

strawberry cinnamon rolls
braised short rib pasta sauce (short rib ragu)
rosemary honey buttermilk biscuits
peach blueberry pie
chocolate marble loaf cake
bourbon banana bread

grammin’

Let’s get ready to bake throughout the holidays! Let’s get ready to bake throughout the holidays! I’ve teamed up with @lucky_leaf_fruit_filling, @diamondnuts and #Kids360 to give away some delicious baking ingredients to make your spirits bright this season. 

To enter:
-Follow @lucky_leaf_fruit_filling, @diamondnuts and @butterlovescompany
-Comment and tag a friend and the name of your favorite holiday dessert
-Enter by December 1. Winner will be selected at random and DM’d! 

You’ll win: 
•(1) Can of Lucky Leaf Premium Blueberry Filling
•(1) Can of Lucky Leaf Premium Apple Filling
•(1) Can of Lucky Leaf Premium Cherry Filling
•(1) Can of Lucky Leaf Premium Strawberry Filling
•(1) Can of Lucky Leaf Premium Peach Filling
•(1) Recipe Book
•(2) Dish Towels
•(1) Pot-Holder
•(1) Picnic Basket

#ad NO PURCHASE NECESSARY. Open to legal residents of the United States (including its commonwealths, territories, and possessions) who are legal age of majority. Enter by 11:59 pm ET on December 1, 2021. Odds of winning depend on # of entries received. Void where prohibited. This is not sponsored or endorsed by Instagram or Facebook.
This was the best photo we could get with an alway This was the best photo we could get with an always moving toddler. 🥸 Happy Thanksgiving to you and yours! ♥️
Something that the past year or so has taught me: Something that the past year or so has taught me: stock your pantry! Having a stocked kitchen has made it super easy to cook and bake without having to run out to the store. Crucial when you get a craving for an Apple Walnut Cake and need to make one stat. With @lucky_leaf_fruit_filling and @diamondnuts, you can put together a delicious cake SO easily with no peeling and slicing of apples. 🍎🌰You get all the beautiful warm spice flavor with sweet, tart apples, and crunchy, hearty walnuts. #ad Get the recipe below: 

Apple Walnut Cake

* 1 box (15.25 oz.) spice cake mix
* 1 can (21 oz.) Lucky Leaf® Premium Apple Fruit Filling
* 2 large eggs
* 1 tbsp. pure vanilla extract
* 1/4 cup whole milk
* 1/4 cup brown sugar
* 1 tsp. ground cinnamon
* 1/2 cup finely chopped Diamond of California® Shelled Walnuts
* 1 container (8 oz.) whipped topping, thawed

Instructions
1. Preheat oven to 350° F and grease 9x13-inch pan. 
2. Combine dry cake mix, apple filling, eggs, vanilla & milk in large bowl. Beat for 2 minutes. Spread half of the batter in the pan. 
3. Make the Walnut Cinnamon filling: Combine brown sugar, cinnamon and walnuts. Sprinkle half the mixture on top of batter. Top with remaining batter and then sprinkle remaining walnut mixture on top.
4. Bake cake for 28-33 minutes. Cool cake. Top with whipped topping and sprinkle with walnut pieces.

Don’t miss my upcoming chance to W I N with #kids360, Diamond and Lucky Leaf!
Spiced pecans, wedding cookies, chocolate turtles, Spiced pecans, wedding cookies, chocolate turtles, pecan pie, sticky buns…just a few of the treats on my standard holiday baking agenda. What do they have in common? NUTS! @diamondnuts are a staple around here for the holidays (and all year, let’s be honest) and I want to share the love. Thanks to Diamond and #kids360, we are giving someone ✨15 FREE product coupons for @diamondnuts ✨to help you bake your holiday treats this year. Go nuts!

To enter:
* Follow @diamondnuts and @butterlovescompany
* Comment and tag a friend who deserves a day off to go nuts! 
* Enter by end of day November 25th. Winner will be selected at random and DM’d! 

#ad NO PURCHASE NECESSARY. Open to legal residents of the United States (including its commonwealths, territories, and possessions) who are the legal age of majority. Enter by 11:59 pm ET on November 25, 2021. Odds of winning depend on # of entries received. Void where prohibited. This is not sponsored or endorsed by Instagram or Facebook.
No gimmicks, no “just for the ‘gram” razzle No gimmicks, no “just for the ‘gram” razzle dazzle here. Just really good chocolate chip cookies.🍪
Fun fact: Layered Magic Cookie Bars were one of th Fun fact: Layered Magic Cookie Bars were one of the first things I ever baked. Making them again with @diamondnuts makes me super nostalgic. Brought me directly back to middle school. Watch out or you may find me in butterfly clips doodling I <3 SOS on my binder soon. There is a reason this recipe is awesome: first, the cookie bars are incredibly delicious. And, second, they are SO easy to put together. Honestly, they are the PERFECT treat to make with your kids. Pecans and walnuts give the bars the best crunch, nuttiness, and heartiness. You could totally customize if there is a certain kind of jam you love, or a combination of nuts that the family loves. #ad Get the recipe below: 

Seven Layer Magic Cookie Bars

* 1/2 cup (1 stick) butter, melted
* 2 cups graham cracker crumbs
* 1 cup raspberry jam
* 1 cup shredded coconut
* 1 cup Diamond of California® walnuts
* 1 cup Diamond of California® pecans
* 1 cup semi-sweet or bittersweet chocolate chips
* 1 (14-ounce) can sweetened condensed milk

Instructions
1. Preheat oven to 350°F. To toast walnuts and pecans, spread evenly on a baking sheet or in a shallow pan. Bake, stirring once or twice, until lightly browned and fragrant, 7 to 10 minutes. Line a 9×13-inch pan with parchment paper.
2. In a medium bowl, combine the melted butter and graham cracker crumbs; mix well. Transfer the crumbs to the prepared pan and using your finger tips, or the flat bottom of a small measuring cup, press firmly and evenly on the bottom of the pan. Spread the raspberry jam evenly over the crumbs. Sprinkle coconut in an even layer over the jam, followed by the chocolate chips, walnuts and pecans. Drizzle the condensed milk evenly over the top.
3. Bake until bubbling and golden brown, 30-35 minutes. Let cool completely in the pan. If lined with parchment, lift out and place on a cutting board. With a sharp knife, cut into bars.

Look out for an upcoming chance to ✨ w i n ✨with @diamondnuts and #kids360!
Raise your hand if you could use a cup of coffee. Raise your hand if you could use a cup of coffee. 🙋 We are giving away some @timhortonsus coffee goodies so you can get your cozy cool morning on with Canada’s favorite cup of joe. Make my Pumpkin Coffee Coffee Cake for a buzzy morning snack or just brew a strong cup for a little pep in your step (as tired parents over here, we could surely use it). 🍂

To enter:
● Follow @butterlovescompany and @timhortonsus
● Comment and tag a friend you would love to grab coffee with ☕ (each comment=1 entry)
● Enter by midnight November 18. Winner will be selected at random and DM’d!
 
You’ll win:
•(1) Colombian Ground Coffee
•(1) Dark Roast Ground Coffee
•(1) Decaf Ground Coffee
•(1) Whole Bean Original Blend Coffee
•(1) Keurig Variety 30-Pack
•(1) Mug
•(1) Branded Notebook
•(1) Branded Baseball Cap
 
 
ad #timhortons #kids360 NO PURCHASE NECESSARY. Open to legal residents of the United States (including its commonwealths, territories, and possessions) who are legal age of majority. Enter by 11:59 pm ET on November  18, 2021. Odds of winning depend on # of entries received. Void where prohibited. This is not sponsored or endorsed by Instagram or Facebook.
Can’t beat a classic. 🥧 Apple streusel pie fo Can’t beat a classic. 🥧 Apple streusel pie for yesterday’s friendsgiving.🥰 Grateful for time with friends enjoying great food. Remy had so much fun playing that he slept until 7am so we are hopefully out of the 4am daylight savings nightmare (knock on wood). 

Sunday includes a farmers market bop, movies, and cooking for the week. Wouldn’t change a thing. 🥳
Cannot. Get. Enough. Fall. Baking. Who’s with me Cannot. Get. Enough. Fall. Baking. Who’s with me? 🍁  This coffee cake packs a punch because it is made with @timhortonsus brewed coffee in the batter and the glaze. A true *coffee* cake. The texture is dreamy and the coffee is perfectly balanced and smooth. It is goood. #ad Get the recipe below:
 
Pumpkin Coffee Coffee Cake
 
Topping
● 2/3 cup granulated sugar
● pinch of salt
● 2/3 cup flour
● 1 teaspoon cinnamon
● 4 tablespoons butter, melted

Filling
● 1/3 cup brown sugar, packed
● 1 teaspoon cinnamon
● 1 teaspoon unsweetened cocoa powder, optional

Cake
● 1/3 cup vegetable oil
● 2 large eggs, at room temperature
● 1 cup granulated sugar
● 1 cup pumpkin purée
● 1 teaspoon pumpkin pie spice
● 1 teaspoon salt
● 1 teaspoon baking powder
● 1/2 cup brewed @timhortonsus Coffee
● 2 cups flour

Glaze
● 1 cup powdered sugar
● 2 tablespoons brewed @timhortonsus coffee
 
Instructions
1. Preheat the oven to 350°F and grease an 8 inch square pan and line with parchment.
2. Make topping: Stir together the sugar, salt, flour, cinnamon, and melted butter until combined into pea sized lumps. Stirring just until well combined. Set aside.
3. Make filling: Mix together the brown sugar, spice, and cocoa powder. Set it aside.
4. Make cake: Beat together the oil, eggs, sugar, pumpkin, pie spice, salt, and baking powder until smooth. Add the brewed coffee followed by the flour, alternating in two additions, and stir until combined.
5. Spread half the batter into the prepared pan. Sprinkle the filling evenly on top of the batter. Top with the remaining batter. Sprinkle the topping over the batter in the pan.
6. Bake until a toothpick inserted into the center comes out clean, about 40 to 45 minutes. Let cool.
7. Make glaze: Combine the powdered sugar and brewed coffee until smooth and thick but drizzle-able. Using a fork, drizzle it over the cake.

Don’t miss our upcoming chance to ⚡️W I N⚡️ thanks to @timhortonsus and #Kids360!

#timhortons #kids360fanclub
One of the hardest parts about being a working mom One of the hardest parts about being a working mom is how little time you get to spend with your sweet bean during the week. Between wake up and getting to daycare, to pickup and bedtime it’s often an hour at best (which is also filled with making dinner, bath time, etc). I soak up ALL the minutes and the weekends are an absolute snuggle and play fest. It’s so tough though! If you are in the same boat, know that you aren’t alone and you’re doing a good job!! ♥️

This photo has nothing to do with this but I made the cookies for our neighbors and regretting not keeping one for myself right now. 😬🤣
✨W I N !✨ I’ve teamed up with @nielsenmassey ✨W I N !✨ I’ve teamed up with @nielsenmassey and #Kids360 to give away some seriously amazing ingredients to make your desserts sing. 🎶 I love their products and have been using them for years—the vanilla is 💯!!
 
To enter:
● Follow @nielsenmassey and @butterlovescompany 
● Comment and tag a friend you’d love to bake with
● Enter by Thursday November 11th. Winner will be selected at random and DM’d!
 
You’ll win:
•(1) Madagascar Bourbon Pure Vanilla Powder
•(1) Madagascar Bourbon Pure Vanilla Sugar
•(1) Ugandan Pure Vanilla Extract
•(1) Pure Coffee Extract
•(1) Pure Peppermint Extract
•(1) Rose Water
•(1) Pure Lemon Extract
•(1) Tahitian Two Vanilla Beans
•(1) Tahitian Pure Vanilla Extract
•(1) Mexican Two Vanilla Beans
•(1) Mexican Pure Vanilla Extract
•(1) Madagascar Bourbon Two Vanilla Beans
•(1) Madagascar Bourbon Pure Vanilla Extract
•(1) Madagascar Bourbon Pure Vanilla Bean Paste
•(1) Orange Blossom Water
•(1) Pure Orange Extract
•(1) Pure Almond Extract
•(1) Pure Chocolate Extract
.
#ad NO PURCHASE NECESSARY. Open to legal residents of the United States (including its commonwealths, territories, and possessions) who are legal age of majority. Enter by 11:59 pm ET on November  11, 2021. Odds of winning depend on # of entries received. Void where prohibited. This giveaway is not sponsored or endorsed by Instagram or Facebook.
Brainstorming dessert recipes for Thanksgiving and Brainstorming dessert recipes for Thanksgiving and it’s hard not to think about this Black Forest Pie. 🍒🍫 It was such an indulgent tart-sweet chocolate-y treat. It has a chocolate all butter pie crust, a layer of dark chocolate ganache, a layer of chocolate pudding, a cherry topping, and whipped cream. Oh, and a cherry on top! Recipe is from @emcdowell #thebookonpie! 

This one *might* be too rich for the menu but there WILL be pie (duh)🥧. What kind of pie do you need to have on your Thanksgiving table?
This error message is only visible to WordPress admins
Hi! I'm Jenna, founder of butter loves company. From holidays to Tuesdays, let's find a way to make every meal special.
  • Email
  • Facebook
  • Instagram
  • Pinterest
  • RSS
  • Twitter
a2f54ba1dcf0635e58c8be4aa2035ce84863a9d9606a428ab3

© 2013-2019 BUTTER LOVES COMPANY, LLC.

Copyright © 2025 · Foodie Pro Theme by Shay Bocks · Built on the Genesis Framework · Powered by WordPress