butter loves company

new york food blogger and lifestyle influencer

  • home
  • Recipes
  • travel
  • lifestyle
  • cookie orders
  • about
  • contact

spinach macadamia pesto

January 6, 2017 by Butter Loves Company

spinach pesto - butter loves company

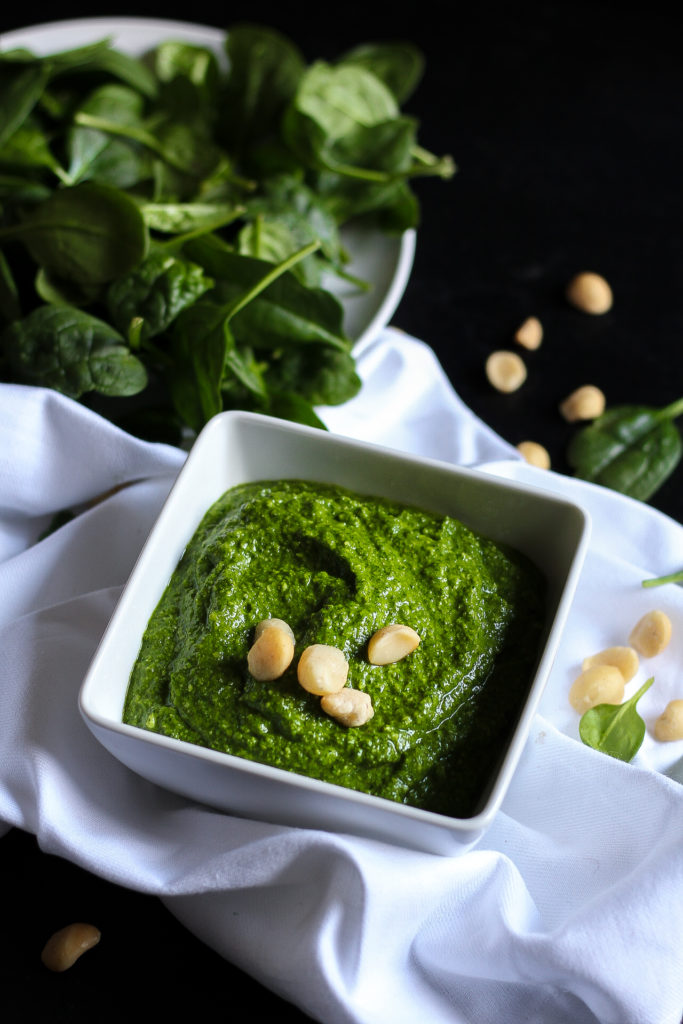
As we jot down our New Year’s resolutions and push the leftover holiday cookies and chocolate trees aside—not too far aside, of course—let’s take a moment to welcome this healthy, vibrant green spinach pesto to our January tables.

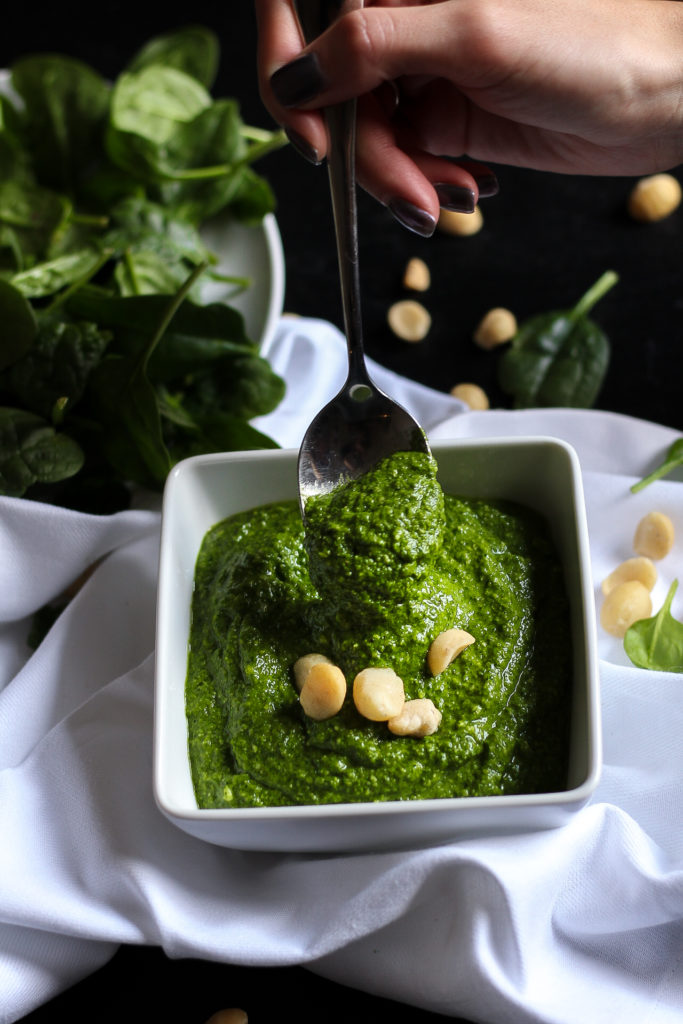
This spinach macadamia pesto is an extremely versatile sauce, perfect for tossing with pasta, drizzling on salads, spreading on sandwiches, swirling into soup—you name it. Super Greg and I chose to serve it with lemon ricotta raviolis (will be sharing that recipe with you soon).

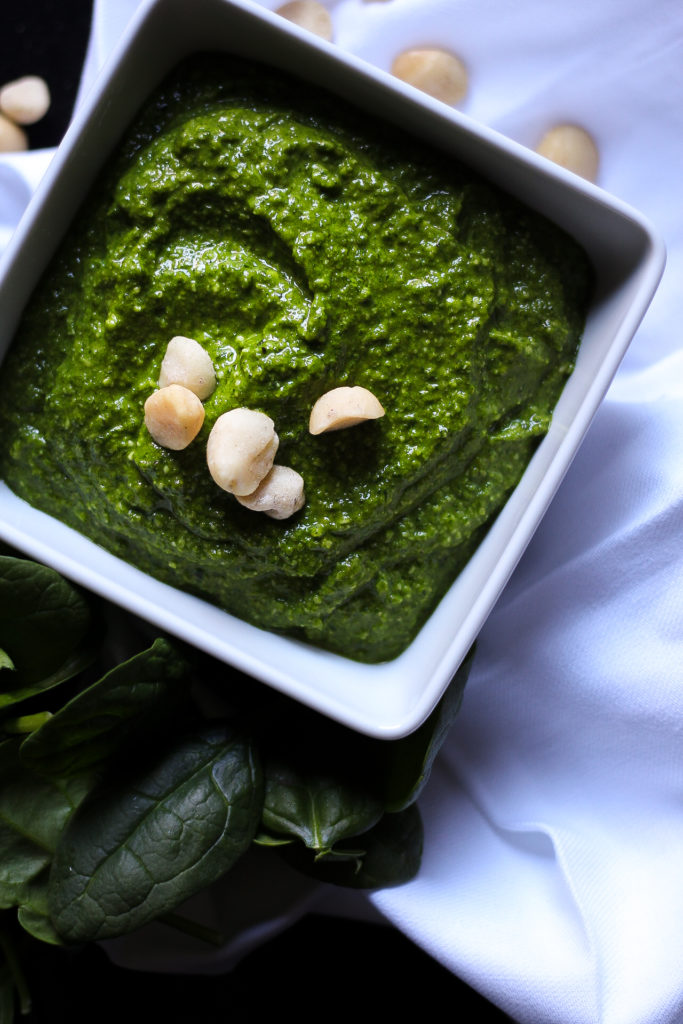
This pesto packs the bright flavor of basil, but with the herb out of its peak summer season, we’re punching it up with earthy, leafy spinach. We’re also swapping in crunchy macadamias for pesto’s traditional pine nut. This swap was born out of having extra macadamia nuts in my freezer (after making these), but is a move we’d certainly repeat.

If pesto is met with as much excitement in your house as it is mine, feel free to add this recipe to your resolutions list: it’ll be an easy one to check off!

spinach pesto - butter loves company

spinach pesto - butter loves company

Filed Under: condiments, bases and sauces, eat, sides, soups and salads Tagged With: basil, healthy, macadamia, nuts, pesto, spinach

perfect white chocolate macadamia cookies

September 15, 2016 by Butter Loves Company

white chocolate macadamia cookies

Nestled into a tiny nook in the corner of the kitchen of my parents’ house sits a shoddy convection oven. Place a piece of bread inside (potato sandwich bread to be specific), twist the knob to high, and an hour later you may return to find a faintly golden browned toast. And that’s if you’re lucky. Atop the dud electronic, sits a package of cookies. While they are most definitely from Costco, the residual heat from the oven below warmed them up to a faux homemade fresh-from-the-oven temperature.

white chocolate macadamia cookies

Three types of cookies line up in rows within the container: chocolate chip, oatmeal raisin, and white chocolate macadamia nut. Oooh, those white chocolate macadamia cookies. They are so good. They’re sweet from the milkiness of white chocolate, crunchy and nutty from the thick macadamia nuts, and doughy in the centers—the sign they were under-baked to perfection.

This recipe for white chocolate macadamia cookies brings me right back to my parents’ kitchen, nibbling on Costco cookies “fresh” off the top of the convection oven. Though, these are even better than I remember, as homemade most often seems to be. They have crispy edges and soft chewy centers. Buttery and sweet with an even spread from a pre-bake chill. I think it is the addition of a dash of almond extract that makes them reminiscent of birthday cake batter too (Skillet cookie birthday cake, anyone?).

white chocolate macadamia cookies

This makes a big batch of white chocolate macadamia cookies, nearly three-dozen 2 1/2-inch cookies. You could save half the dough in the freezer for a future craving if you’re so inclined. Mix up a batch and enjoy fresh from the oven, warmed to perfection, no shoddy convection oven required.

Not a white chocolate fan or craving more cookies? Why not give these triple chocolate cookies a try. Or, my favorite M&M cookies are always a winner.

white chocolate macadamia cookies

white chocolate macadamia cookies

Filed Under: desserts and sweets, eat Tagged With: cookies, macadamia, nuts, white chocolate

chewy homemade granola bars

July 29, 2014 by Butter Loves Company

chewy-homemade-granola-nature-bars-recipe-13

Raise your hand if you’re the sleep in until the last minute, get ready quick, eat a grab-and-go breakfast type. Like the “if I wear that thing that needs no ironing, I can stay in bed for exactly 7 minutes more” type. Or even the “eh, shower schmower…I’ll skip for the extra 10 minutes of rest” type. If you’re hand is up, take that hand and go ahead, hit that snooze button one more time. I’ve got you covered with this homemade granola bars recipe.

Granola bar for you, and you, and you, and you! Granola bar for me, for sure!

These chewy, wholesome, customizable, homemade breakfast bars are dreamy. Not only because they’re a cinch to make and also freeze and store well to save you precious Zs for weeks to come. But also, on top of that, they’re delicious and can be studded with any combination of your favorite nuts, fruits, chocolate chips, seeds, sprinkles or candies!

chewy-homemade-granola-nature-bars-recipe-1

After spending too much money—on my walk to work—on granola bars to satisfy my ‘I-didn’t-have-time-to-eat-breakfast’ appetite—and only half enjoying their taste, no less—I decided I needed to tackle making my own. I was so excited—as I hope you’ll be too—when I realized how easy they were to make and how many different flavor combinations could result from one basic recipe. Think of this more as a guide than a recipe. 

chewy-homemade-granola-nature-bars-recipe-3

As a heads up, these bars do call for butter, but when you think about the amount of butter in the recipe divided across an entire tray, the butter content in one bar is really not that bad. A super-healthy version will come your way soon. Promise.

chewy-homemade-granola-nature-bars-recipe-2

For this batch, I chose to use dried cranberries, golden raisins, lightly chopped walnuts, sunflower seeds, flax seeds and shredded coconut.

chewy-homemade-granola-nature-bars-recipe-4

chewy-homemade-granola-nature-bars-recipe-5

chewy-homemade-granola-nature-bars-recipe-7

chewy-homemade-granola-nature-bars-recipe-8

chewy-homemade-granola-nature-bars-recipe-11

chewy-homemade-granola-nature-bars-recipe-12

chewy-homemade-granola-nature-bars-recipe-9

chewy homemade granola bars
adapted from the smitten kitchen recipe which is adapted from king arthur flour

prep time: 10 minutes
cook time: 35 minutes
total time: 45 minutes (not including cool time after baking)
makes 12 to 16 bars

Ingredients:

1 2/3 cups 1-minute rolled oats (aka instant oats; I used old fashion oats for 1/3 cup of this because I had them on hand and was interested in the texture. Feel free to try that combination or use all instant.)
1/2 to 3/4 cup granulated sugar (less for mild sweetness, more for sweeter bars)
1/3 cup oat flour (or 1/3 cup oats, ground into a powdery texture in a food processor or blender)
1/2 teaspoon salt
1/4 teaspoon ground cinnamon
2 to 3 cups assorted dried fruits, nuts, seeds, chocolate chips, sprinkles or candies (pick any of your favorites until they total 10 to 15 ounces)
1/3 cup peanut butter or another nut butter (optional)
1 tablespoon vanilla extract (optional)
6 tablespoons melted butter
1/4 cup honey or maple syrup
2 tablespoons light corn syrup
1 tablespoon water

Instruction:

  1. Preheat the oven to 350°F. Line an 8″ x 8″ x 2″ baking pan with a piece of parchment paper to cover the bottom and two opposite sides (you are creating “handles” that will help you remove the granola bars later). Lightly grease, with butter or a non-stick spray, the parchment paper and the exposed pan.
  2. In a large bowl, stir together the rolled oats, sugar, oat flour, salt, cinnamon and desired fruits and nuts. Set aside.
  3. In a small bowl, whisk together the vanilla, melted butter, honey or syrup, corn syrup and water. If using peanut butter, toss that in with the wet ingredients now.
  4. Pour the wet ingredients into the bowl with the dry and stir until all of the oats have been coated with the wet ingredients and the mixture starts coming together in chunks. Spread mixture into the prepared pan and press firmly across the top and into all corners and edges. Smooth down the top for a flat, even final product.
  5. Bake the bars for 25 to 35 minutes until they’re brown around the edges and a deep golden color on top. They may seem soft and almost under-baked in the center, but they’ll set completely once fully cooled.
  6. Cool the bars—in the pan—completely on a cooling rack. Once cool, lift the bars out of the pan using the parchment paper “handles” and then double check that they are totally cool in the middle. If yes, use a serrated knife to cut the bars into squares or rectangles—or triangles if you’re so inclined. To store, wrap the bars individually in plastic or stack them in an airtight container and leave at room temperature or in the refrigerator. The bars will seem hard when you take them right out of the fridge, but they come back to their chewy state in about 10 minutes. Remember, they also freeze well.

Filed Under: breakfast and breads, eat Tagged With: breakfast, dried fruit, easy, granola, make ahead, nature bars, nuts, oats, on the go

Welcome!

jenna of butterlovescompany

Pull up a chair

Hi! I’m Jenna. Story seeker, food lover, recipe developer based in NYC. Firm believer in making every day delicious! Read more…

looking for something?

  • Email
  • Facebook
  • Instagram
  • Pinterest
  • RSS
  • Twitter

Latest Posts

  • Freezer Meals to Make Before Baby: How We Meal Prepped Before Baby
  • mom’s famous spiced pecans
  • funfetti cookie dough truffles (no-bake)
  • maple coconut cookies
  • snickerdoodle blondies

popular now

brown butter banana bread, with crumble
crunchy chewy bakery-style sugar cookies
rosemary honey buttermilk biscuits
tourte milanese
pecan sticky bun babka recipe
braised short rib pasta sauce (short rib ragu)

grammin’

Hi! I'm Jenna, founder of butter loves company. From holidays to Tuesdays, let's find a way to make every meal special.
  • Email
  • Facebook
  • Instagram
  • Pinterest
  • RSS
  • Twitter
a2f54ba1dcf0635e58c8be4aa2035ce84863a9d9606a428ab3

© 2013-2019 BUTTER LOVES COMPANY, LLC.

Copyright © 2026 · Foodie Pro Theme by Shay Bocks · Built on the Genesis Framework · Powered by WordPress