butter loves company

new york food blogger and lifestyle influencer

  • home
  • Recipes
  • travel
  • lifestyle
  • cookie orders
  • about
  • contact

goat cheese pumpkin pie

November 28, 2018 by Butter Loves Company

Before you roll your eyes and tell me Thanksgiving is over and that you’ve experienced pumpkin overload (especially if you just made this), hear me out on this pumpkin pie with goat cheese.

goat cheese pumpkin pie

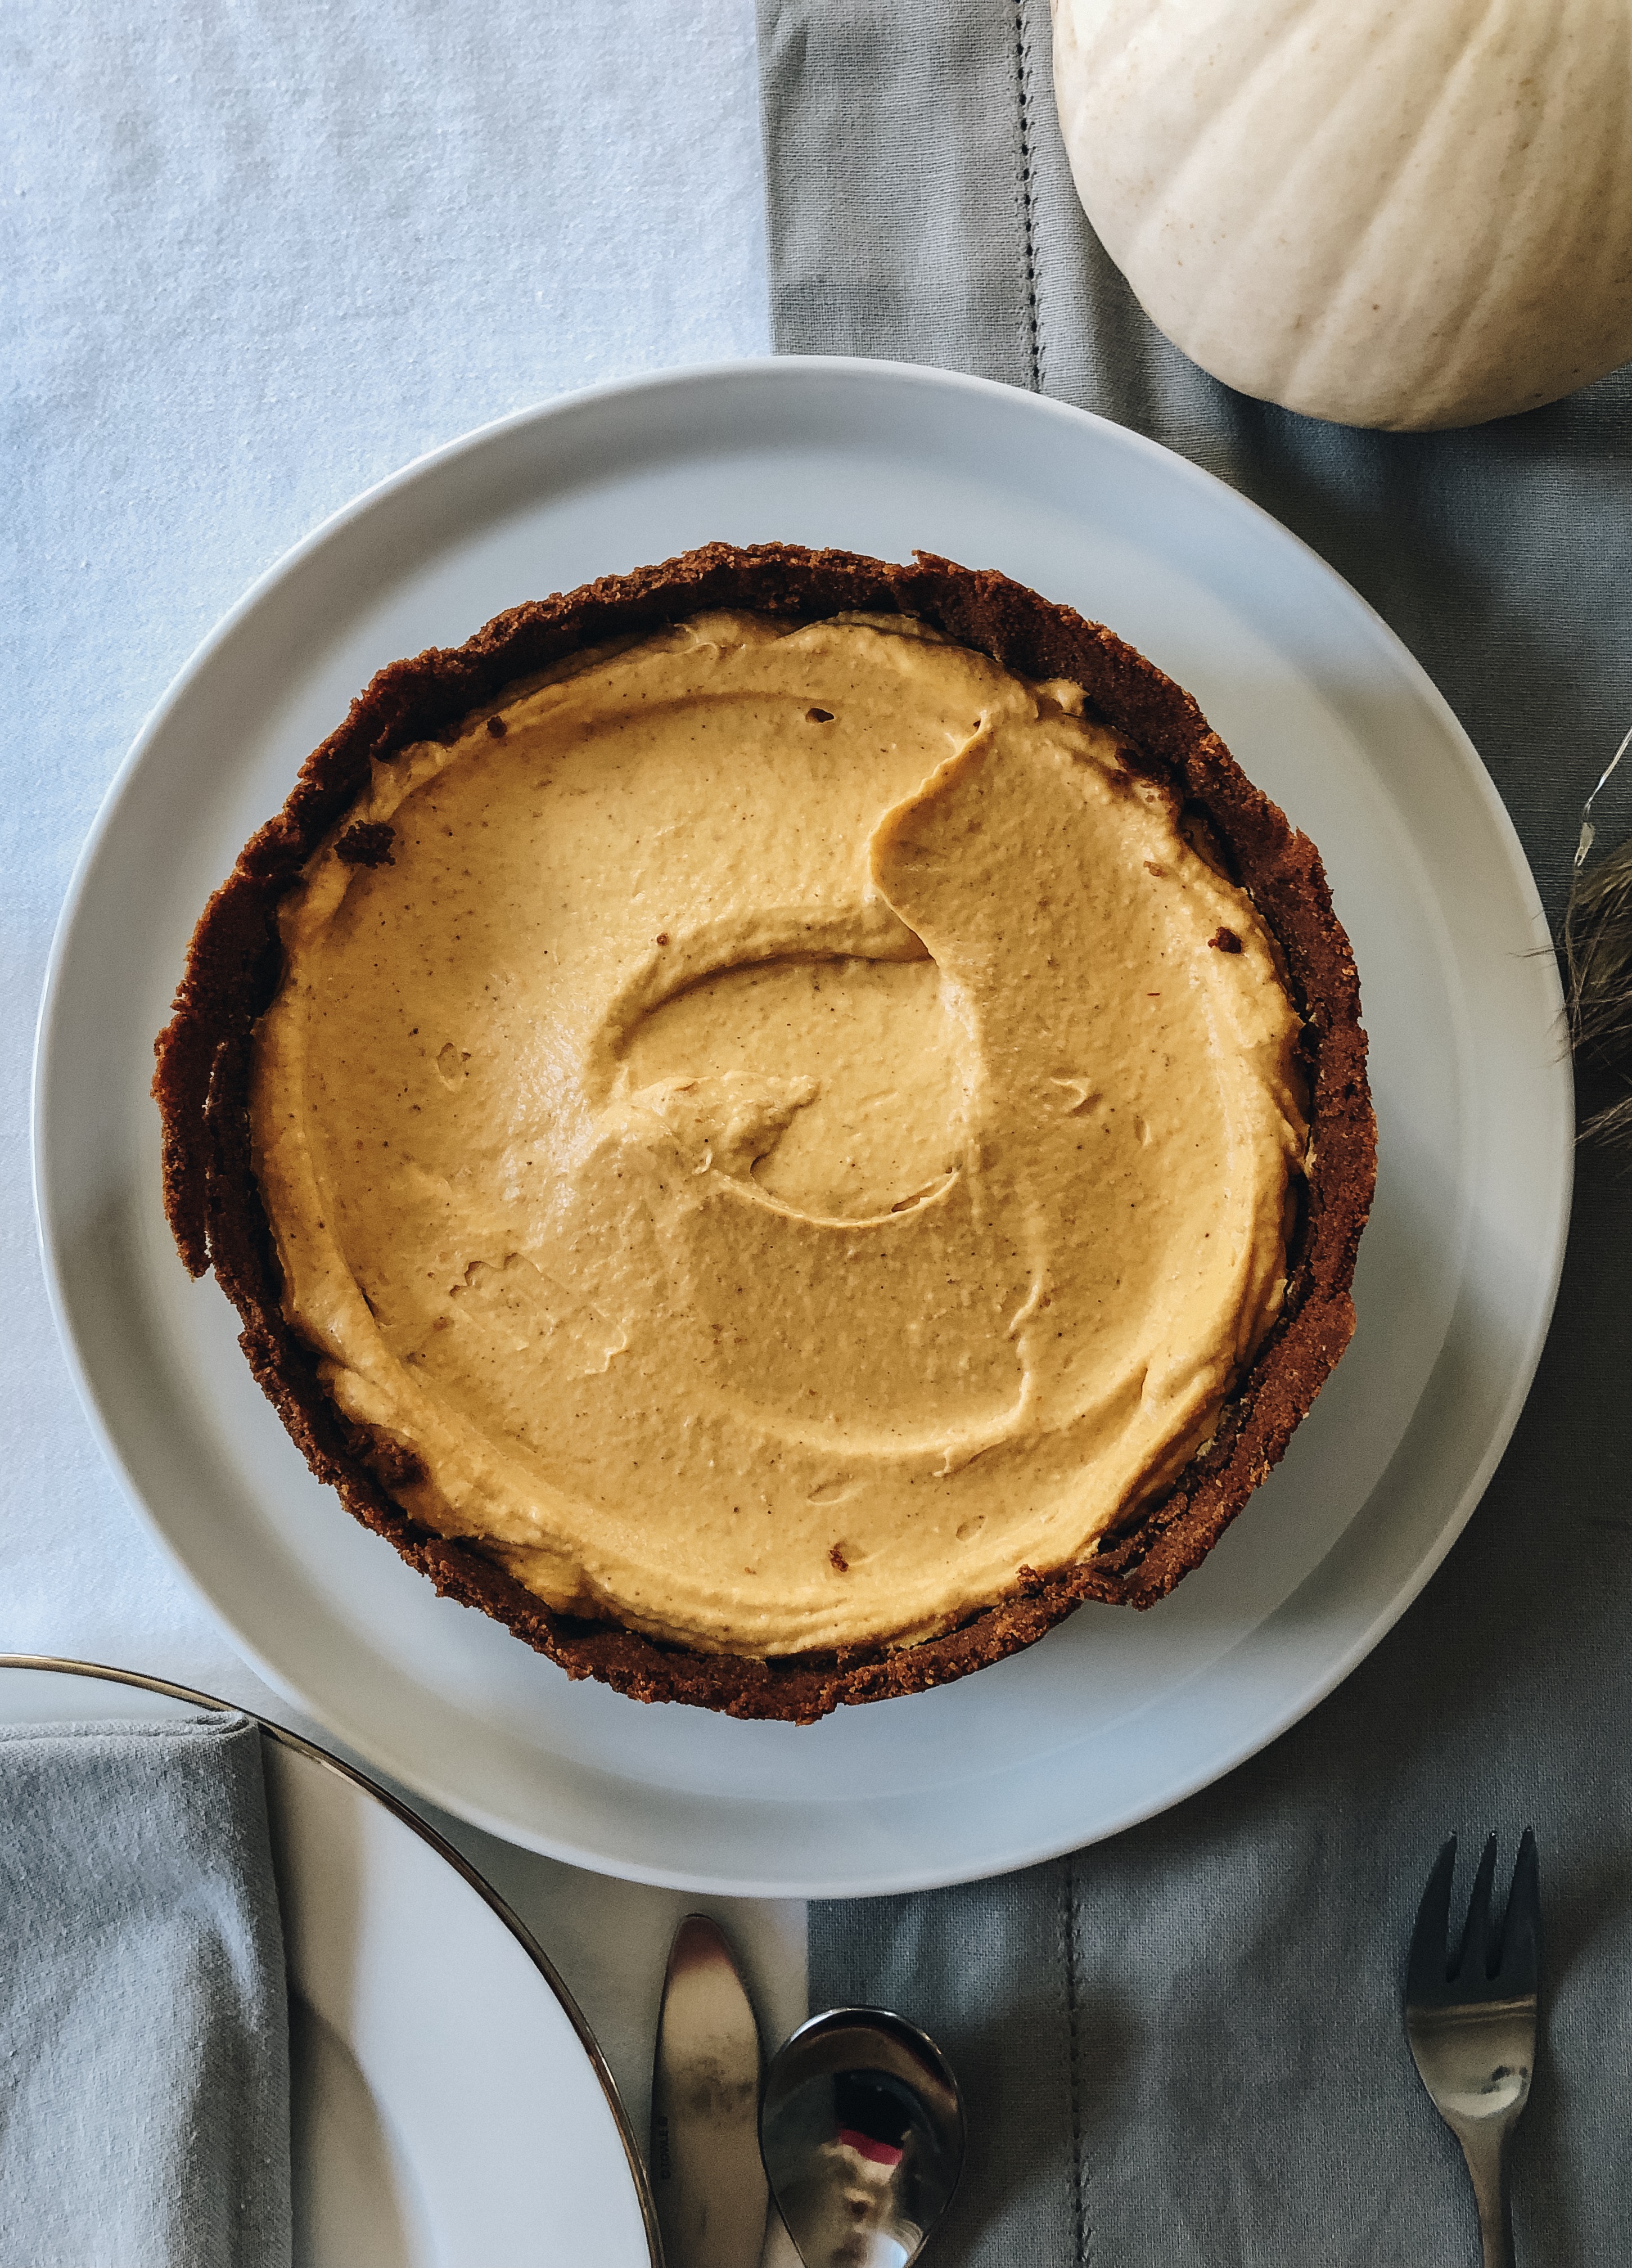
A friend of mine shared this recipe from Munchies with me and it sounded too interesting not to try for a Thanksgiving dessert. This goat cheese pumpkin pie sits in an gingery almond cookie crust that has gone savory with fresh earthy rosemary and the filling, a simple blend (literally blended) of pumpkin puree, cream cheese, and tangy-funky goat cheese, requires no baking at all. Greg, my mom, and my brother Garrett will tell you I was hesitant about making this because of the no-bake-factor, an atypical attribute of a traditional pumpkin pie, but, I’m so glad I gave it a shot.

goat cheese pumpkin pie

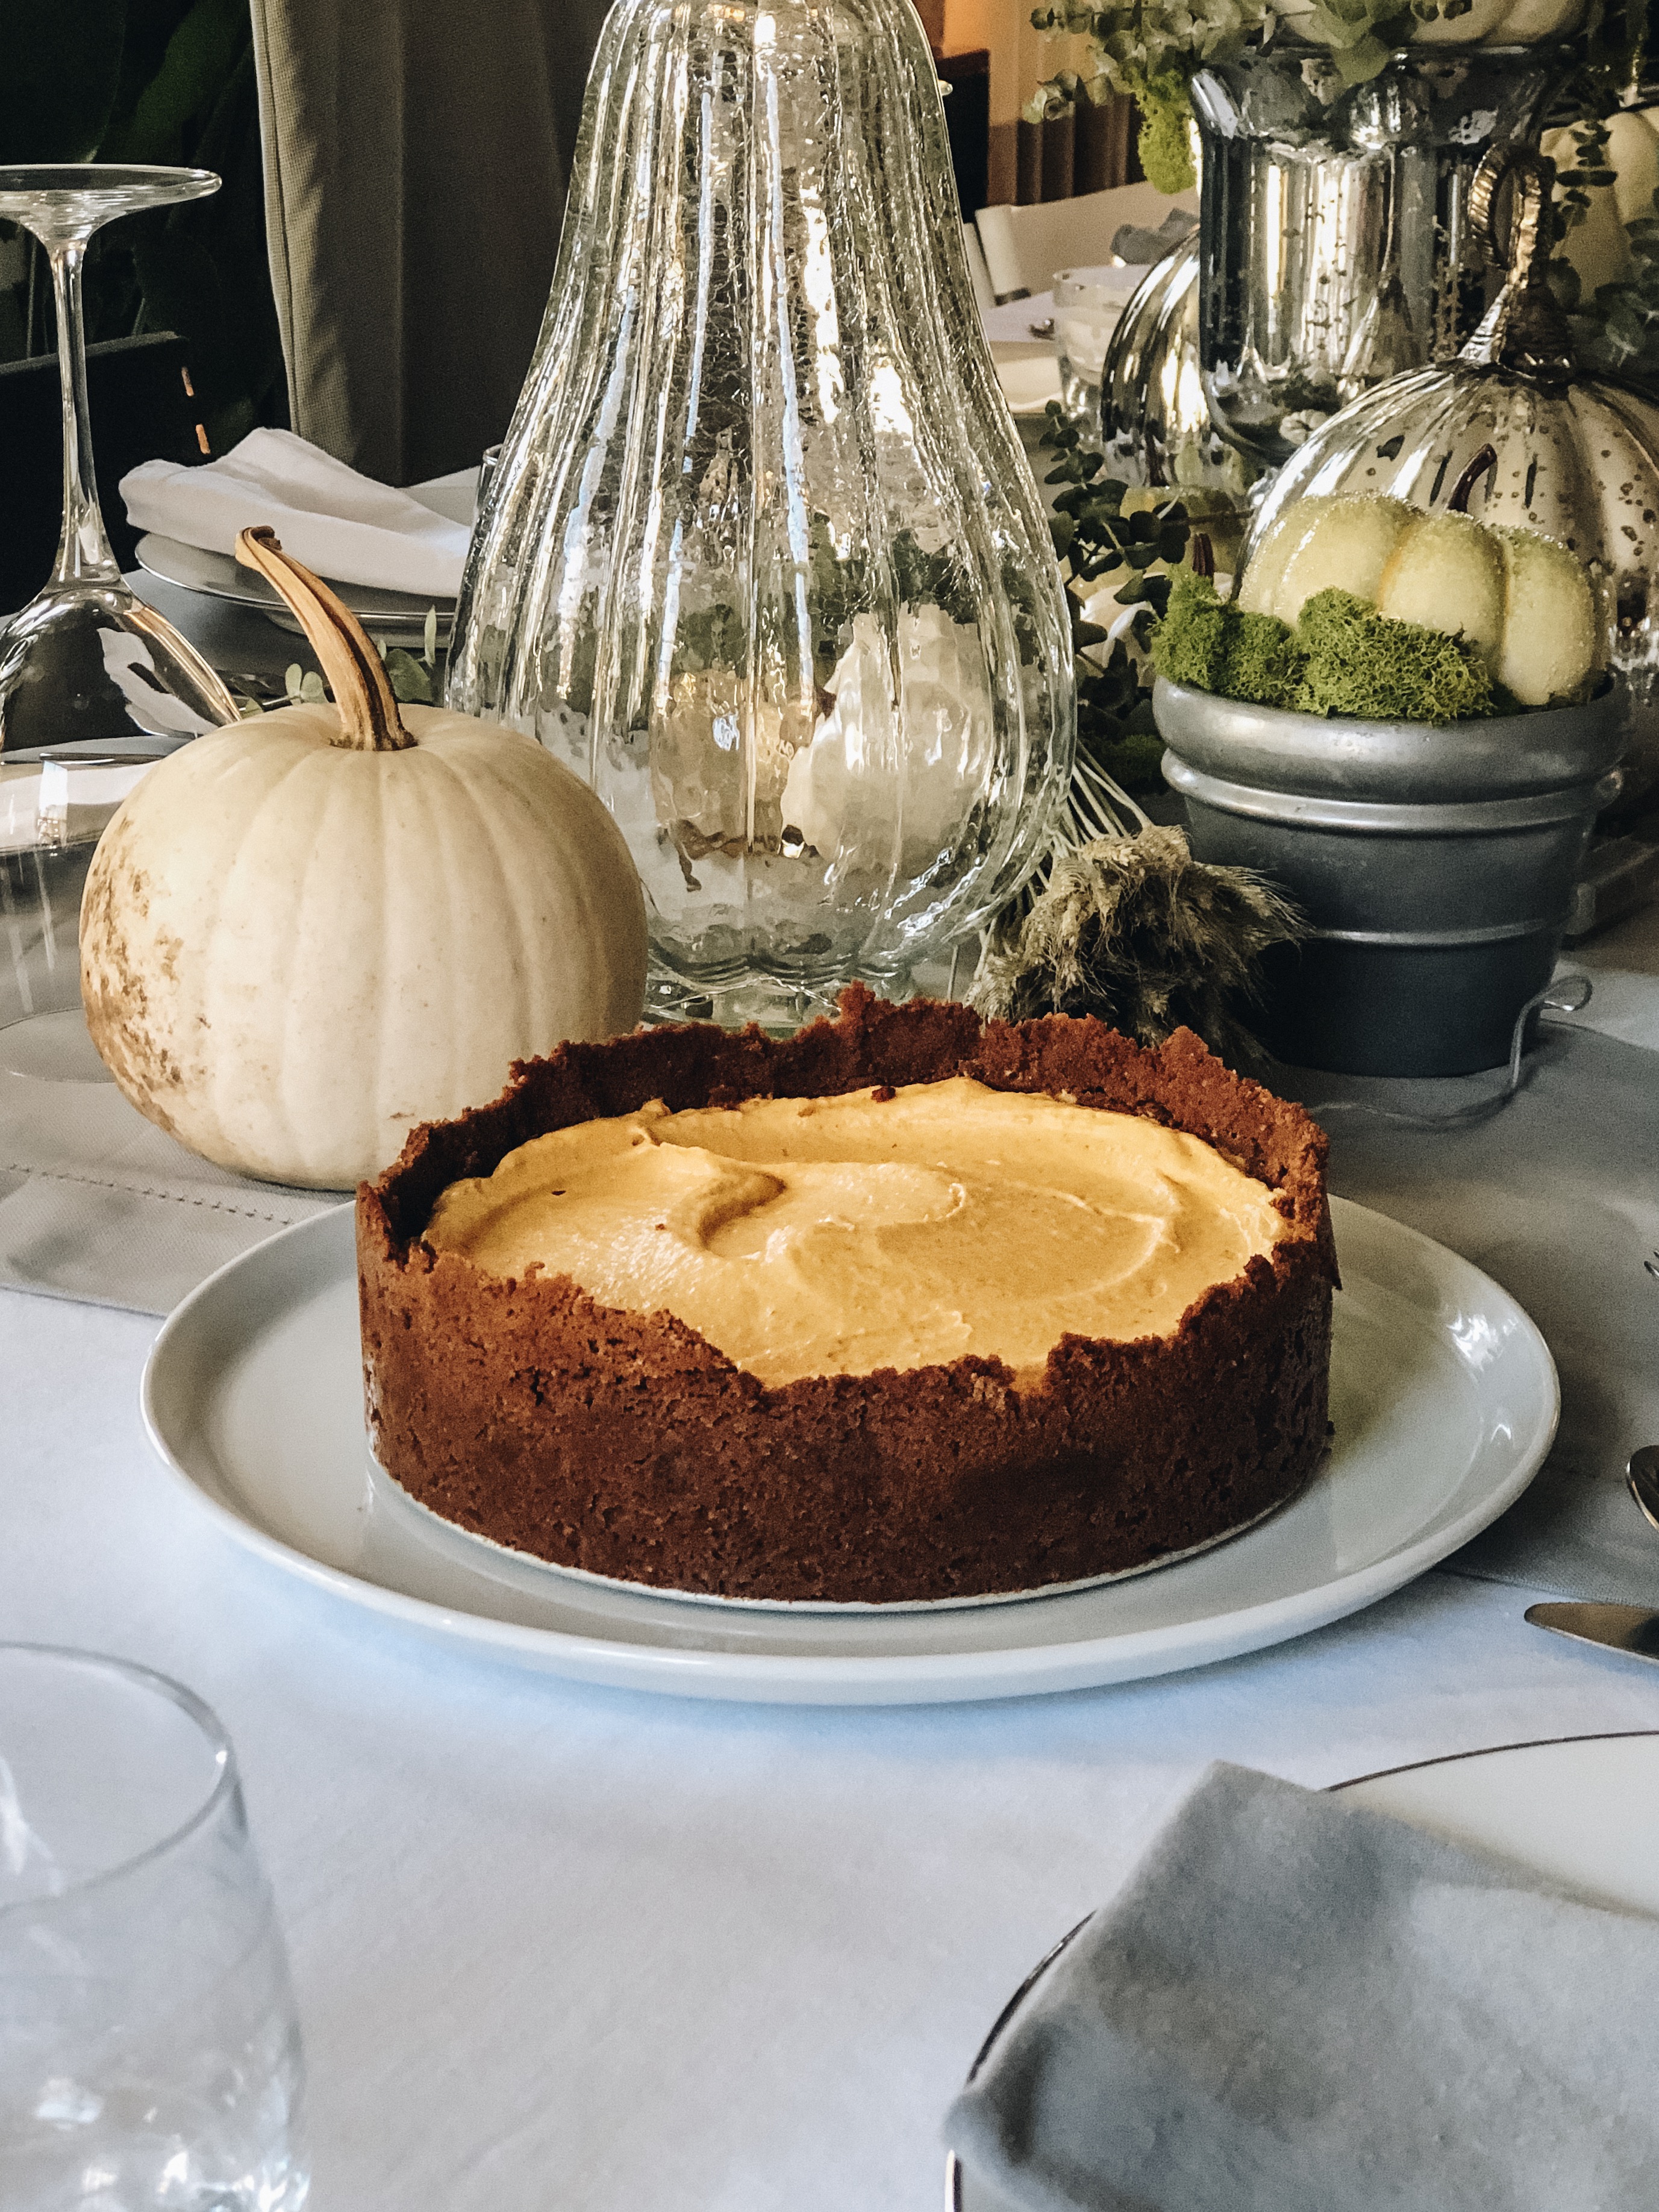
Not only is this goat cheese pumpkin pie simple to put together—your only effort going towards squishing the crust up the sides of a springform pan—but it also proved to be a crowd pleaser. Even after our Thanksgiving dinner complete with four turkeys—one baked, one fried, one BBQ’d and bacon wrapped, and one deboned, stuffed with herbs, and grilled—even after all of the mashed potatoes and stuffing and cranberry sauce was weighing in our bellies, nearly all of our family and friends topped their dessert plates with a sliver of the orange-hued pie.

There were too many requests for the recipe for me not to share with them, and with you, even if you keep it bookmarked until next year.

goat cheese pumpkin pie

Print
goat cheese pumpkin pie

Servings: 1 9-inch pie

goat cheese pumpkin pie

Ingredients

    for the crust:
  • 2 (5.25-ounce) packages Anna's Almond Thins (or any similarly thin gingersnap cookie). These are Swedish Pepparkakor which are a ginger cookie.
  • 2 tablespoons fresh rosemary, chopped
  • 1 teaspoon kosher salt
  • 10 tablespoons (1 1/4 sticks unsalted butter), melted and cooled
    for the filling:
  • 1 (15-ounce) can pumpkin purée (not pumpkin pie filling)
  • 8 ounces soft goat cheese, at room temperature
  • 4 ounces full fat cream cheese (half of a standard block), at room temperature
  • 5 tablespoons unsalted butter, melted and cooled
  • 1 1/2 cups confectioners' sugar
  • 1 1/2 teaspoons pumpkin pie spice
  • 1 teaspoon ground cinnamon
  • 3/4 teaspoon ground ginger
  • 3/4 teaspoon ground nutmeg
  • 1/2 teaspoon ground allspice
  • 1/2 teaspoon ground cloves
  • 1/2 teaspoon kosher salt

Instructions

  1. Position oven racks into the bottom and middle third of the oven and preheat to 350°F. Grab a 9-inch round springform pan and set it nearby. You could likely use a 9-inch pie dish as long as the sides are ~2 inches high. In this case you will cut and serve from the dish rather than removing before serving.
  2. In the work bowl of a food processor, pulse together the cookies, rosemary, and salt until combined. Add the melted butter and run until well combined, stopping and scraping down the bowl to ensure the butter is evenly distributed. The dough should stick together when pinched.
  3. Press the dough firmly into the bottom and up the sides of the pan so there are no holes (give your food processor bowl a quick rinse since we are making the filling with this as well). Don’t worry about getting all the edges even. Take a piece of foil and gently press it into the pan to keep the dough in place when baking. Place a cookie sheet on the bottom rack of the oven and then bake the crust on the middle rack for 15 minutes. Remove the foil and then continue baking for another 5 to 10 minutes or until the edges are golden. Set aside to cool.
  4. While the crust is cooling, prepare the filling in the cleaned work bowl of your food processor. Combine the pumpkin, goat cheese, cream cheese, butter, sugar, salt and all the spices and blend until very smooth. It may take a few minutes but you want to get rid of all the chunks. Scoop into the cooled, baked pie crust and smooth the top. Cover and refrigerate until the filling firms up, about 6 hours, or overnight, before serving.

Notes

Adapted slightly from Munchies

6.1.0
https://www.butterlovescompany.com/2018/11/28/goat-cheese-pumpkin-pie/
butter loves company | jenna larsson

More Pumpkin Goodness:

Pumpkin Pecan Trifle

Glazed Pumpkin Bundt Cake

Spiced Pumpkin Muffins

Filed Under: desserts and sweets, eat Tagged With: goat cheese, pie, pumpkin

plum hand pies

August 24, 2016 by Butter Loves Company

plum hand pies 3

A few precarious Waze drives across Los Angeles scoping out the neighborhood’s farmers’ market and we’ve finally found our favorite. Just so happens it is right in our Hollywood backyard.

It was love at first sight or, more specifically, love at first sight of the oysters being freshly shucked at the first stall.

plum hand pies 5

Continue up the pavement a few steps, past the casual cool parents with arms around their stylish kids and the effortless beauties holding baskets with flowers fluttering over the wicker edges. Keep going by the chef piling up the freshest ingredients for the night’s service and the person you swear you recognize from Law & Order SVU, and you’ll arrive at a most-colorful stall.

It’s mid- to late-summer and stone fruits are the cream of the crop. Mounds and mounds of peaches, nectarines, plums, apricots, and pluots await you. Each fruit wearing a different jewel toned coat. Who knew there were twelve varieties of plum? From a golden yellow with a soft and sugar sweet flavor to a deep dark indigo with a tart skin and apricot-esque taste, this farm’s stand has it all. Stock up and enjoy with everything. But most importantly, in my opinion, bake!

plum hand pies 4

Is there a better showcase for summer fruit than pie? There’s something about wrapping peaches or plums in a tender buttery crust and letting the oven bring out the fruit’s fresh and tangy juices that feels incredibly homey and effortless. The fresh ingredients really do the work.

plum hand pies 2

So here we are with Plum Hand Pies; a portable version of your favorite summer pie. I always prefer a homemade crust but feel free to use store bought if that is your preference or if you’re tight on time.

blc signature

plum hand pies 1

Print
Plum Hand Pies

Prep Time: 2 hours, 30 minutes

Cook Time: 35 minutes

Total Time: 2 hours, 30 minutes

Servings: 6 hand pies

plum hand pies 4

Ingredients

    For the dough (if making from scratch):
  • 1 1/2 cups all-purpose flour
  • 1 1/2 tablespoons sugar
  • 1/4 teaspoon kosher salt
  • 1/2 cup (1 stick) cold unsalted butter, cut into 1/2-inch pieces and chilled
  • 1/4 cup ice water, plus up to 1/4 cup more if needed
    For the filling + assembly:
  • 4 medium plums or pluots, halved and pitted and then cut into 1/4-inch slices
  • 1/4 cup sugar
  • 1 tablespoon flour
  • 1 teaspoon lemon zest
  • 1/2 teaspoon ground ginger
  • 1/2 teaspoon ground cinnamon
  • 1/4 teaspoon salt
  • 1 large egg, beaten with 1 teaspoon water, for egg wash
  • sugar, for sprinkling on top

Instructions

  1. In the bowl of the food processor, prepare the dough by pulsing the flour, sugar, and salt to combine. Drop in the chilled butter and pulse for about 15 seconds, or just until the butter is dispersed and the pieces are the size of peas. Pour in 1/4 cup ice water and pulse just until dough comes together in clumps, adding more water 1 tablespoon at a time, if necessary to moisten. Grab the dough and pat into a square, wrap in plastic and refrigerate until firm, about 2 hours (can be made and chilled up to 3 days ahead).
  2. When the dough is chilled, preheat the oven to 375°F. Line a baking sheet with parchment and set aside. Prepare the filling by gently mixing the sliced plum, sugar, flour, zest, ginger, cinnamon, and salt in a medium bowl until the fruit is coated.
  3. On a lightly floured surface, roll out chilled dough to an approximate 15 x 12-inch rectangle. Slice the dough in half the long way, and then in thirds the short way, to create a total of 6 rectangles.
  4. Brush edges of rectangles with the egg wash; layer the filling across one side of each rectangle, leaving a 1/2 inch border of dough. Fold the empty side of dough over the fruit and press edges to seal. Crimp with a fork, for an extra seal if you desire (I did). Place each hand pie on the prepared baking sheet and brush with egg wash and sprinkle with sugar. Cut slits in tops as little air vents.
  5. Bake hand pies at 375°F for 30¬–35 minutes, until juices are bubbling and pastry is golden brown, rotating sheet halfway through. Serve warm or at room temperature.
6.1.0
https://www.butterlovescompany.com/2016/08/24/plum-hand-pies/
butter loves company | jenna larsson


plum hand pies 6

Filed Under: desserts and sweets, eat Tagged With: pie, plum, pluot, portable, summer fruit

funfetti pie crust (happy pi day! 3.14.15)

March 14, 2015 by Butter Loves Company

funfetti-pie-crust-recipe-national-pi-day-txt

With National Kiss Your Fiancé Day* just around the corner, I can’t help but ask: are National “________” Days getting out of hand? Regardless, as a pun-loving baker, there is one National Day I could not be more on board with. It’s Pi Day and it is… Today!

That’s correct, we are talking about a day commemorating the mathematical constant π (3.14159265359… you get the idea). But, we are also talking about the best way to celebrate this special day—and that’s with pie, of course! We learned about it in school and now here we are, putting our math skills to great use.

Don’t mistake tomorrow for your typical Pi Day though. As Mashable points out, today is the only time for the next 100 years where the calendar date reflects the first FIVE digits of that fabulous number (3.1415). The next time this will come our way isn’t until March 14, 2115. Because this isn’t your average Pi Day, you can’t celebrate with an average pie, right? Right. Time to funfettify your pie.

I first made this all butter pie crust filled with sprinkles for my birthday. When you are the baker in the family, you make your own birthday cake (ahem, pie). I like to get my hands dirty and use a pastry blender, but feel free to use a food processor for ease and speed. If you take that route, be mindful not to over-pulse as you want to have lots of visible butter bits. They are your keys to a flaky pie palace.

*National Kiss Your Fiancé Day is March 20th. I’m not a fiancé, but to me this begs the question, why are you not kissing them other days??

funfetti-pie-crust-recipe-national-pi-day-1

yup. feet.

funfetti-pie-crust-recipe-national-pi-day-2

funfetti-pie-crust-recipe-national-pi-day-3

funfetti-pie-crust-recipe-national-pi-day-5

funfetti pie crust
adapted from The Smitten Kitchen

Makes enough dough for one double-, or two single-crust pies.

Ingredients:

2 1/2 cups all purpose flour
1 tablespoon sugar
1 teaspoon table salt
2 sticks (8 ounces/1 cup) unsalted butter, very cold
1 teaspoon vanilla extract
ice water (about 3/4 cup, will be dough glue)
1/4 cup sprinkles of your choice

Instructions:

  1. Prepare your cold ingredients: fill a 1-cup liquid measuring cup with water and a couple ice cubes and set aside. Dice your butter into 1/2-inch pieces and place in a small bowl. Move the bowl to the fridge or freezer until you need it.
    In a large, wide bowl whisk together 2 1/2 cups flour, 1 tablespoon of sugar, and a teaspoon of salt. Get out your pastry blender.
  2. Remove your diced butter from the fridge and sprinkle the cubes over the flour. Begin working them into the flour with the pastry blender. Try to break down the butter evenly and stop when all of the butter pieces are around the size of peas.
    Pour in vanilla extract and then start slowly drizzling 1/2 cup of the ice-cold water over the butter and flour mixture. Using a rubber or silicon spatula, stir the dough together. Add in more cold water, a tablespoon at a time, just until you’re pulling large clumps with the spatula. Pour in the sprinkles and then, using your hands, gather the clumps together into one mound, kneading and turning the dough gently a couple of times to distribute the sprinkles as you pull it all together.
  3. All set! You can now chill the dough by dividing it in half and wrapping each half in plastic. Let the dough chill in the fridge for at least one hour before rolling it out. The dough will keep in the fridge for up to a week and in the freezer for a month or so. Any time you are going to make dough for a later use, make sure to wrap it an extra time in plastic to ward off any freezer or fridge smells.

Filed Under: desserts and sweets, eat Tagged With: all butter, funfetti, pi day, pie, pie crust, sprinkles

my favorite strawberry rhubarb pie

May 30, 2014 by Butter Loves Company

strawberry rhubarb pie 12

You know those people who know everything there is to know about fresh produce? The ones who can tell you exactly which plant is a perennial versus an annual, which grows better in the shade than the sun and which should be under-watered versus over-watered? The farmer’s market-aficionados who know which is the best time of the year, the month or the week to buy every fruit or veggie because that’s when it’s at the peak of freshness?

I do.

And nope, I’m definitely not one of them.

I’m the puppy who follows those people around the farmer’s market looking for tips. Maybe one day, I’ll (creepily) collect enough pointers to come close to being one of those people, but, for now, I’m the one who stands behind them and says, “I’ll have a pound of that too!”

My most recent market-stalking-reward was rhubarb. The woman in front of me “ooohed” at the pile of rhubarb, bought a pound and half and I followed suit. Guess what? The tart, greenish-red vegetable resembling celery stalk happened to be at the height of its season! Which I now know to be between late April and June (around Boston).

strawberry rhubarb pie 1

strawberry rhubarb pie 2

Rhubarb is often linked to strawberry—typically in Strawberry Rhubarb Pie—and it’s no wonder why. Between two flaky, buttery crusts, the sharpness of the rhubarb is balanced by the juices of sweet, sugared strawberries resulting in the perfect spring showcase of fresh-dessert flavors.

strawberry rhubarb pie 3

I’ve made strawberry rhubarb pie only once before and, while it was delicious, it came out very drippy. While I didn’t want to shift completely to the jelly-like viscosity of some store bought pies, I wanted to make sure this pie held its form better.

Deb Perelman of The Smitten Kitchen, not surprisingly, got it just right. Her secret ingredient for thickening the filling is adding a ¼ cup of tiny tapioca pearls. It totally worked. We identified the tiny tapioca balls on our forks—sometimes—but it mostly blended completely into the texture of the fruit and did not change the flavor one bit. I barely changed a thing about Deb’s recipe (I even followed her dough recipe!), so Deb, thank you for the scrumptiousness of this pie!

strawberry rhubarb pie 4

Now, here’s the part where you expect a photo of the inside of the finished pie so you can see the gorgeous pink hues of sweet, tart goodness; proof of a perfect pie slice that’s not too runny and not too gelatinous.

And here’s the part where I disappoint. No strategically placed pie slices smiling for the camera. None. Nothing. I’m sorry! I brought the pie to my parent’s house for a family dinner and after one bite my head was lifted to the pie clouds. One bite and I was swimming through the sky on pie. Before I ever came down from the clouds, we had eaten it all up. And, here’s the part where I beg you to try it anyway. I really don’t think you’ll regret it. And neither will anyone you choose to share with (Or not!).

strawberry rhubarb pie 5

strawberry rhubarb pie 7

strawberry rhubarb pie 9

strawberry rhubarb pie 11

strawberry rhubarb pie 10

strawberry rhubarb pie 12

strawberry rhubarb pie
Adapted, barely, from Deb Perelman of The Smitten Kitchen

Prep Time: 20 minutes (includes rolling out dough, but not making it)
Cook Time: 50 minutes
Total Time: 1 hour 10 minutes (But leave plenty of time for cooling!)
Makes 1 double crusted 9-inch pie

Because rhubarb is tart, the resulting pie isn’t crazy sweet. If you are looking for a pie on the sweeter side, Deb recommends upping the white sugar to ¾ cup. I did not up the sugar and, honestly, think it is just perfect with the ratios listed below.

Ingredients:

1 All Butter, Really Flaky Pie Dough or double-crust pie dough of your choice (Store bought is okay!), divided in two and chilled
3 ½ cups (about 1 ½ pounds, untrimmed) rhubarb, in ½-inch thick slices
4 cups (about 1 pound) strawberries, hulled and sliced into 4–6 pieces if big, halved if tiny
½ cup granulated sugar
¼ cup light brown sugar
1 tablespoon lemon juice
1 teaspoon finely grated lemon zest
¼ teaspoon salt
¼ cup quick-cooking tapioca
2 tablespoons unsalted butter, cut into small pieces
1 large egg yolk beaten to blend with 1 teaspoon water (for glaze)
Sparkling sugar, optional (for topping)

Instructions:

  1. Preheat oven to 400 degrees. On a well-floured counter, roll half of chilled pie dough into a 12-inch circle and carefully transfer to a 9-inch pie plate. Refrigerate while you prepare the filling.
  2. Stir together rhubarb, strawberries, sugars, lemon juice and zest, salt, and tapioca in a large bowl. Roll second half of chilled pie dough into an 11-inch circle and place on a sheet of parchment paper. Cut into 1-inch strips if making a lattice top or cut decorative slits in it if keeping a full crust. I like to weave my lattice tops on the parchment paper similar to the technique used in this old school video, rather than trying to weave it over the filling. Then I slide the full weave onto the pie during the next step. Return dough-topped parchment to the refrigerator for a few minutes to firm up.
  3. Remove pie plate from the refrigerator and pile strawberry-rhubarb filling into it, spreading into the sides. Dot the top with the 2 tablespoons of butter pieces.
  4. Remove pie top from the refrigerator and slide it off the parchment, centering it on top of the pie. Trim top and bottom pie dough so that the dough hangs over the pie plate edge only ½-inch. Tuck the rim of dough underneath itself and crimp it decoratively. Transfer pie to a baking sheet, brush egg yolk mixture over dough and sprinkle with sugar.
  5. Bake for 20 minutes then reduce temperature to 350 degrees and bake for an additional 25 to 30 minutes, until the pie is golden and the juices bubble visibly. Transfer the pie to wire rack to cool. Allow the pie to cool for at least 2–3 hours before cutting to allow the juices to firm up a little bit.


Filed Under: desserts and sweets, eat Tagged With: dessert, fruit, pie, rhubarb, spring, strawberry

apple galette or free form apple tart or lazy man’s apple pie

January 14, 2014 by Butter Loves Company

Apples are one of those ingredients that you can find anywhere at any time of year in the Northeast. I can even count on the grocery store* down the street from my apartment to have apples consistently, which is truly telling (the store has been less reliable for butter or even eggs in the past). Because of this, an apple galette, or free form apple tart, is never too far away from my dessert table.

The galette begins with a flaky yet sturdy pie crust and the edges of the crust are effortlessly flipped onto simply seasoned apples for a rustic dessert. While it bakes, the apple galette gives off the same luscious sugared sweet and buttery aroma as apple pie around the holidays, because it basically is a lazy man’s apple pie.

I’ll admit this recipe is a lot better in the late summer or early fall when you pick the apples fresh off the tree – maybe while holding a cider donut in the other hand. But it is January and the galette still satisfied my craving for baked apples. It would have been even more satisfying with a scoop of vanilla ice cream on the side, but unfortunately it was too cold for us to go out to grab some (polar vortex!). Greg did make a caramel sauce to drizzle on top of our slices out of the sugars and juices leftover from the spiced apples. I think we may be watching too much of Food Network’s Chopped!

* Using the term very loosely in this case

First, you'll prepare the dough.

First, you’ll prepare the dough.

As you can see, I am a messy baker!

As you can see, I am a messy baker!

While the dough is chilling, prepare the apples.

While the dough is chilling, prepare the apples.

When the dough is firm, roll it out on a floured surface. You can tell this will be flaky because you can see the butter!

When the dough is firm, roll it out on a floured surface. You can tell this will be flaky because you can see the butter!

Arrange the apples on the prepared dough.

Arrange the apples on the prepared dough.

Feel free to pile them on!

Feel free to pile them on!

Fold the edges over and it is ready for the oven.

Fold the edges over and it is ready for the oven.

Ready to eat!

Ready to eat!


Needed to give the caramel sauce a shout out!

Needed to give the caramel sauce a shout out!


apple galette or free form apple tart or lazy man’s apple pie
Recipe Type: Dessert
Author: Butter Loves Company
Prep time: 1 hour 30 mins
Cook time: 1 hour
Total time: 2 hours 30 mins
Serves: 6-8
Ingredients
  • Dough:
  • 1 ¼ cups flour
  • 1 tablespoon sugar
  • ½ teaspoon salt
  • ½ cup (1 stick) unsalted butter, diced and re-refrigerated
  • ½-¾ cup cold water
  • 1 tablespoon unsalted butter, melted
  • Filling:
  • 4-5 baking apples peeled and sliced ¼-1/2 inch thick (Cortland, Granny Smith, or Pink Lady are some options but feel free to pick whatever you prefer, or mix varieties)
  • 1 tablespoon fresh lemon juice
  • ½ cup granulated sugar
  • ½ cup light brown sugar
  • 1 teaspoon cinnamon
  • 1 tablespoon flour
Instructions
  1. In a food processor, combine flour, sugar, and salt and pulse for 10 seconds to combine.
  2. Drop in the diced, cold butter and pulse until the butter is the size of small marbles but larger than peas.
  3. Begin adding ice water in 1/8th cup increments, pulsing between additions, until the dough comes together and the butter is pea sized but still visible. You may not need the full amount of iced water.
  4. Transfer the dough to a work surface, gather it together and pat into a disk. Wrap the dough in plastic and refrigerate until chilled, one to two hours.
  5. While the dough is chilling, peel and slice the apples.
  6. In a large bowl, combine the apples with lemon juice, both sugars, cinnamon, and flour.
  7. Once the dough is chilled, preheat the oven to 400 degrees and line a baking sheet with parchment paper.
  8. Transfer the dough to a floured surface and roll out into a circle about 12 inches in diameter and 1/8th inch thick. Shake off excess flour and transfer dough to the prepared baking sheet.
  9. Arrange apples on the dough, leaving 2 inches of pastry around all sides. Fold edges of the dough onto the apples and crimp edges to create the crust.
  10. Brush the entire crust with 1 tablespoon melted butter and sprinkle with sugar.
  11. Bake until the crust is golden and the apples are tender, 55-60 minutes.
  12. Remove from oven and let cool for at least 15 minutes before serving.
3.2.1275


Filed Under: desserts and sweets, eat Tagged With: apple, dessert, fruit, galette, pie, tart

Welcome!

jenna of butterlovescompany

Pull up a chair

Hi! I’m Jenna. Story seeker, food lover, recipe developer based in NYC. Firm believer in making every day delicious! Read more…

looking for something?

  • Email
  • Facebook
  • Instagram
  • Pinterest
  • RSS
  • Twitter

Latest Posts

  • Freezer Meals to Make Before Baby: How We Meal Prepped Before Baby
  • mom’s famous spiced pecans
  • funfetti cookie dough truffles (no-bake)
  • maple coconut cookies
  • snickerdoodle blondies

popular now

braised short rib pasta sauce (short rib ragu)
rosemary honey buttermilk biscuits
strawberry cinnamon rolls
bourbon banana bread
chocolate marble loaf cake
chocolate pecan torte with strawberry buttercream

grammin’

Let’s get ready to bake throughout the holidays! Let’s get ready to bake throughout the holidays! I’ve teamed up with @lucky_leaf_fruit_filling, @diamondnuts and #Kids360 to give away some delicious baking ingredients to make your spirits bright this season. 

To enter:
-Follow @lucky_leaf_fruit_filling, @diamondnuts and @butterlovescompany
-Comment and tag a friend and the name of your favorite holiday dessert
-Enter by December 1. Winner will be selected at random and DM’d! 

You’ll win: 
•(1) Can of Lucky Leaf Premium Blueberry Filling
•(1) Can of Lucky Leaf Premium Apple Filling
•(1) Can of Lucky Leaf Premium Cherry Filling
•(1) Can of Lucky Leaf Premium Strawberry Filling
•(1) Can of Lucky Leaf Premium Peach Filling
•(1) Recipe Book
•(2) Dish Towels
•(1) Pot-Holder
•(1) Picnic Basket

#ad NO PURCHASE NECESSARY. Open to legal residents of the United States (including its commonwealths, territories, and possessions) who are legal age of majority. Enter by 11:59 pm ET on December 1, 2021. Odds of winning depend on # of entries received. Void where prohibited. This is not sponsored or endorsed by Instagram or Facebook.
This was the best photo we could get with an alway This was the best photo we could get with an always moving toddler. 🥸 Happy Thanksgiving to you and yours! ♥️
Something that the past year or so has taught me: Something that the past year or so has taught me: stock your pantry! Having a stocked kitchen has made it super easy to cook and bake without having to run out to the store. Crucial when you get a craving for an Apple Walnut Cake and need to make one stat. With @lucky_leaf_fruit_filling and @diamondnuts, you can put together a delicious cake SO easily with no peeling and slicing of apples. 🍎🌰You get all the beautiful warm spice flavor with sweet, tart apples, and crunchy, hearty walnuts. #ad Get the recipe below: 

Apple Walnut Cake

* 1 box (15.25 oz.) spice cake mix
* 1 can (21 oz.) Lucky Leaf® Premium Apple Fruit Filling
* 2 large eggs
* 1 tbsp. pure vanilla extract
* 1/4 cup whole milk
* 1/4 cup brown sugar
* 1 tsp. ground cinnamon
* 1/2 cup finely chopped Diamond of California® Shelled Walnuts
* 1 container (8 oz.) whipped topping, thawed

Instructions
1. Preheat oven to 350° F and grease 9x13-inch pan. 
2. Combine dry cake mix, apple filling, eggs, vanilla & milk in large bowl. Beat for 2 minutes. Spread half of the batter in the pan. 
3. Make the Walnut Cinnamon filling: Combine brown sugar, cinnamon and walnuts. Sprinkle half the mixture on top of batter. Top with remaining batter and then sprinkle remaining walnut mixture on top.
4. Bake cake for 28-33 minutes. Cool cake. Top with whipped topping and sprinkle with walnut pieces.

Don’t miss my upcoming chance to W I N with #kids360, Diamond and Lucky Leaf!
Spiced pecans, wedding cookies, chocolate turtles, Spiced pecans, wedding cookies, chocolate turtles, pecan pie, sticky buns…just a few of the treats on my standard holiday baking agenda. What do they have in common? NUTS! @diamondnuts are a staple around here for the holidays (and all year, let’s be honest) and I want to share the love. Thanks to Diamond and #kids360, we are giving someone ✨15 FREE product coupons for @diamondnuts ✨to help you bake your holiday treats this year. Go nuts!

To enter:
* Follow @diamondnuts and @butterlovescompany
* Comment and tag a friend who deserves a day off to go nuts! 
* Enter by end of day November 25th. Winner will be selected at random and DM’d! 

#ad NO PURCHASE NECESSARY. Open to legal residents of the United States (including its commonwealths, territories, and possessions) who are the legal age of majority. Enter by 11:59 pm ET on November 25, 2021. Odds of winning depend on # of entries received. Void where prohibited. This is not sponsored or endorsed by Instagram or Facebook.
No gimmicks, no “just for the ‘gram” razzle No gimmicks, no “just for the ‘gram” razzle dazzle here. Just really good chocolate chip cookies.🍪
Fun fact: Layered Magic Cookie Bars were one of th Fun fact: Layered Magic Cookie Bars were one of the first things I ever baked. Making them again with @diamondnuts makes me super nostalgic. Brought me directly back to middle school. Watch out or you may find me in butterfly clips doodling I <3 SOS on my binder soon. There is a reason this recipe is awesome: first, the cookie bars are incredibly delicious. And, second, they are SO easy to put together. Honestly, they are the PERFECT treat to make with your kids. Pecans and walnuts give the bars the best crunch, nuttiness, and heartiness. You could totally customize if there is a certain kind of jam you love, or a combination of nuts that the family loves. #ad Get the recipe below: 

Seven Layer Magic Cookie Bars

* 1/2 cup (1 stick) butter, melted
* 2 cups graham cracker crumbs
* 1 cup raspberry jam
* 1 cup shredded coconut
* 1 cup Diamond of California® walnuts
* 1 cup Diamond of California® pecans
* 1 cup semi-sweet or bittersweet chocolate chips
* 1 (14-ounce) can sweetened condensed milk

Instructions
1. Preheat oven to 350°F. To toast walnuts and pecans, spread evenly on a baking sheet or in a shallow pan. Bake, stirring once or twice, until lightly browned and fragrant, 7 to 10 minutes. Line a 9×13-inch pan with parchment paper.
2. In a medium bowl, combine the melted butter and graham cracker crumbs; mix well. Transfer the crumbs to the prepared pan and using your finger tips, or the flat bottom of a small measuring cup, press firmly and evenly on the bottom of the pan. Spread the raspberry jam evenly over the crumbs. Sprinkle coconut in an even layer over the jam, followed by the chocolate chips, walnuts and pecans. Drizzle the condensed milk evenly over the top.
3. Bake until bubbling and golden brown, 30-35 minutes. Let cool completely in the pan. If lined with parchment, lift out and place on a cutting board. With a sharp knife, cut into bars.

Look out for an upcoming chance to ✨ w i n ✨with @diamondnuts and #kids360!
Raise your hand if you could use a cup of coffee. Raise your hand if you could use a cup of coffee. 🙋 We are giving away some @timhortonsus coffee goodies so you can get your cozy cool morning on with Canada’s favorite cup of joe. Make my Pumpkin Coffee Coffee Cake for a buzzy morning snack or just brew a strong cup for a little pep in your step (as tired parents over here, we could surely use it). 🍂

To enter:
● Follow @butterlovescompany and @timhortonsus
● Comment and tag a friend you would love to grab coffee with ☕ (each comment=1 entry)
● Enter by midnight November 18. Winner will be selected at random and DM’d!
 
You’ll win:
•(1) Colombian Ground Coffee
•(1) Dark Roast Ground Coffee
•(1) Decaf Ground Coffee
•(1) Whole Bean Original Blend Coffee
•(1) Keurig Variety 30-Pack
•(1) Mug
•(1) Branded Notebook
•(1) Branded Baseball Cap
 
 
ad #timhortons #kids360 NO PURCHASE NECESSARY. Open to legal residents of the United States (including its commonwealths, territories, and possessions) who are legal age of majority. Enter by 11:59 pm ET on November  18, 2021. Odds of winning depend on # of entries received. Void where prohibited. This is not sponsored or endorsed by Instagram or Facebook.
Can’t beat a classic. 🥧 Apple streusel pie fo Can’t beat a classic. 🥧 Apple streusel pie for yesterday’s friendsgiving.🥰 Grateful for time with friends enjoying great food. Remy had so much fun playing that he slept until 7am so we are hopefully out of the 4am daylight savings nightmare (knock on wood). 

Sunday includes a farmers market bop, movies, and cooking for the week. Wouldn’t change a thing. 🥳
Cannot. Get. Enough. Fall. Baking. Who’s with me Cannot. Get. Enough. Fall. Baking. Who’s with me? 🍁  This coffee cake packs a punch because it is made with @timhortonsus brewed coffee in the batter and the glaze. A true *coffee* cake. The texture is dreamy and the coffee is perfectly balanced and smooth. It is goood. #ad Get the recipe below:
 
Pumpkin Coffee Coffee Cake
 
Topping
● 2/3 cup granulated sugar
● pinch of salt
● 2/3 cup flour
● 1 teaspoon cinnamon
● 4 tablespoons butter, melted

Filling
● 1/3 cup brown sugar, packed
● 1 teaspoon cinnamon
● 1 teaspoon unsweetened cocoa powder, optional

Cake
● 1/3 cup vegetable oil
● 2 large eggs, at room temperature
● 1 cup granulated sugar
● 1 cup pumpkin purée
● 1 teaspoon pumpkin pie spice
● 1 teaspoon salt
● 1 teaspoon baking powder
● 1/2 cup brewed @timhortonsus Coffee
● 2 cups flour

Glaze
● 1 cup powdered sugar
● 2 tablespoons brewed @timhortonsus coffee
 
Instructions
1. Preheat the oven to 350°F and grease an 8 inch square pan and line with parchment.
2. Make topping: Stir together the sugar, salt, flour, cinnamon, and melted butter until combined into pea sized lumps. Stirring just until well combined. Set aside.
3. Make filling: Mix together the brown sugar, spice, and cocoa powder. Set it aside.
4. Make cake: Beat together the oil, eggs, sugar, pumpkin, pie spice, salt, and baking powder until smooth. Add the brewed coffee followed by the flour, alternating in two additions, and stir until combined.
5. Spread half the batter into the prepared pan. Sprinkle the filling evenly on top of the batter. Top with the remaining batter. Sprinkle the topping over the batter in the pan.
6. Bake until a toothpick inserted into the center comes out clean, about 40 to 45 minutes. Let cool.
7. Make glaze: Combine the powdered sugar and brewed coffee until smooth and thick but drizzle-able. Using a fork, drizzle it over the cake.

Don’t miss our upcoming chance to ⚡️W I N⚡️ thanks to @timhortonsus and #Kids360!

#timhortons #kids360fanclub
One of the hardest parts about being a working mom One of the hardest parts about being a working mom is how little time you get to spend with your sweet bean during the week. Between wake up and getting to daycare, to pickup and bedtime it’s often an hour at best (which is also filled with making dinner, bath time, etc). I soak up ALL the minutes and the weekends are an absolute snuggle and play fest. It’s so tough though! If you are in the same boat, know that you aren’t alone and you’re doing a good job!! ♥️

This photo has nothing to do with this but I made the cookies for our neighbors and regretting not keeping one for myself right now. 😬🤣
✨W I N !✨ I’ve teamed up with @nielsenmassey ✨W I N !✨ I’ve teamed up with @nielsenmassey and #Kids360 to give away some seriously amazing ingredients to make your desserts sing. 🎶 I love their products and have been using them for years—the vanilla is 💯!!
 
To enter:
● Follow @nielsenmassey and @butterlovescompany 
● Comment and tag a friend you’d love to bake with
● Enter by Thursday November 11th. Winner will be selected at random and DM’d!
 
You’ll win:
•(1) Madagascar Bourbon Pure Vanilla Powder
•(1) Madagascar Bourbon Pure Vanilla Sugar
•(1) Ugandan Pure Vanilla Extract
•(1) Pure Coffee Extract
•(1) Pure Peppermint Extract
•(1) Rose Water
•(1) Pure Lemon Extract
•(1) Tahitian Two Vanilla Beans
•(1) Tahitian Pure Vanilla Extract
•(1) Mexican Two Vanilla Beans
•(1) Mexican Pure Vanilla Extract
•(1) Madagascar Bourbon Two Vanilla Beans
•(1) Madagascar Bourbon Pure Vanilla Extract
•(1) Madagascar Bourbon Pure Vanilla Bean Paste
•(1) Orange Blossom Water
•(1) Pure Orange Extract
•(1) Pure Almond Extract
•(1) Pure Chocolate Extract
.
#ad NO PURCHASE NECESSARY. Open to legal residents of the United States (including its commonwealths, territories, and possessions) who are legal age of majority. Enter by 11:59 pm ET on November  11, 2021. Odds of winning depend on # of entries received. Void where prohibited. This giveaway is not sponsored or endorsed by Instagram or Facebook.
Brainstorming dessert recipes for Thanksgiving and Brainstorming dessert recipes for Thanksgiving and it’s hard not to think about this Black Forest Pie. 🍒🍫 It was such an indulgent tart-sweet chocolate-y treat. It has a chocolate all butter pie crust, a layer of dark chocolate ganache, a layer of chocolate pudding, a cherry topping, and whipped cream. Oh, and a cherry on top! Recipe is from @emcdowell #thebookonpie! 

This one *might* be too rich for the menu but there WILL be pie (duh)🥧. What kind of pie do you need to have on your Thanksgiving table?
This error message is only visible to WordPress admins
Hi! I'm Jenna, founder of butter loves company. From holidays to Tuesdays, let's find a way to make every meal special.
  • Email
  • Facebook
  • Instagram
  • Pinterest
  • RSS
  • Twitter
a2f54ba1dcf0635e58c8be4aa2035ce84863a9d9606a428ab3

© 2013-2019 BUTTER LOVES COMPANY, LLC.

Copyright © 2025 · Foodie Pro Theme by Shay Bocks · Built on the Genesis Framework · Powered by WordPress