butter loves company

new york food blogger and lifestyle influencer

  • home
  • Recipes
  • travel
  • lifestyle
  • cookie orders
  • about
  • contact

chocolate chip and funfetti cookie cake

September 15, 2019 by Butter Loves Company

Does the thought of a cookie cake make you think of the mall you visited growing up or the work birthdays and events you attend these days? For me it’s both and that’s part of why I love them so much. The other thing I love about them is that they’re so easy to make and enjoy in the comfort of your own home too! Today’s chocolate chip and funfetti cookie cake is a combination of two favorite cookies.

This cookie cake recipe includes instructions to make half the dough chocolate chip and half the dough funfetti. You can swirl the two together by scooping each randomly into the pie dish. OR, you can make it half and half like you would your Friday night pizza order (a half pepperoni and half mushroom and olive in our house). 

funfetti-cookie-cake

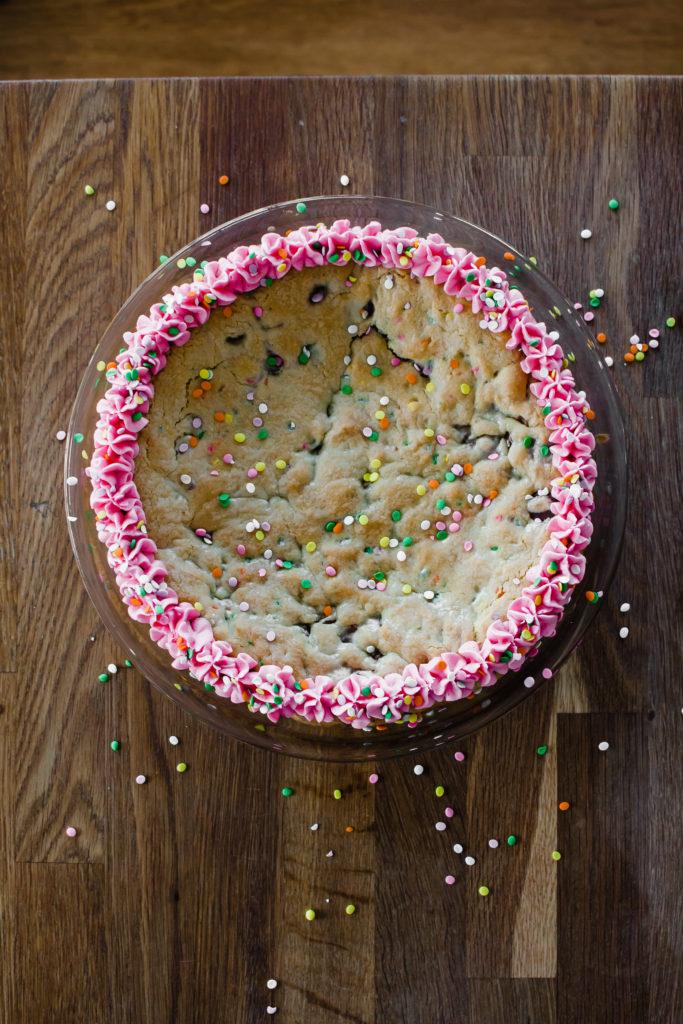
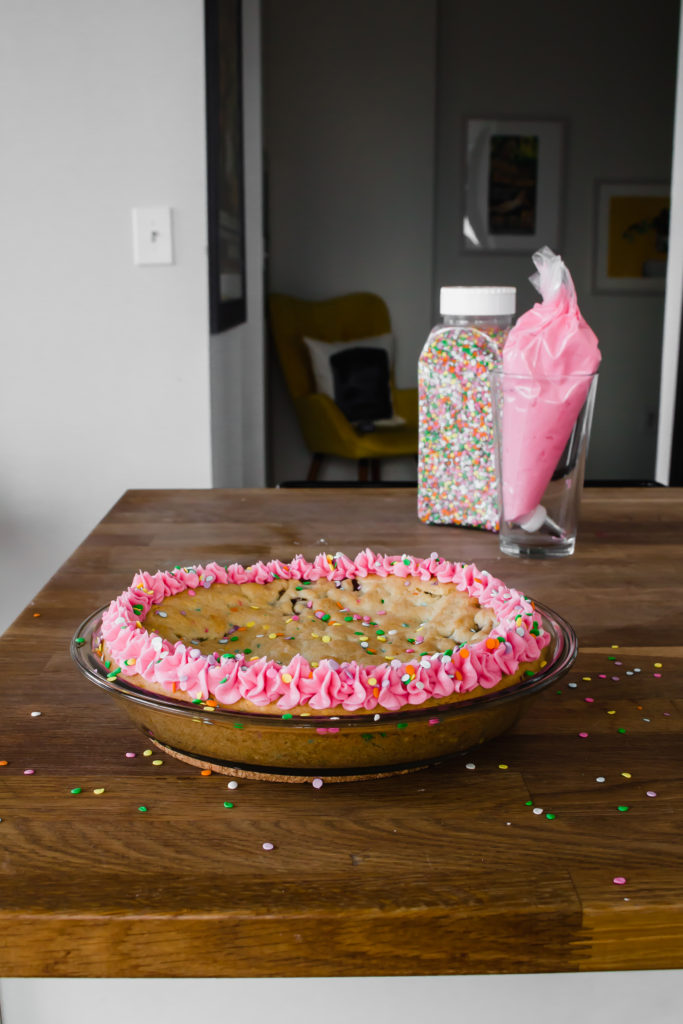
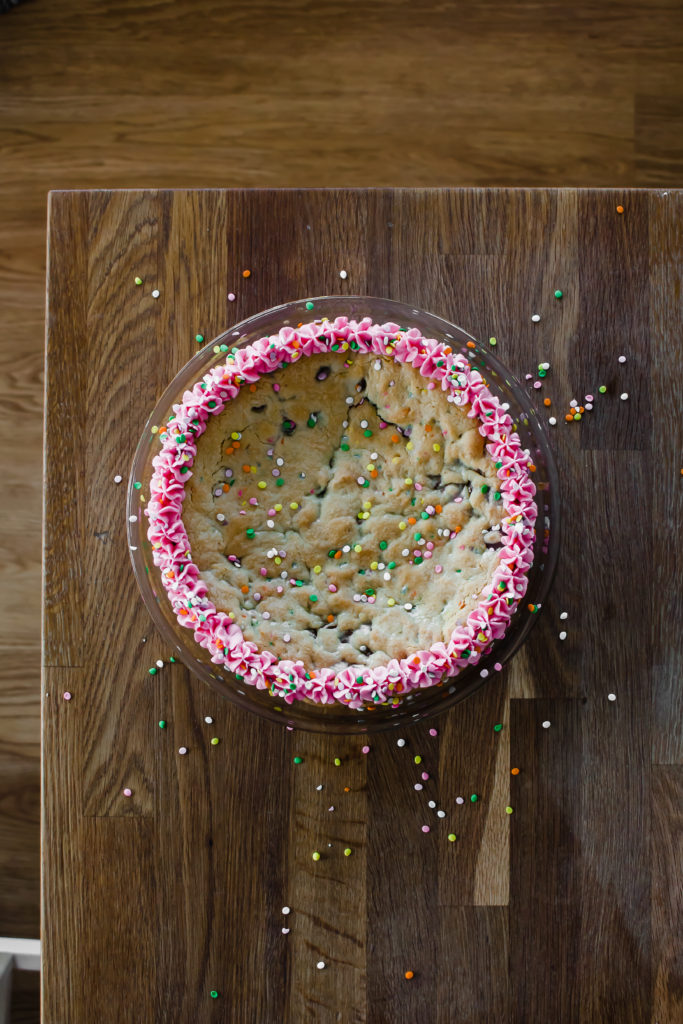
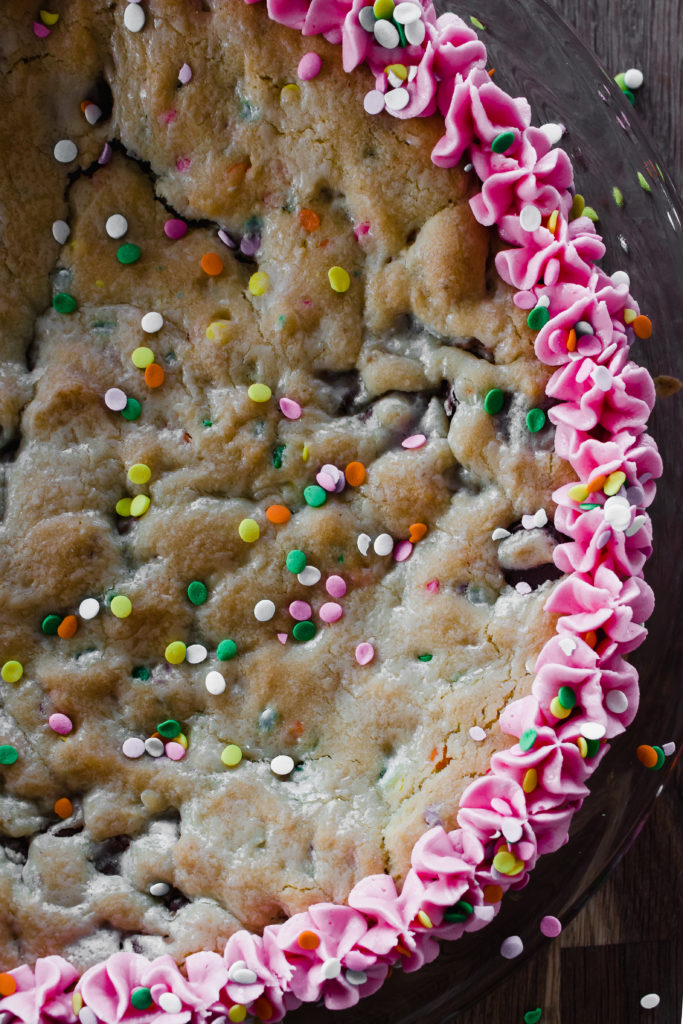
Cookie cake is basically a giant cookie that is perfect for slicing and sharing. You get the crisp edges you love in cookies along with super soft and intentionally underbaked centers. To make the cookie cake more, well, cake-y, we add a little cornstarch. It also helps with making the cake soft.

I decided to make this for our first wedding anniversary since Greg REALLY loves cookie cakes. I was going to make funfetti only but he wanted chocolate chip, so here we are with a compromise. This gives you the best of both worlds: melty semi-sweet chocolate, creamy white chocolate, and colorful sprinkles.

cookie-cake-recipe-close-up

This is really easy to put together since you will be using the same base dough for both. Essentially you will just remove half of the dough while it is naked (aka before adding chocolates and sprinkles). You’ll add the chocolate to the remaining dough, and then swap halves and add the white chocolate and sprinkles. 

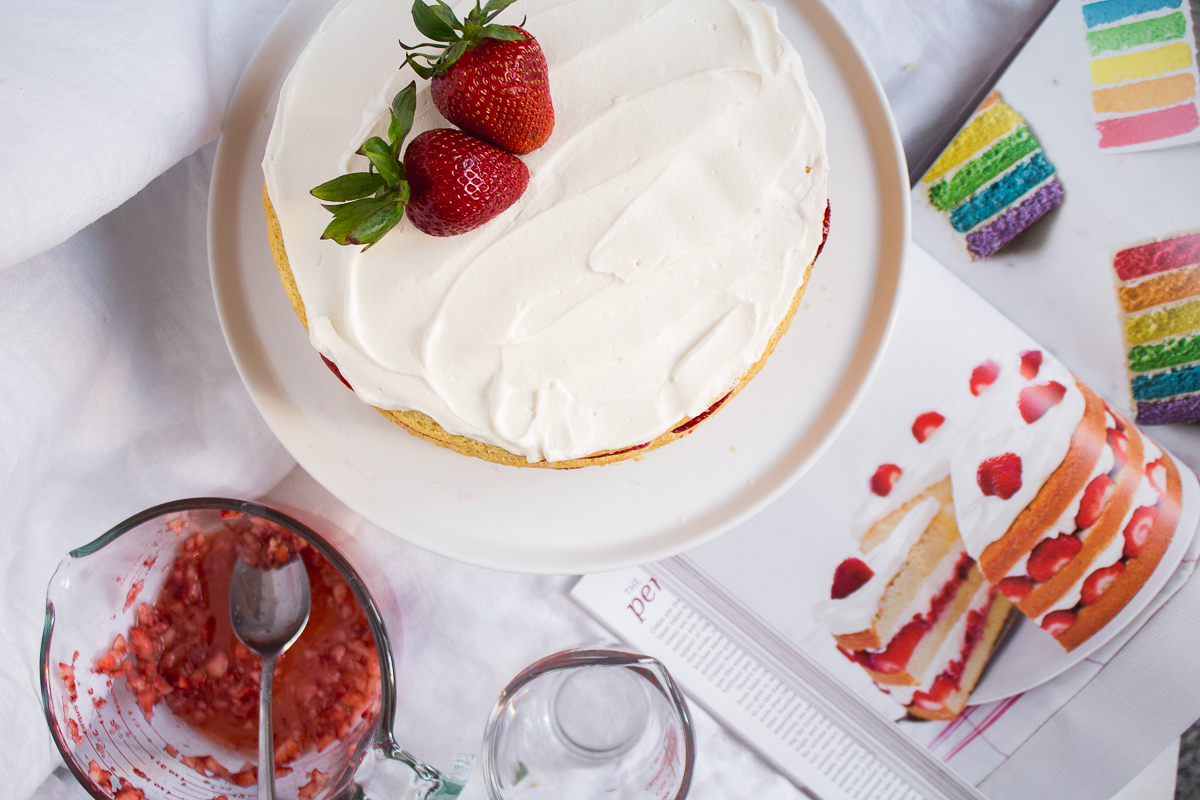
Bake this chocolate and funfetti cookie cake in a cake pan or a pie dish. I like using a glass pie dish. You can add some buttercream on top for extra flair. I would recommend just a vanilla American buttercream which is made with butter, confectioners’ sugar, a little milk or cream, and vanilla extract. YUM!

Xo,
Jenna

P.s. If you are in the funfetti mood, you can also check out Confetti Broyé or a Funfetti Pie Crust. Both add a little celebration to the table. 🙂

cookie-cake-on-table
Print
chocolate chip and funfetti cookie cake

Prep Time: 15 minutes

Cook Time: 25 minutes

Total Time: 40 minutes

Servings: 1 9-inch cookie pie

funfetti-cookie-cake

Ingredients

  • 1/2 cup (1 stick) unsalted butter, room temperature
  • 1/2 cup granulated sugar
  • 1/4 cup light brown sugar, packed
  • 1 large egg and 1 large egg yolk
  • 2 teaspoons pure vanilla extract
  • 1 1/2 cups all purpose flour
  • 1/4 teaspoon salt
  • 1 teaspoon baking powder
  • 1/2 teaspoon baking soda
  • 1 and 1/2 teaspoons cornstarch
  • 1/2 cup semi-sweet chocolate chips
  • 1/2 cup white chocolate chips
  • 1/2 cup rainbow sprinkles (not nonpareils)
  • Buttercream frosting for decorating (optional)

Instructions

  1. Place a rack in the middle of your oven and preheat to 350°F. Grease or spray a 9-inch pie dish or cake pan with nonstick spray. Set aside.
  2. In a medium bowl, whisk together the flour, salt, baking powder, baking soda, and cornstarch. Set aside.
  3. In a large bowl using a hand mixer or stand mixer fitted with a paddle attachment, cream the butter, granulated sugar, and light brown sugar together on medium speed until light and fluffy, about 3 minutes. Add the egg, egg yolk, and vanilla and mix to combine. With the mixer on low speed, gradually add the flour mixture to the butter mixture, mixing until just combined. Remove half of the dough from the bowl and place it in the empty bowl the flour was just in while you mix the chocolate chip dough.
  4. Add the chocolate chips to the remaining half of dough in the stand mixer. Mix until distributed. With a spoon or cookie scoop, drop dough chunks into the prepared pie pan (randomly all over for swirled cake or keeping to one side of the pan if you want a half and half cookie cake). Don’t press the scoops down yet.
  5. Transfer the reserved dough to the stand mixer bowl. Add the white chocolate chips and sprinkles and mix until distributed. With a spoon or cookie scoop, drop dough chunks into the prepared pie pan (in between holes of chocolate chip dough for swirled, on the other half of the pan if doing half and half). With your hand, gently pat down the dough so there aren’t any holes.
  6. Bake for 25–30 minutes or until very lightly browned on the edges. Be careful not to overbake as the cookie cake is best when the center is underbaked. 🙂 It will puff up in the oven and then sink as it cools. Top with a buttercream frosting, if desired.

Notes

Adapted from Sally’s Baking Addiction

6.1.0
https://www.butterlovescompany.com/2019/09/15/funfetti-cookie-cake/
butter loves company | jenna larsson
funfetti-cookie-cake

Filed Under: desserts and sweets Tagged With: cookies, funfetti, party

butternut squash alfredo

September 4, 2019 by Butter Loves Company

This post has been sponsored by Ronzoni SuperGreens® Pasta. All thoughts and opinions are my own.

butternut-squash-alfredo

You all know how much I love pasta, which is why I’m super pumped about today’s recipe. We’re taking all the luxurious creaminess of a traditional alfredo sauce and giving it a fall-forward veggie twist by using butternut squash in the sauce, plus a green spaghetti!

This Butternut Squash Alfredo uses Ronzoni SuperGreens® Thin Spaghetti from ACME Markets. The pasta is packed with greens as it is made with spinach, zucchini, broccoli, parsley, and kale. So, not only are we making the sauce a little more nutritious by using squash in place of the heavy cream and cheese you often find in alfredo but we’re also getting an excellent dose of veggies within the pasta itself. 

The butternut squash alfredo sauce can be made in advance and kept in the refrigerator for up to a week (or frozen for about a month), making it perfect for weekday meals for the family. I love that the pasta is a good source of fiber, vitamin A, thiamin, folate, iron, and riboflavin. I’m always looking for more ways to get iron into our diets, so finding out I could do that by twirling this pasta was quite the pleasant surprise!

The sauce has a slight sweetness from the squash and warmth from a dash of nutmeg, which is perfect for the autumn season. It’s balanced by the saltiness of some grated Parmesan and the welcome earthiness of the Ronzoni SuperGreens® Thin Spaghetti. I added shrimp for a little protein, but you could also omit or swap with ground turkey or chicken if you prefer. Just be sure to cook your protein fully before combining with the sauce and spaghetti.

The pasta can be found at your local ACME in the pasta aisle (it’s the only major green pasta made with 5 green vegetables on the market today), and be sure to check out the ACME mobile app in case there are any coupons or deals on your other ingredients!

I can’t wait to eat this butternut squash alfredo pasta throughout the fall and winter months. Prime pasta months if you ask me!

Xo,

Jenna

Print
Butternut Squash Alfredo Pasta with Shrimp

Prep Time: 20 minutes

Cook Time: 25 minutes

Total Time: 45 minutes

Servings: 4 Servings (depending on how hungry you are!)

butternut-squash-alfredo

Ingredients

  • 4 cups butternut squash, cut into 1/2 inch cubes
  • 1 1/2 cups yellow onion, chopped (about 1 medium)
  • 3 cloves garlic, minced
  • 2 tablespoons butter
  • 2 tablespoons olive oil, divided
  • 1/4 teaspoon nutmeg
  • 1/2 cup water or chicken stock
  • 1 cup milk
  • 1 pound Ronzoni SuperGreens® Thin Spaghetti
  • 1 pound shrimp, peeled and deveined (optional)
  • Salt and pepper
  • 1/4 cup Parmesan cheese, for serving
    Special Equipment: A blender or handheld immersion blender

Instructions

  1. Set a large skillet over medium heat, add the butter and 1 tablespoon oil, and allow butter to melt. Add the onion and sauté to soften, about 1–2 minutes.
  2. Add the garlic and butternut squash and stir to combine. Add the water or stock and nutmeg as well as a generous pinch of salt and pepper. Stir to combine and then cover to cook until the butternut squash is fork tender, about 15 minutes.
  3. Transfer butternut squash mixture to a blender or large bowl if using an immersion blender. Add the milk and then purée until smooth.
  4. In a small bowl, toss the shrimp with a little salt and pepper. Give your skillet a quick wipe or rinse, and then set it back over medium heat. Add remaining 1 tablespoon oil, followed by the shrimp—cooking until pink, about 2–3 minutes. Remove pan from heat.
  5. Bring a large pot of salted water to a boil. Add pasta and cook until al dente (6–8 minutes).
  6. Drain pasta and add to the skillet with the shrimp. Pour the butternut squash alfredo over the pasta and gently toss together. Serve with a little grated Parmesan cheese.
6.1.0
https://www.butterlovescompany.com/2019/09/04/butternut-squash-alfredo/
butter loves company | jenna larsson

Save now at your local ACME! 

Filed Under: mains Tagged With: pasta, squash

kentucky butter cake

August 15, 2019 by Butter Loves Company

This butter cake will surprise you. I had never had Kentucky Butter Cake before the random Tuesday when I made this recipe and sat in awe of its deliciousness.

kentucky-butter-cake

While the ingredients are uncomplicated, and the cake is seemingly simple with no icing or frosting, you’ll be surprised at the satisfying flavor the moment you take a bite. I officially want to make this Kentucky Butter Cake recipe a weekly occurrence. 

The butter and buttermilk in the cake give it moistness and body and baking it in a bundt pan leaves it with a sweet, thinly crisp exterior that reminds me of the top of a corn muffin from Dunkin’ Donuts. (Or, I guess just Dunkin’ now.) And, if you’ve had one of those, you know how good that flavor and texture is. 

After you bake this rich butter cake, you pierce its warm top with a skewer or toothpick to make tiny little tunnels for your BUTTER SAUCE to seep in. I mean, enough said. The key is to pour the sauce, which you prepare while the bundt cake is baking, over the poked cake while it is still hot and in the pan. It soaks into the crumb of the cake to add flavor and moisture into its crevices.

  • kentucky-butter-cake

I’m not positive where Kentucky Butter Cake got its origin, having just stumbled across it when looking for a simple and delicious vanilla pound cake, but after doing some research it seems to me that the luxurious butter, sugar, vanilla sauce is what makes this butter cake an official Kentucky Butter Cake. Wherever it came from, I’m glad it’s here!

kentucky-butter-cake
Print
kentucky butter cake

Prep Time: 20 minutes

Cook Time: 1 hour

Total Time: 1 hour, 20 minutes

Category: Cake

Cuisine: Dessert

Servings: 1 bundt cake

kentucky-butter-cake-1

Ingredients

    For the Cake:
  • 3 cups/13 1/2 ounces all-purpose flour
  • 2 cups granulated sugar
  • 1 teaspoon salt
  • 1 teaspoon baking powder
  • 1/2 teaspoon baking soda
  • 1 cup buttermilk
  • 1 cup butter (room temperature)
  • 2 teaspoons vanilla
  • 4 large eggs
    For the Sauce
  • 3/4 cup sugar
  • 1/3 cup butter, room temperature
  • 3 tablespoons water
  • 2 teaspoons vanilla

Instructions

  1. Set your oven rack just below the center and preheat your oven to 325°F. Generously grease and flour a 12-cup bundt pan or spray it generously with a non-stick baking spray. This is important so the the cake will invert cleanly after it is baked.
  2. In a large bowl, or the bowl of your stand mixer fitted with the paddle attachment, combine the flour, 2 cups of sugar, salt, baking powder, baking soda, buttermilk, 1 cup of butter, 2 teaspoons of vanilla, and the eggs. Mix on low until the flour is absorbed and then increase the speed to medium to beat for an additional 3 to 4 minutes.
  3. Scrape the batter evenly into the prepared pan. Bake the cake in the preheated oven for 55 to 65 minutes, or until a toothpick inserted into the center comes out clean.
  4. While the cake is baking, place a small saucepan on the stovetop and add to it the 3/4 cup of sugar, 1/3 cup of butter, 3 tablespoons of water, and 2 teaspoons of vanilla. Turn the heat on to low and cook, stirring, just until butter melts but do not bring the mixture to a boil.
  5. When the cake is complete, remove from oven and place on a rack (keep in pan). While it is hot, pierce it all over with a toothpick or skewer to create little tunnels for the sauce.
  6. Pour the hot butter sauce over the warm cake and let the cake stand 5 to 10 minutes, or until sauce is absorbed.
  7. Carefully turn the cake out onto a serving plate and let cool completely (if you can wait that long) before slicing and serving

Notes

Recipe adapted slightly from The Spruce Eats

6.1.0
https://www.butterlovescompany.com/2019/08/15/kentucky-butter-cake/
butter loves company | jenna larsson

If you’re looking for other delicious cake recipes, might I suggest:

Berry Ricotta Cake

Pumpkin Bundt Cake

kentucky-butter-cake

Filed Under: breakfast and breads, desserts and sweets Tagged With: bundt cake, buttermilk, cake

kouign-amann recipe (breton butter cake)

April 11, 2019 by Butter Loves Company

One of the best bites you’ll ever have: the kouign-amann is a croissant-like pastry with layers-upon-layers of buttery, flaky sweet dough with a sugary crisp top and a caramelized sticky bottom.

kouign amann pastry

I can’t even remember the first time I ate one of these perfect pastries because I was swirled immediately into a doughy dreamland. It was the most luscious bite I’d ever experienced and I knew right away it was my new favorite.

  • kouign amann 2

So, What Is a Kouign-Amann?

The kouign-amann pastry (which is pronounced like QUEEN A-MAHN) is a French pastry that originates from the Brittany region of the country. This is why you may also see it referred to as “breton butter cake.” “Kouign-amann” actually comes from the local Breton terms for “butter” and “cake” so you know it going to be good. I’ve heard that it is typically baked into one large round cake shape but any time I have seen it at a bakery, or have made it myself, it is in muffin-like form.

kouign amann pastry

Making It at Home

This is the best kouign-amann recipe that I have found in my tests and is adapted slightly from Joanne Chang in the Flour, Too cookbook. First, you’ll bake the dough base, let it rise, and chill it so it will be easier to roll out. Then, once rolled, you will smear it with a layer of butter. Then comes the folding and rolling lamination process. This is critical to getting flaky layers of dough when you bake. Near the end of your folding and rolling, you introduce some granulated sugar so that some of the layers are lined with sweetness. Lastly, you’ll cut the laminated dough into squares and dip them into (yes, seriously) more sugar, let them rise in a muffin pan, bake, take a bite, and enter dreamland.

  • kouign amann pastry

Kouign-Amann Pastry Recipe

Recipe from Flour Bakery

Makes 12 small cakes

Ingredients:
1 1/4 teaspoon active dry yeast
2 3/4 cups (385 grams) all-purpose flour
1 1/4 teaspoon table salt
1 cup (2 sticks or 225 grams) unsalted butter, at room temperature (it should be very spreadable)
1 1/2 cups (300 grams) granulated sugar, plus more for rolling and coating

Instructions:

  1. In the bowl of a stand mixer fitted with a dough hook, mix together the yeast and 1 cup warm water (about 110°F) until the yeast dissolves and the mixture gets a little foamy indicating the yeast is active. If the yeast doesn’t foam, discard and start again.
  2. To the bowl with the yeast, add the flour, salt, and 1 tablespoon melted butter and mix on low speed for 3 to 4 minutes, or until the dough comes together and is smooth. (If the dough is too wet, add 2 to 3 tablespoons of flour; if it is too dry, add 2 to 3 teaspoons of water.) The dough should be soft and supple and should come away from the sides of the bowl when the mixer is on.
  3. Transfer the dough to the lightly greased bowl and cover with plastic wrap. Allow to proof in a warm area for 1 hour. Then transfer the dough to the fridge and proof it for another hour.
  4. Transfer the dough from the fridge to a generously floured work surface. Roll it into a rectangle about 16 in/40.5 cm wide and 10 in/25 cm from top to bottom. With your fingers, or a small spatula, press or smear the room-temperature butter all over the right half of the dough. Fold the left half of the dough over the butter, and press down to seal the butter between the dough layers. Turn the dough 90 degrees clockwise so that the rectangle is about 10 in/25 cm wide and 8 in/20 cm top to bottom, and flour under and on top of the dough.
  5. Slowly begin rolling the dough from side-to-side into a rectangle about 24 in/61 cm wide and 12 in/30.5 cm from top to bottom. If the dough is sticky, feel free to continue flouring the surface as needed to prevent the rolling pin from sticking. Once it is rolled, lift the right third of the dough and flip it over onto the middle third. Then lift the left third of the dough and flip it on top of the middle and right thirds (like folding a business letter). Your dough should now be about 8 in/20 cm wide, 12 in/30.5 cm from top to bottom, and about 11⁄2 in/4 cm thick. Rotate the dough clockwise 90 degrees; it will now be 12 in/30.5 cm wide and 8 in/20 cm from top to bottom, with the folded seam on top. This process of folding in thirds and rotating is called turning the dough.
  6. Repeat the process once more, patiently and slowly rolling the dough into a long rectangle, flipping it upside down as needed as you roll it back and forth, and then folding the dough into thirds. The dough will be a bit tougher to roll out and a bit more elastic.
  7. Return the dough to the baking sheet and cover it completely with plastic wrap, tucking the plastic wrap under the dough as if you are tucking it into bed. Refrigerate the dough for about 30 minutes. This will relax the dough so that you’ll be able to roll it out again and give it more turns. Don’t leave the dough in the fridge much longer than 30 minutes or the butter will harden too much and it won’t roll out properly.
  8. Remove the dough from the refrigerator and place it on a well-floured work surface with a long side of the rectangle facing you and the seam on top. Again, roll the dough into a rectangle about 24 in/61 cm wide and 12 in/30.5 cm from top to bottom. Sprinkle 3⁄4 cup/150 g of the sugar over the dough and use the rolling pin to gently press it in. Give the dough another fold into thirds and turn as directed previously. The sugar may spill out a bit. That’s okay, just scoop it back in.
  9. Once again roll the dough into a rectangle 24 in/61 cm wide and 12 in/30.5 cm from top to bottom. Sprinkle the remaining 3⁄4 cup/150 g sugar over the dough and use the rolling pin to press the sugar gently into the dough. Give the dough one last fold into thirds and turn. Return the dough to the baking sheet, cover again with plastic wrap, and refrigerate for another 30 minutes.
  10. Meanwhile, liberally butter the cups of the muffin tin and set aside.
  11. Remove the dough from the refrigerator. Sprinkle your work surface generously with sugar, place the dough on the sugar, and sprinkle the top with more sugar. Roll the dough into a long rectangle 24 in/61 cm wide and 8 in/20 cm from top to bottom. The sugar will make the dough gritty and sticky, but it will also make the dough easier to roll out. Using a chef’s knife, cut the dough in half lengthwise. You should have two strips of dough, each 24 in/61 cm wide and 4 in/10 cm from top to bottom. Cut each strip into six 4 in/10 cm squares.
  12. Working with one square at a time, fold the corners of the square into the center and press down so they stick in place. Shape and cup the dough into a little circle, and press the bottom and the top into more sugar so that the entire pastry is evenly coated with sugar. Place the dough circle, folded-side up, into a cup of the prepared muffin tin. It will just barely fit. Repeat with the remaining squares. Cover the tin with plastic wrap and let the cakes proof in a warm place (78°F to 82°F/25°C to 27°C is ideal) for 1 hour to 1 hour and 20 minutes, or until the dough has pouffed up.
  13. About 20 minutes before you are ready to bake, preheat the oven to 400°F/200°C, and place a rack in the center of the oven.
  14. When the dough is ready, place the muffin tin in the oven, reduce the heat to 325°F/165°C, and bake for 30 to 40 minutes, or until the cakes are golden brown. Remove the cakes from the oven and let them cool just until you can handle them, then gently pry them out the muffin tin onto a wire rack and leave them to cool upside down. They are extremely sticky and will stick to the muffin tin if you don’t pop them out while they are still warm. Let cool completely before serving.
kouign amann recipe
kouign amann recipe


Filed Under: desserts and sweets Tagged With: flour bakery kougn amann, pastry

the springiest snack spread

March 29, 2019 by Butter Loves Company

Spring is HERE! Thank goodness, amirite? I don’t care if winter coats are still necessary in New York, as soon at Daylight Savings hit and the temperatures rose above 50 degrees, I decided I would force warm weather feels in the kitchen. Bring on all the fresh herbs, veggies, and spring appetizer recipes.

One of my favorite things to do during the summer months is to take out a cheese board around 5 or 6 pm, when the sun is angling down to bless us with golden hour, opening a crisp bottle of wine, and put out a snack board for a pre-dinner bite.

We’ll nibble on all the juicy produce, savory cheese, and always, always, something salted and crunchy, like Harvest Snaps. I’m kicking off spring with this snack board filled with a super herb-filled green goddess dip (we’re talking dill, parsley, mint, basil and more), crispy greens like blanched asparagus and sliced cucumbers, rounded out with cheesy Harvest Snaps in their Parmesan Roasted Garlic and White Cheddar Flavors because, duh, a cheesy snack is destined for your snack board. I love that all the items on this board feel like wholesome options for starting the season.

This is the type of snack board you could pack up into little bags and take with you on a picnic in the park or put together really quickly for a last-minute plate to bring to a friend’s house. You can customize it with whatever dip or veggies you prefer, and Harvest Snaps also have so many flavors so you could try out a different one to mix it up!

Harvest Snaps are made from wholesome green peas, red lentils or black beans. Quick tip: if you are looking for Harvest Snaps in your grocery store, mosey over to the produce section and that’s where they’ll be. Find them near you here!

Happy Spring loves!

The Springiest Snack Spread

Ingredients

Green Goddess Dip (adapted from New York Times):

  • 1/2 cup fresh dill
  • 1/2 cup fresh mint
  • 1/2 cup fresh parsley
  • 1/3 cup fresh basil
  • 1 garlic clove
  • 2 scallions, white and green parts
  • Juice of one lemon
  • Pinch kosher salt, plus more to taste
  • 1/2 cup extra virgin olive oil
  • 1/2 cup feta cheese
  • 1/2 cup Greek yogurt
  • 1/4 cup mayonnaise, optional

Celery Sticks

Sliced Cucumber

Green Grapes

Blanched Asparagus

Harvest Snaps in your favorite flavor (I used Parmesan Roasted Garlic and White Cheddar)

Instructions

  1. In the bowl of a food processor, add all of the ingredients for the Green Goddess Dip, and pulse until blended into a nearly smooth puree. Scrape into a small serving bowl.
  2. On a medium flat platter, place the dip bowl on one side of the plate. Add the celery sticks, grapes, and cheese slices in clusters, saving a spot for crackers or Harvest Snaps. At this point you can refrigerate until close to serving time.
  3. When ready to serve, remove from the fridge and add the Harvest Snaps. Serve!

Thank you to Harvest Snaps for sponsoring this post. As always, all opinions are my own.

harvest snaps snack appetizers

Filed Under: appetizers Tagged With: appetizers, dip

5 Tips for Hosting a Fancy Last Minute Dinner Party

March 26, 2019 by Butter Loves Company

This post has been sponsored by Delizza. All thoughts and opinions are my own.

Sometimes, you have time to plan for a dinner party in advance. Other times, you want to take advantage of the moment and get together at the last minute. Don’t let the fear of hosting stop you from inviting friends or family over. Because we are relatively new to New York and still trying to meet people, I always like to keep some last-minute dinner party tricks in my back pocket in case we have a last-minute opportunity to invite people over.

  • Dinner Party Tips

We recently had a few friends by, and I was so grateful to have these Delizza Mini Chocolate Mousse in my freezer so I could focus on just making dinner in time. I actually remember my mom used to keep the cream puffs on hand when I was growing up for the very reason of hosting fancy last-minute parties. People would be so impressed and she would be able to stay stress-free. You all know how much I love to cook, but sometimes you simply have to keep it easy!

Here are 5 tips for throwing together a last minute dinner party that feels fancy-pants:

  • Last Minute Dinner Party Tips Delizza
  1. Less is more for decor – Don’t worry if you don’t have time to set up an elaborate tablescape. Simply let your meal be your centerpiece. Leave a carafe of water and a bottle of wine in the middle of the table (if you’d like) and serve dinner right at the table in big dishes. It will make everyone feel comfortable to help themselves to more. If you have a few unscented candles on hand, scatter them on the table to add some atmosphere.
  2. Spruce up your water – Something super simple that can feel fancy is some amped-up water. Fill a pitcher with water and thin slices of fruit or fresh herbs. Lemons, limes, orange, cucumber, and mint are great additions to your regular H2O. Add this to the dinner table ‘centerpiece.’
  3. Get the guests involved – Ask your guests to help with some of the prep, whether that is dressing a salad, opening a bottle of wine, slicing bread, or setting the table.
  4. Pass the pasta – If you don’t have time to run to the grocery store or make an elaborate braise or sauce, turn to a pantry staple that still feels indulgent. Pasta is cost effective and, if you get a shape that is a little out of your norm, say bucatini or cavatelli, it will feel special. All you need from there is a little butter, salt, pepper, and Parmesan, and you’ll be able to make a tasty and fancy-feeling meal.
  5. A frozen dessert is essential – If you’re going to be making dinner last minute, then you definitely don’t want to worry about making something from scratch for dessert. The Delizza Mini Chocolate Mousse is perfect for us. They have a crunchy Belgian chocolate crust, a smooth filling, and little sprinkles on top. They are reminiscent of the fancy desserts you might find at a nice restaurant during a night on the town. Delizza also makes Belgian Mini Eclairs and Mini Cream Puffs like my mom used to keep on hand. If you want to see where they are sold near you, here is their store locator!
  • Mini Chocolate Mousse

With these couple quick tips, you can be ready to party in no time!

Filed Under: desserts and sweets, entertaining Tagged With: dinner party, entertaining tips

coffee toffee cookies

December 12, 2018 by Butter Loves Company

coffee cookie scoops

The rich flavor of espresso combined with the sweet, caramelized crunch of toffee meet in this crisp-chewy coffee toffee cookie, perfect for the holidays. This a cookie for coffee lovers, ‘not-too-sweet’ people, and cookie-for-breakfast people. (Raises hand.)

I’ve been working on my holiday cookie baskets for friends and neighbors and was reminiscing with Greg about our favorite new cookies of the year. I make quite a few cookies each week so there was a lot to think about. Some of them were too light or summery for inclusion in a holiday gift tin (Although I’m usually not picky, just prioritizing time, ha!). One of the standouts from the year was these Coffee Toffee Cookies which originated from America’s Test Kitchen. The first one or two times I made them we loved them and the only tweak I thought I would make for personal preference was to go even stronger with the coffee flavor to give them a little oomph so they didn’t spread so much. That’s where we are here.

These cookies are noticeably java flavored, using instant espresso dissolved in warm water, and they have little bits of crunch from Heath toffee bits. Since there is a bit of melted butter and sugar, the cookie is at the edge of ‘stick to your teeth’ chewy, which I love, but also not overly sweet.

Coffee cookie scoops

coffee toffee cookies
adapted from america’s test kitchen
makes about 14-16 3-inch cookies

ingredients:

  • 2 1/3 cups all-purpose flour
  • 1 teaspoon baking soda
  • 1/2 teaspoon salt
  • 3 tablespoons instant espresso powder
  • 1 tablespoon hot water
  • 10 tablespoons unsalted butter, melted and cooled slightly
  • 1/4 cups granulated sugar
  • 2 large eggs
  • 1 teaspoon vanilla extract
  • 3/4 cup (4 1/2 ounces) toffee chips (I used Heath milk toffee bits)
  1. Position oven racks in the middle thirds of the oven and preheat to 350 degrees. Line two baking sheets with parchment paper and set aside.
  2. In a small bowl, whisk together the flour, baking soda, and salt.
  3. In the bowl of your electric mixer fitted with the paddle attachment, whisk espresso powder and hot water together until espresso powder dissolves (you may need to swirl it with a spoon if the attachment doesn’t catch the bottom). Add the melted and cooled butter and the granulated sugar and mix until combined. Mix in the eggs, one at a time, and then vanilla until smooth.
  4. With the mixer on low speed, slowly add the flour mixture into the butter coffee mixture until incorporated. Swirl in toffee chips.
  5. Scoop cookie dough and place onto prepared cookie sheet, leaving 3 inches between each scoop since they tend to spread a little. Bake until puffy and the edges are set but the middles still look a little wet, 14-16 minutes. Let cookies cool slightly on the sheets before transferring to a rack to cool completely.

Enjoy cookies for breakfast? You might also like these coffee cake cookies.

Filed Under: desserts and sweets, eat Tagged With: coffee

goat cheese pumpkin pie

November 28, 2018 by Butter Loves Company

Before you roll your eyes and tell me Thanksgiving is over and that you’ve experienced pumpkin overload (especially if you just made this), hear me out on this pumpkin pie with goat cheese.

goat cheese pumpkin pie

A friend of mine shared this recipe from Munchies with me and it sounded too interesting not to try for a Thanksgiving dessert. This goat cheese pumpkin pie sits in an gingery almond cookie crust that has gone savory with fresh earthy rosemary and the filling, a simple blend (literally blended) of pumpkin puree, cream cheese, and tangy-funky goat cheese, requires no baking at all. Greg, my mom, and my brother Garrett will tell you I was hesitant about making this because of the no-bake-factor, an atypical attribute of a traditional pumpkin pie, but, I’m so glad I gave it a shot.

goat cheese pumpkin pie

Not only is this goat cheese pumpkin pie simple to put together—your only effort going towards squishing the crust up the sides of a springform pan—but it also proved to be a crowd pleaser. Even after our Thanksgiving dinner complete with four turkeys—one baked, one fried, one BBQ’d and bacon wrapped, and one deboned, stuffed with herbs, and grilled—even after all of the mashed potatoes and stuffing and cranberry sauce was weighing in our bellies, nearly all of our family and friends topped their dessert plates with a sliver of the orange-hued pie.

There were too many requests for the recipe for me not to share with them, and with you, even if you keep it bookmarked until next year.

goat cheese pumpkin pie

Print
goat cheese pumpkin pie

Servings: 1 9-inch pie

goat cheese pumpkin pie

Ingredients

    for the crust:
  • 2 (5.25-ounce) packages Anna's Almond Thins (or any similarly thin gingersnap cookie). These are Swedish Pepparkakor which are a ginger cookie.
  • 2 tablespoons fresh rosemary, chopped
  • 1 teaspoon kosher salt
  • 10 tablespoons (1 1/4 sticks unsalted butter), melted and cooled
    for the filling:
  • 1 (15-ounce) can pumpkin purée (not pumpkin pie filling)
  • 8 ounces soft goat cheese, at room temperature
  • 4 ounces full fat cream cheese (half of a standard block), at room temperature
  • 5 tablespoons unsalted butter, melted and cooled
  • 1 1/2 cups confectioners' sugar
  • 1 1/2 teaspoons pumpkin pie spice
  • 1 teaspoon ground cinnamon
  • 3/4 teaspoon ground ginger
  • 3/4 teaspoon ground nutmeg
  • 1/2 teaspoon ground allspice
  • 1/2 teaspoon ground cloves
  • 1/2 teaspoon kosher salt

Instructions

  1. Position oven racks into the bottom and middle third of the oven and preheat to 350°F. Grab a 9-inch round springform pan and set it nearby. You could likely use a 9-inch pie dish as long as the sides are ~2 inches high. In this case you will cut and serve from the dish rather than removing before serving.
  2. In the work bowl of a food processor, pulse together the cookies, rosemary, and salt until combined. Add the melted butter and run until well combined, stopping and scraping down the bowl to ensure the butter is evenly distributed. The dough should stick together when pinched.
  3. Press the dough firmly into the bottom and up the sides of the pan so there are no holes (give your food processor bowl a quick rinse since we are making the filling with this as well). Don’t worry about getting all the edges even. Take a piece of foil and gently press it into the pan to keep the dough in place when baking. Place a cookie sheet on the bottom rack of the oven and then bake the crust on the middle rack for 15 minutes. Remove the foil and then continue baking for another 5 to 10 minutes or until the edges are golden. Set aside to cool.
  4. While the crust is cooling, prepare the filling in the cleaned work bowl of your food processor. Combine the pumpkin, goat cheese, cream cheese, butter, sugar, salt and all the spices and blend until very smooth. It may take a few minutes but you want to get rid of all the chunks. Scoop into the cooled, baked pie crust and smooth the top. Cover and refrigerate until the filling firms up, about 6 hours, or overnight, before serving.

Notes

Adapted slightly from Munchies

6.1.0
https://www.butterlovescompany.com/2018/11/28/goat-cheese-pumpkin-pie/
butter loves company | jenna larsson

More Pumpkin Goodness:

Pumpkin Pecan Trifle

Glazed Pumpkin Bundt Cake

Spiced Pumpkin Muffins

Filed Under: desserts and sweets, eat Tagged With: goat cheese, pie, pumpkin

pumpkin pecan trifle aka thanksgiving dessert “stuffing”

November 2, 2018 by Butter Loves Company

This post has been sponsored by Eagle Brand®. All thoughts and opinions are my own.

pumpkin trifle thanksgiving dessert

If I haven’t made it abundantly clear already, I should let you know now I am obsessed with the holiday season. Seeing pumpkins resting on doorsteps around Thanksgiving or string lights crossing branches in front of festive houses warms my little heart. I love getting together with family and friends during this time of year to celebrate, reflect, and simply enjoy good food and company. It is also one of the best times to bake. Hellooo, pumpkin.

pumpkin trifle thanksgiving dessert

pumpkin trifle thanksgiving dessert

This year, I’m combining some Thanksgiving dessert favorites into one incredible Thanksgiving Dessert “Stuffing” because why should the bready dinner side get all the love? If you like custard pie, pumpkin pie, or pecan pie at Thanksgiving (or anytime, really), you’ll love this Pumpkin Pecan Trifle which has a combination of all three, boosted with flavor using Eagle Brand Sweetened Condensed Milk in the pudding and buttercream.

pumpkin trifle thanksgiving dessert

If you aren’t familiar with sweetened condensed milk, have no fear! Simply put, it is milk from which the water has been removed and sugar has been added. Eagle Brand Sweetened Condensed Milk literally has just two simple ingredients: milk and sugar.

pumpkin trifle thanksgiving dessert

For this trifle, there are a few key elements that are easy to put together on their own and then layer amongst each other. First you’ll make a moist and spicy pumpkin pound cake, which can be made a few days ahead. You could substitute with a store-bought pound cake in a pinch. Next, you’ll make a batch of candied pecans and try not to eat them all before you assemble the trifle. Then you’ll put together the custard-inspired layer, which uses instant vanilla pudding as a shortcut. Finally, you’ll whip up a small batch of sweetened condensed milk buttercream to top the dessert off. Greg exclaimed that it was one of the best tasting buttercreams I have ever made. The pure milk and sugar turns delicious buttercream into amazing buttercream for you to share with family and friends.

While it seems like a lot of steps, it is truly a cinch as once you have the four components. Assembling this decadent trifle takes just moments.

pumpkin trifle thanksgiving dessert

Pumpkin Pecan Trifle AKA Thanksgiving Dessert “Stuffing”

Ingredients:

  • 1 pumpkin pound cake, cooled and cut into 1-2 inch cubes (recipe follows)
  • 4 cups candied pecans (recipe follows)
  • 8 cups Eagle Brand® Sweetened Condensed Milk pudding (recipe follows)
  • 3 cups Eagle Brand® Sweetened Condensed Milk buttercream (recipe follows)

To Assemble:

  1. In a trifle dish, dollop about 1 cup of the pudding on the bottom and spread evenly to the edges. Top with a layer of pumpkin pound cake cubes, followed by a sprinkle of candied pecans (about 1/2 cup). Top the pecans with another cup of the pudding, followed by a layer of pumpkin pound cake cubes, followed by a sprinkle of candied pecans. Repeat these layers until you are out of pudding and pumpkin bread. Sprinkle your last pumpkin bread with some candied pecans.
  2. Using a piping bag or just with a spatula, pipe or spread the buttercream across the top of the trifle. Sprinkle with a few final pecans. Refrigerate for an hour or two before serving.

For the Pumpkin Pound Cake:

  • 1 1/2 cups all purpose flour
  • 1/2 tsp salt
  • 1/2 tsp baking soda
  • 1/2 tsp baking powder
  • 1/2 tsp ground cloves
  • 1/2 tsp ground nutmeg
  • 1 teaspoon cinnamon
  • 1/2 teaspoon ground ginger
  • 1 1/2 sticks unsalted butter
  • 2/3 cup sugar
  • 2/3 cup light brown sugar
  • 3 eggs
  • 1 teaspoon vanilla
  • 1 cup canned pumpkin puree
  1. Preheat oven to 350ºF and line a 8 x 4 inch loaf pan with parchment paper. Butter or spray the pan with non-stick spray.
  2. In a medium bowl, whisk together the flour, cinnamon, salt, baking soda, baking powder, cloves, and nutmeg. Set aside.
  3. In a large bowl or the bowl of your electric mixer fitted with the paddle attachment, cream the butter and both sugars until fluffy. Add the eggs, one at a time, allowing each to incorporate before adding the next. Add the vanilla and pumpkin and mix to combine.
  4. Slowly add the dry ingredients to the pumpkin mixture, stirring until everything is combined.
  5. Scrape batter into the prepared loaf pan and bake until a toothpick inserted into the center comes out clean, about 50-60 minutes.

For the Candied Pecans

  • 1/2 cup granulated sugar
  • 1/2 cup light brown sugar
  • 1 tablespoon ground cinnamon
  • 1 teaspoon salt
  • 16 ounces (about 4 cups) unsalted pecans halves
  • 1 egg white
  • 1/2 teaspoon vanilla extract
  • 1 teaspoon water
  • Preheat oven to 300ºF, line a rimmed baking sheet with parchment paper and set aside.
  • In a medium bowl, add both sugars, cinnamon, and salt. Whisk until combined. Set aside.
  • In a large bowl, whisk the egg white, vanilla, and water together until frothy. Add the pecans and gently toss until the pecans are well coated. Add the sugar and cinnamon mixture and toss until pecans are covered.
  • Spread the pecans out in a single layer on prepared baking sheet. Bake for about 40-45 minutes, stirring every 15 minutes. The sugar mixture will harden on the pecans.

For the Eagle Brand® Sweetened Condensed Milk Pudding:

  • 2 14 oz cans Eagle Brand® Sweetened Condensed Milk, reserve 2 tablespoons in a separate container for the buttercream
  • 3 cups cold water
  • 2 packages instant vanilla pudding (the 4-serving sizes)
  1. In a large bowl, whisk together condensed milk, cold water and instant pudding until thoroughly combined. Refrigerate until set.

For the Eagle Brand® Sweetened Condensed Milk Buttercream:

  • 1/2 cup (1 stick) unsalted butter at room temperature
  • 2 tablespoons Eagle Brand® Sweetened Condensed Milk
  • 1 teaspoon vanilla extract
  • 2 teaspoons whole milk
  • 3 cups confectioners sugar
  1. In a medium bowl using a hand mixer (or in your stand mixer with the whisk attachment), beat together the butter, condensed milk, vanilla, and milk until combined.  Begin adding sugar, slowly, and continue adding and whisking until all the sugar has been added and the buttercream reaches smooth peaks.

pumpkin trifle thanksgiving dessert


Filed Under: breakfast and breads, desserts and sweets Tagged With: pecan, pumpkin, trifle

strawberry cream cake

May 24, 2018 by Butter Loves Company

Strawberry shortcake is one of my favorite unexpected desserts. Traditional strawberry shortcake is super unassuming with its craggily biscuit-like shortbreads topped with loosely chopped berries and a dollop of cream. I’ve never met someone who did not devour a plate of strawberry shortcake when handed to them on a summer day.

blog-strawberry-shortcake-cake-1

This cake-style riff on the summer favorite oozes SoCal summer style. It is a casual chic ode to the freshness of the season’s berries and the lightness of a fresh whipped topping.

I’m super excited to collaborate with America’s Test Kitchen again on the release of their new and first ever all-cake cookbook, The Perfect Cake!

blog-strawberry-shortcake-cake-1

You may remember their The Perfect Cookie cookbook, from which I made these Dulce de Leche Sandwich cookies. In true ATK fashion, I have since turned to the cookbook when looking for inventive and reliable cookie recipe inspiration.

It has been so busy lately that I haven’t taken the time to do one of my favorite things: actually read a cookbook from start to finish. This cookbook has 240 kitchen-tested recipes that you can trust to work perfectly each time. I’ve tried a handful of the recipes so far, such as the classic red velvet cake with cream cheese frosting (duh), classic white cake with Swiss buttercream (perfect for parties and celebrations), and then this strawberry cream cake recipe.

blog-strawberry-shortcake-cake-1

I love this strawberry layer cake, not only because it’s beautiful with the strawberries peeking through the edges in the naked cake style, but also because the whipped cream includes one of my favorite ingredients: cream cheese. This addition helps by making it a little bit more sturdy than a traditional whipped cream and it adds a little tang reminiscent of a thicker frosting.

To make the juicy strawberry layer, you’ll chop and macerate the strawberries in a bit of sugar. This helps soften the berries and draw out their juices. The dough for the cake layer is light and airy, made with a number of egg whites to add lift and spongy texture.

America’s Test Kitchen’s The Perfect Cake cookbook has a mix of different cake types for any occasion, layer cakes, sheet cakes, tortes, bundts, snack cakes, and ice cream cakes. With plenty of options for customization, I’m excited to mix and match for my next celebration. A blackberry mascarpone lemon cake to celebrate a Wednesday? Count me in.

You could actually use the strawberry cream cake recipe and substitute in different berries I imagine if strawberries are not in season. Why not try it with some raspberries or blueberries? The main concept would be the same and you will not regret making the out-of-this-world cream cheese whipped cream.

blog-strawberry-shortcake-cake-1

Print
strawberry cream cake

Prep Time: 1 hour, 30 minutes

Total Time: 1 hour, 30 minutes

Servings: 1 9-inch 3-layer cake

blog-strawberry-shortcake-cake-1

Ingredients

    Strawberry Cream Cake
  • 1 cup (7 ounces) sugar
  • 1 1/4 cup (5 ounces) cake flour
  • 1 1/2 (teaspoons baking powder)
  • 1/4 teaspoon salt
  • 5 large eggs (2 whole, 3 separated), room temperature
  • 6 tablespoons unsalted butter, melted and cooled
  • 2 tablespoons water
  • 2 teaspoons vanilla extract
  • Pinch cream of tartar
    Filling
  • 2 pounds strawberries, hulled (6 cups)
  • 4 to 6 tablespoons sugar
  • 2 tablespoons kirsch
  • Pinch salt
    Whipped Cream
  • 8 ounces cream cheese, softened
  • 1/2 cup (3.5 ounces) sugar
  • 1 teaspoons vanilla extract
  • 1/8 teaspoon salt
  • 2 cups heavy cream, chilled

Instructions

  1. FOR THE CAKE: Adjust oven rack to lower-middle position and heat oven to 325°F. Grease tall 9 inch cake pan and line with parchment paper. Grease parchment and flour pan. Reserve 3 tablespoons sugar in a small bowl. Whisk flour, baking powder, salt, and remaining sugar in mixing bowl. Whisk in 2 whole eggs and 3 yolks (reserving whites), melted butter, water, and vanilla until smooth.
  2. Using a stand mixer fitted with whisk attachment, beat remaining 3 egg whites and cream of tartar at medium-low speed until frothy, about 1 minute. Gradually add remaining 3 tablespoons sugar and beat until soft peaks form, 1 to 2 minutes. Using rubber spatula, stir one-third of whites into batter and then gently fold remaining white into batter until no white streaks remain.
  3. Transfer batter into prepared pan, smooth top with rubber spatula and bake until toothpick inserted into center of cake comes out clean, 30 to 40 minutes. Let cake cool in pan on wire rack for 10 minutes, invert cake to remove it from pan, discarding parchment, and let cake cool on rack until cool, about 2 hours.
  4. FOR THE FILLING: Halve 24 of best-looking berries and reserve. Quarter remaining berries; toss with 4 to 6 tablespoons sugar (depending on sweetness of berries) in medium bowl and let sit 1 hour, stirring occasionally. Strain juices from berries and reserve (you should have about 1/2 cup). Pulse berries in food processor for about five 1-second pulses until coarsely chopped. In small saucepan over medium-high heat, simmer reserved juices and Kirsch until syrupy and reduced to about 3 tablespoons, 3 to 5 minutes. Pour reduced syrup over macerated berries, add pinch of salt, and toss to combine. Set aside until cake is cooled.
  5. FOR THE WHIPPED CREAM: When cake has cooled, fit stand mixer with whisk attachment and whip cream cheese, sugar, vanilla, and salt on medium-high speed until light and fluffy, 1 to 2 minutes, scraping down bowl with rubber spatula as needed. Reduce speed to low and add cream in slow, steady stream. When almost fully combined, increase speed to medium-high and beat until mixture holds stiff peaks, 2 to 2 1/2 minutes more, scraping bowl as needed (you should have about 4 1/2 cups).
  6. TO ASSEMBLE THE CAKE: Using large serrated knife, cut two horizontal lines around the sides of cake. Then, following scored lines, cut cake into three even layers. Place bottom layer on platter and arrange ring of 20 strawberry halves, cut sides down, and stem ends facing out in ring around perimeter of cake layer. Pour half of puréed berry mixture (about 3/4 cup) in center, then spread evenly to cover cake. Gently spread one-third of whipped cream (about 1 1/2 cups) over berry layer, leaving 1/2-inch border from edge. Top with middle cake layer pressing lightly to adhere (whipped cream layer should become flush with cake edge). Repeat with 20 additional strawberry halves, remaining berry mixture, and half of remaining whipped cream. Top with remaining last cake layer pressing lightly to adhere. Spread remaining whipped cream over top; decorate with remaining strawberries. Serve. Cake can be refrigerated for up to 4 hours.
6.1.0
https://www.butterlovescompany.com/2018/05/24/strawberry-shortcake-cake/
butter loves company | jenna larsson

blog-strawberry-shortcake-cake-1

Filed Under: desserts and sweets, Uncategorized Tagged With: berries, cake, strawberry

« Previous Page
Next Page »

Welcome!

jenna of butterlovescompany

Pull up a chair

Hi! I’m Jenna. Story seeker, food lover, recipe developer based in NYC. Firm believer in making every day delicious! Read more…

looking for something?

  • Email
  • Facebook
  • Instagram
  • Pinterest
  • RSS
  • Twitter

Latest Posts

  • Freezer Meals to Make Before Baby: How We Meal Prepped Before Baby
  • mom’s famous spiced pecans
  • funfetti cookie dough truffles (no-bake)
  • maple coconut cookies
  • snickerdoodle blondies

popular now

strawberry cinnamon rolls
braised short rib pasta sauce (short rib ragu)
rosemary honey buttermilk biscuits
peach blueberry pie
chocolate marble loaf cake
bourbon banana bread

grammin’

Let’s get ready to bake throughout the holidays! Let’s get ready to bake throughout the holidays! I’ve teamed up with @lucky_leaf_fruit_filling, @diamondnuts and #Kids360 to give away some delicious baking ingredients to make your spirits bright this season. 

To enter:
-Follow @lucky_leaf_fruit_filling, @diamondnuts and @butterlovescompany
-Comment and tag a friend and the name of your favorite holiday dessert
-Enter by December 1. Winner will be selected at random and DM’d! 

You’ll win: 
•(1) Can of Lucky Leaf Premium Blueberry Filling
•(1) Can of Lucky Leaf Premium Apple Filling
•(1) Can of Lucky Leaf Premium Cherry Filling
•(1) Can of Lucky Leaf Premium Strawberry Filling
•(1) Can of Lucky Leaf Premium Peach Filling
•(1) Recipe Book
•(2) Dish Towels
•(1) Pot-Holder
•(1) Picnic Basket

#ad NO PURCHASE NECESSARY. Open to legal residents of the United States (including its commonwealths, territories, and possessions) who are legal age of majority. Enter by 11:59 pm ET on December 1, 2021. Odds of winning depend on # of entries received. Void where prohibited. This is not sponsored or endorsed by Instagram or Facebook.
This was the best photo we could get with an alway This was the best photo we could get with an always moving toddler. 🥸 Happy Thanksgiving to you and yours! ♥️
Something that the past year or so has taught me: Something that the past year or so has taught me: stock your pantry! Having a stocked kitchen has made it super easy to cook and bake without having to run out to the store. Crucial when you get a craving for an Apple Walnut Cake and need to make one stat. With @lucky_leaf_fruit_filling and @diamondnuts, you can put together a delicious cake SO easily with no peeling and slicing of apples. 🍎🌰You get all the beautiful warm spice flavor with sweet, tart apples, and crunchy, hearty walnuts. #ad Get the recipe below: 

Apple Walnut Cake

* 1 box (15.25 oz.) spice cake mix
* 1 can (21 oz.) Lucky Leaf® Premium Apple Fruit Filling
* 2 large eggs
* 1 tbsp. pure vanilla extract
* 1/4 cup whole milk
* 1/4 cup brown sugar
* 1 tsp. ground cinnamon
* 1/2 cup finely chopped Diamond of California® Shelled Walnuts
* 1 container (8 oz.) whipped topping, thawed

Instructions
1. Preheat oven to 350° F and grease 9x13-inch pan. 
2. Combine dry cake mix, apple filling, eggs, vanilla & milk in large bowl. Beat for 2 minutes. Spread half of the batter in the pan. 
3. Make the Walnut Cinnamon filling: Combine brown sugar, cinnamon and walnuts. Sprinkle half the mixture on top of batter. Top with remaining batter and then sprinkle remaining walnut mixture on top.
4. Bake cake for 28-33 minutes. Cool cake. Top with whipped topping and sprinkle with walnut pieces.

Don’t miss my upcoming chance to W I N with #kids360, Diamond and Lucky Leaf!
Spiced pecans, wedding cookies, chocolate turtles, Spiced pecans, wedding cookies, chocolate turtles, pecan pie, sticky buns…just a few of the treats on my standard holiday baking agenda. What do they have in common? NUTS! @diamondnuts are a staple around here for the holidays (and all year, let’s be honest) and I want to share the love. Thanks to Diamond and #kids360, we are giving someone ✨15 FREE product coupons for @diamondnuts ✨to help you bake your holiday treats this year. Go nuts!

To enter:
* Follow @diamondnuts and @butterlovescompany
* Comment and tag a friend who deserves a day off to go nuts! 
* Enter by end of day November 25th. Winner will be selected at random and DM’d! 

#ad NO PURCHASE NECESSARY. Open to legal residents of the United States (including its commonwealths, territories, and possessions) who are the legal age of majority. Enter by 11:59 pm ET on November 25, 2021. Odds of winning depend on # of entries received. Void where prohibited. This is not sponsored or endorsed by Instagram or Facebook.
No gimmicks, no “just for the ‘gram” razzle No gimmicks, no “just for the ‘gram” razzle dazzle here. Just really good chocolate chip cookies.🍪
Fun fact: Layered Magic Cookie Bars were one of th Fun fact: Layered Magic Cookie Bars were one of the first things I ever baked. Making them again with @diamondnuts makes me super nostalgic. Brought me directly back to middle school. Watch out or you may find me in butterfly clips doodling I <3 SOS on my binder soon. There is a reason this recipe is awesome: first, the cookie bars are incredibly delicious. And, second, they are SO easy to put together. Honestly, they are the PERFECT treat to make with your kids. Pecans and walnuts give the bars the best crunch, nuttiness, and heartiness. You could totally customize if there is a certain kind of jam you love, or a combination of nuts that the family loves. #ad Get the recipe below: 

Seven Layer Magic Cookie Bars

* 1/2 cup (1 stick) butter, melted
* 2 cups graham cracker crumbs
* 1 cup raspberry jam
* 1 cup shredded coconut
* 1 cup Diamond of California® walnuts
* 1 cup Diamond of California® pecans
* 1 cup semi-sweet or bittersweet chocolate chips
* 1 (14-ounce) can sweetened condensed milk

Instructions
1. Preheat oven to 350°F. To toast walnuts and pecans, spread evenly on a baking sheet or in a shallow pan. Bake, stirring once or twice, until lightly browned and fragrant, 7 to 10 minutes. Line a 9×13-inch pan with parchment paper.
2. In a medium bowl, combine the melted butter and graham cracker crumbs; mix well. Transfer the crumbs to the prepared pan and using your finger tips, or the flat bottom of a small measuring cup, press firmly and evenly on the bottom of the pan. Spread the raspberry jam evenly over the crumbs. Sprinkle coconut in an even layer over the jam, followed by the chocolate chips, walnuts and pecans. Drizzle the condensed milk evenly over the top.
3. Bake until bubbling and golden brown, 30-35 minutes. Let cool completely in the pan. If lined with parchment, lift out and place on a cutting board. With a sharp knife, cut into bars.

Look out for an upcoming chance to ✨ w i n ✨with @diamondnuts and #kids360!
Raise your hand if you could use a cup of coffee. Raise your hand if you could use a cup of coffee. 🙋 We are giving away some @timhortonsus coffee goodies so you can get your cozy cool morning on with Canada’s favorite cup of joe. Make my Pumpkin Coffee Coffee Cake for a buzzy morning snack or just brew a strong cup for a little pep in your step (as tired parents over here, we could surely use it). 🍂

To enter:
● Follow @butterlovescompany and @timhortonsus
● Comment and tag a friend you would love to grab coffee with ☕ (each comment=1 entry)
● Enter by midnight November 18. Winner will be selected at random and DM’d!
 
You’ll win:
•(1) Colombian Ground Coffee
•(1) Dark Roast Ground Coffee
•(1) Decaf Ground Coffee
•(1) Whole Bean Original Blend Coffee
•(1) Keurig Variety 30-Pack
•(1) Mug
•(1) Branded Notebook
•(1) Branded Baseball Cap
 
 
ad #timhortons #kids360 NO PURCHASE NECESSARY. Open to legal residents of the United States (including its commonwealths, territories, and possessions) who are legal age of majority. Enter by 11:59 pm ET on November  18, 2021. Odds of winning depend on # of entries received. Void where prohibited. This is not sponsored or endorsed by Instagram or Facebook.
Can’t beat a classic. 🥧 Apple streusel pie fo Can’t beat a classic. 🥧 Apple streusel pie for yesterday’s friendsgiving.🥰 Grateful for time with friends enjoying great food. Remy had so much fun playing that he slept until 7am so we are hopefully out of the 4am daylight savings nightmare (knock on wood). 

Sunday includes a farmers market bop, movies, and cooking for the week. Wouldn’t change a thing. 🥳
Cannot. Get. Enough. Fall. Baking. Who’s with me Cannot. Get. Enough. Fall. Baking. Who’s with me? 🍁  This coffee cake packs a punch because it is made with @timhortonsus brewed coffee in the batter and the glaze. A true *coffee* cake. The texture is dreamy and the coffee is perfectly balanced and smooth. It is goood. #ad Get the recipe below:
 
Pumpkin Coffee Coffee Cake
 
Topping
● 2/3 cup granulated sugar
● pinch of salt
● 2/3 cup flour
● 1 teaspoon cinnamon
● 4 tablespoons butter, melted

Filling
● 1/3 cup brown sugar, packed
● 1 teaspoon cinnamon
● 1 teaspoon unsweetened cocoa powder, optional

Cake
● 1/3 cup vegetable oil
● 2 large eggs, at room temperature
● 1 cup granulated sugar
● 1 cup pumpkin purée
● 1 teaspoon pumpkin pie spice
● 1 teaspoon salt
● 1 teaspoon baking powder
● 1/2 cup brewed @timhortonsus Coffee
● 2 cups flour

Glaze
● 1 cup powdered sugar
● 2 tablespoons brewed @timhortonsus coffee
 
Instructions
1. Preheat the oven to 350°F and grease an 8 inch square pan and line with parchment.
2. Make topping: Stir together the sugar, salt, flour, cinnamon, and melted butter until combined into pea sized lumps. Stirring just until well combined. Set aside.
3. Make filling: Mix together the brown sugar, spice, and cocoa powder. Set it aside.
4. Make cake: Beat together the oil, eggs, sugar, pumpkin, pie spice, salt, and baking powder until smooth. Add the brewed coffee followed by the flour, alternating in two additions, and stir until combined.
5. Spread half the batter into the prepared pan. Sprinkle the filling evenly on top of the batter. Top with the remaining batter. Sprinkle the topping over the batter in the pan.
6. Bake until a toothpick inserted into the center comes out clean, about 40 to 45 minutes. Let cool.
7. Make glaze: Combine the powdered sugar and brewed coffee until smooth and thick but drizzle-able. Using a fork, drizzle it over the cake.

Don’t miss our upcoming chance to ⚡️W I N⚡️ thanks to @timhortonsus and #Kids360!

#timhortons #kids360fanclub
One of the hardest parts about being a working mom One of the hardest parts about being a working mom is how little time you get to spend with your sweet bean during the week. Between wake up and getting to daycare, to pickup and bedtime it’s often an hour at best (which is also filled with making dinner, bath time, etc). I soak up ALL the minutes and the weekends are an absolute snuggle and play fest. It’s so tough though! If you are in the same boat, know that you aren’t alone and you’re doing a good job!! ♥️

This photo has nothing to do with this but I made the cookies for our neighbors and regretting not keeping one for myself right now. 😬🤣
✨W I N !✨ I’ve teamed up with @nielsenmassey ✨W I N !✨ I’ve teamed up with @nielsenmassey and #Kids360 to give away some seriously amazing ingredients to make your desserts sing. 🎶 I love their products and have been using them for years—the vanilla is 💯!!
 
To enter:
● Follow @nielsenmassey and @butterlovescompany 
● Comment and tag a friend you’d love to bake with
● Enter by Thursday November 11th. Winner will be selected at random and DM’d!
 
You’ll win:
•(1) Madagascar Bourbon Pure Vanilla Powder
•(1) Madagascar Bourbon Pure Vanilla Sugar
•(1) Ugandan Pure Vanilla Extract
•(1) Pure Coffee Extract
•(1) Pure Peppermint Extract
•(1) Rose Water
•(1) Pure Lemon Extract
•(1) Tahitian Two Vanilla Beans
•(1) Tahitian Pure Vanilla Extract
•(1) Mexican Two Vanilla Beans
•(1) Mexican Pure Vanilla Extract
•(1) Madagascar Bourbon Two Vanilla Beans
•(1) Madagascar Bourbon Pure Vanilla Extract
•(1) Madagascar Bourbon Pure Vanilla Bean Paste
•(1) Orange Blossom Water
•(1) Pure Orange Extract
•(1) Pure Almond Extract
•(1) Pure Chocolate Extract
.
#ad NO PURCHASE NECESSARY. Open to legal residents of the United States (including its commonwealths, territories, and possessions) who are legal age of majority. Enter by 11:59 pm ET on November  11, 2021. Odds of winning depend on # of entries received. Void where prohibited. This giveaway is not sponsored or endorsed by Instagram or Facebook.
Brainstorming dessert recipes for Thanksgiving and Brainstorming dessert recipes for Thanksgiving and it’s hard not to think about this Black Forest Pie. 🍒🍫 It was such an indulgent tart-sweet chocolate-y treat. It has a chocolate all butter pie crust, a layer of dark chocolate ganache, a layer of chocolate pudding, a cherry topping, and whipped cream. Oh, and a cherry on top! Recipe is from @emcdowell #thebookonpie! 

This one *might* be too rich for the menu but there WILL be pie (duh)🥧. What kind of pie do you need to have on your Thanksgiving table?
This error message is only visible to WordPress admins
Hi! I'm Jenna, founder of butter loves company. From holidays to Tuesdays, let's find a way to make every meal special.
  • Email
  • Facebook
  • Instagram
  • Pinterest
  • RSS
  • Twitter
a2f54ba1dcf0635e58c8be4aa2035ce84863a9d9606a428ab3

© 2013-2019 BUTTER LOVES COMPANY, LLC.

Copyright © 2025 · Foodie Pro Theme by Shay Bocks · Built on the Genesis Framework · Powered by WordPress